¶ Installation
¶ Configuration
Proxmox config is very delicate. Almost all settings can be configured through the GUI, but sometimes you might have to dig into config files with the CLI. ALWAYS make a backup before doing so! I learned the hard way that messing up only one file (especially related to the cluster) can mean a full reinstall of that cluster!
¶ Backups
-
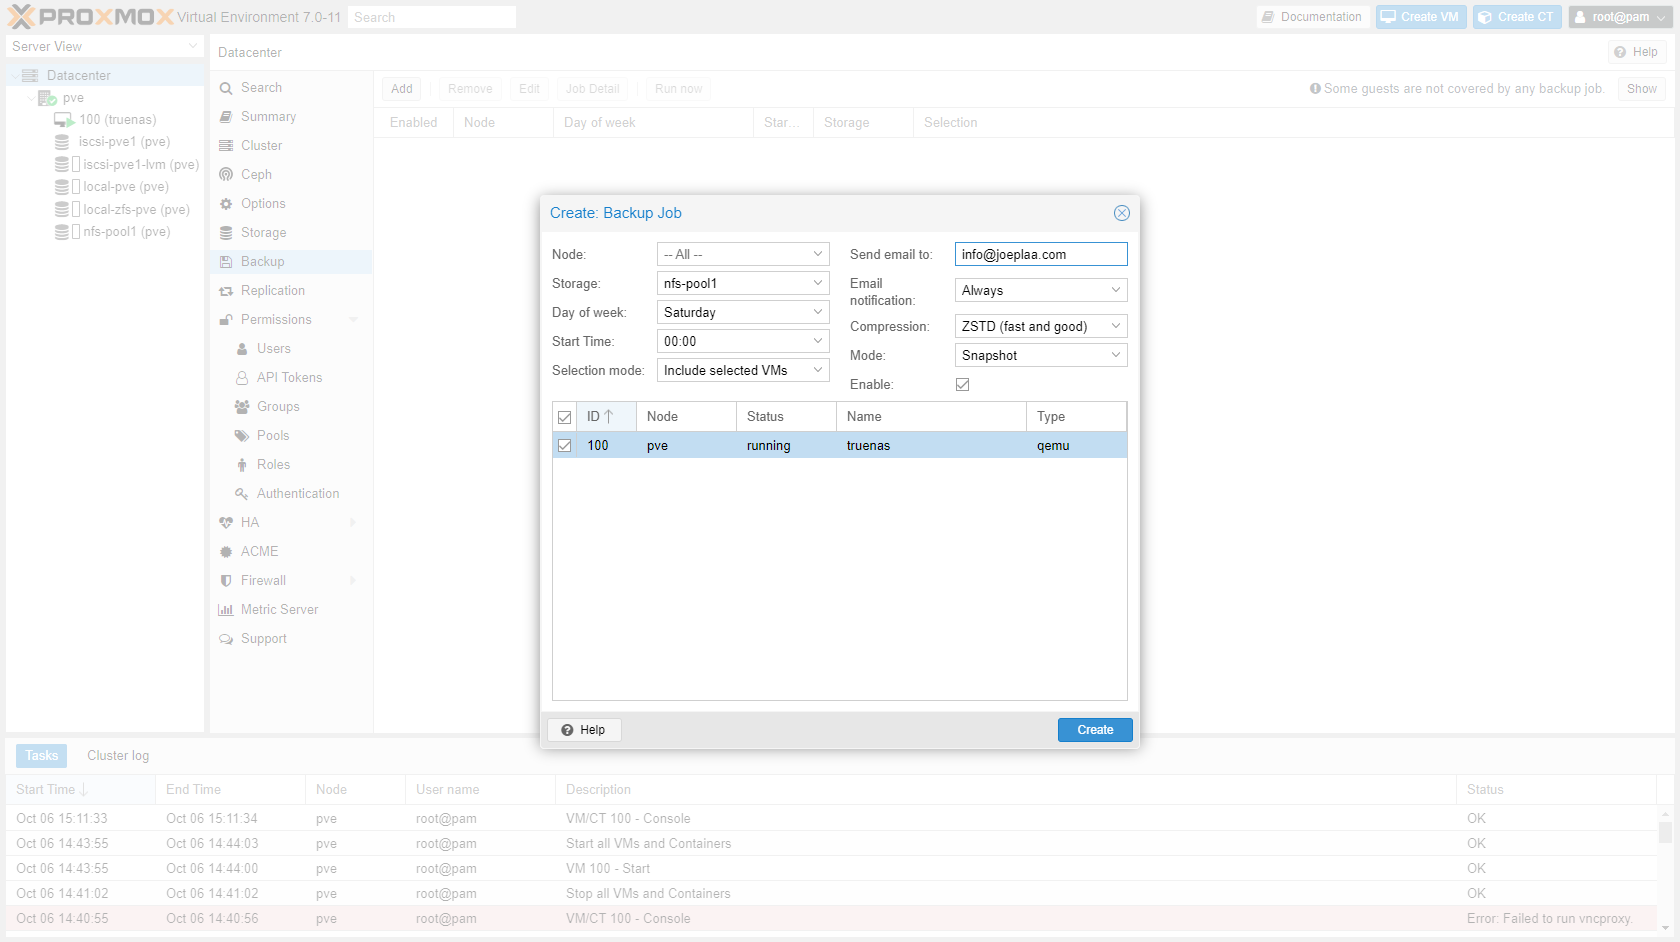
Go to "Datacenter" -> "Backup" and add a weekly backup job
-
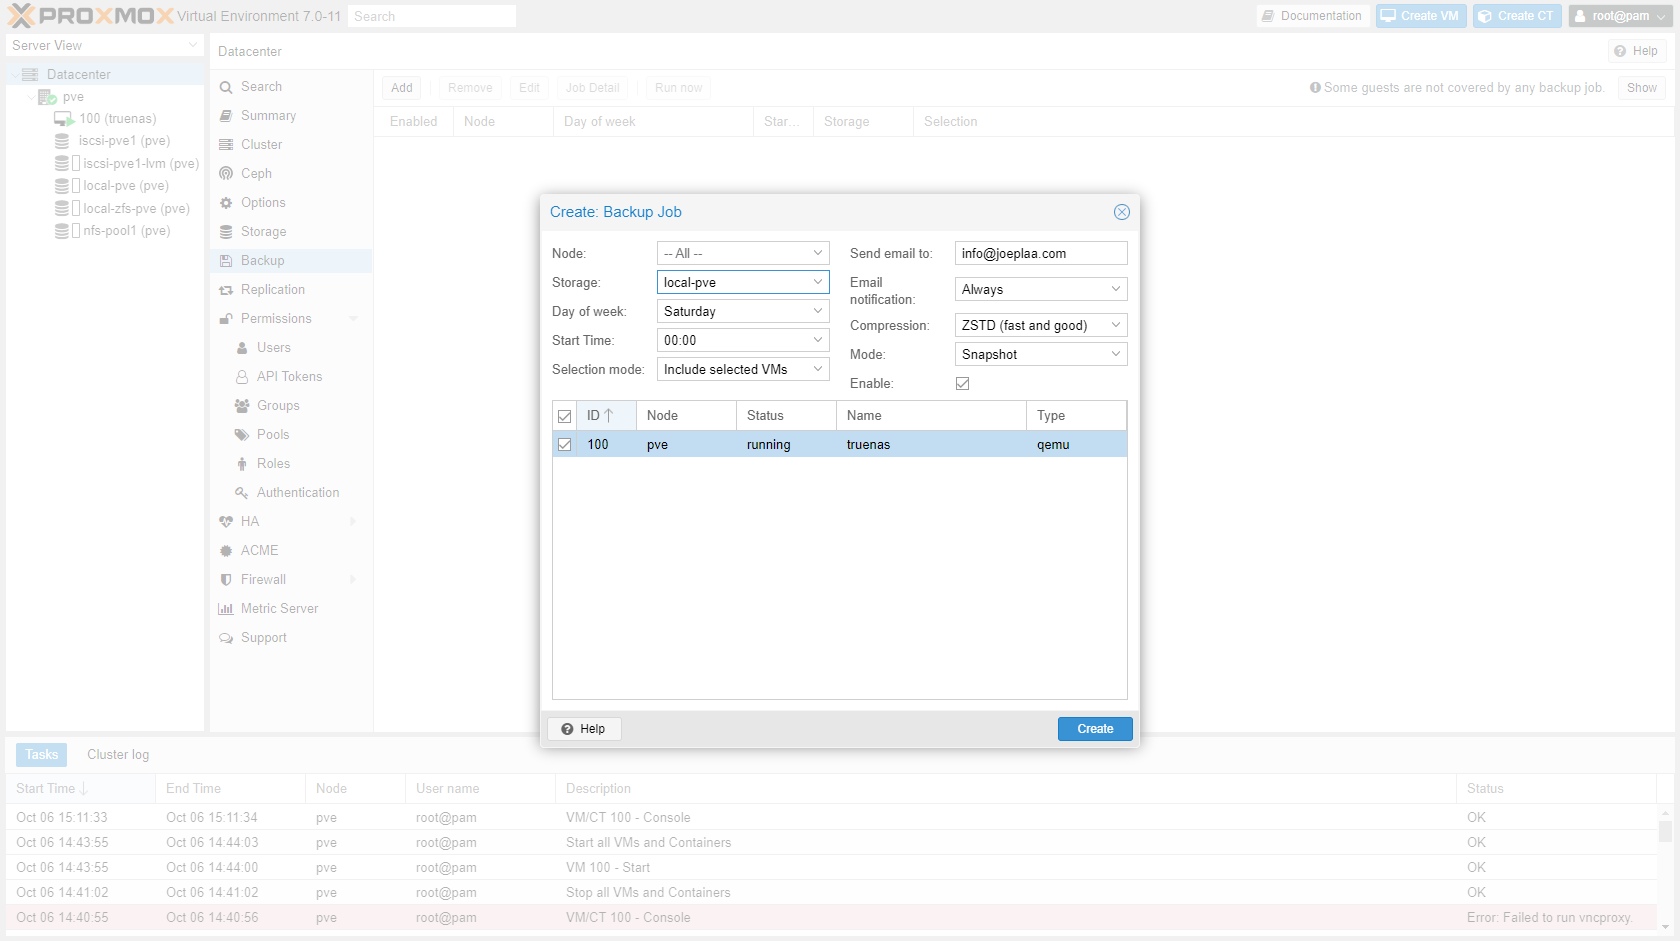
If you want to make a backup of a virtualized TrueNAS than you can't store it on the TrueNAS network drive. So you have to create a separate backup job for the TrueNAS VM that stores the backup locally.
¶ Rsync cronjob
Source: https://technologyplusblog.com/2013/networking/setting-up-automatic-remote-backups-with-rsync/
This local backup can then be transfered to either another node in the cluster or to the NAS. This can be automated with an rsync cronjob.
-
SSH into the Proxmox node.
-
Open crontab:
crontab -e -
Add lines (screenshot not up to date):
# Every saturday at 0:25 UTC: Copy local backup of TrueNas machine to NAS
25 0 * * 6 rsync -ah --delete /var/lib/vz/dump/vzdump-qemu-100* root@12.34.56.78:/mnt/pve/nfs-pool1/dump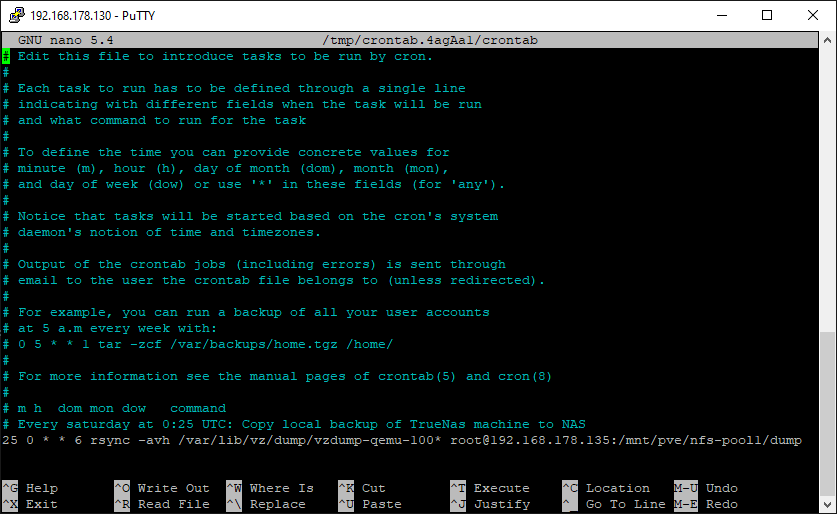
¶ Errors
To prevent error "Backup failed with exit code 2" or "CHOWN Permission Denied Errors" change the temporary backup storage directory to local disk.
nano /etc/vzdump.conf
# vzdump default settings

tmpdir: /npool/tmp
#dumpdir: DIR
#storage: STORAGE_ID
#mode: snapshot|suspend|stop
#bwlimit: KBPS
#ionice: PRI
#lockwait: MINUTES
#stopwait: MINUTES
#stdexcludes: BOOLEAN
#mailto: ADDRESSLIST
#prune-backups: keep-INTERVAL=N[,...]
#script: FILENAME
#exclude-path: PATHLIST
#pigz: N
¶ Cluster
Sources:
Cluster Manager
pvecm(1)
Adding a node to a PVE cluster with TFA on root account
Corosync Redundancy
Two node Cluster (non HA)
¶ Intro
When you want to link multiple Proxmox nodes together it's called a cluster (shown as datacenter in the GUI). Clusters have a lot of quirks, I find, especially if you enabled 2FA and create users. You have to be logged in as root if I remember correctly. At least try it if something doesn't seem to work. When you have created a cluster, you can:
- Use a single login
- Single username-password
- Single private-public key
- Control the nodes, VM's and containers from a single GUI
- Share configuration (files) between nodes
- Migrate VM's and containers between nodes
¶ Config
So I think it's definitely worth the time and effort. Let's do it:
-
Choose the master node and create a cluster through the GUI.
-
Add the other nodes to the cluster by clicking the "Join Cluster" button.
Sources:
If you only have two nodes, you will run into issues when one of the nodes is powered down and you reboot the other. Officially you need at least three nodes. If you don't need any HA stuff, you can circumvent this by adding two lines to the corosync config, which should look something like the excerpt below.
quorum {
  provider: corosync_votequorum
  two_node: 1
  wait_for_all: 0
}
¶ Errors and warnings
That should be it, but in my experience it never works that easily. These are some things I encountered:
-
When you already have 2FA enabled, this will not work. You have to join the cluster through the command line. First make sure the public key of the secondary/slave node is added to
~/root/.ssh/authorized_keys. Then add the node through the shell of the secondary node:pvecm add IP-ADDRESS-MASTER-NODE -link0 IP-ADDRESS-SLAVE-LINK0 --use_sshIf you have setup multiple links, you have to specify them all. So use
-link0,-link1etc. -
You can only change the ip address through which the cluster communicates manually, not through the GUI. Update file
/etc/corosync/corosync.confand don't forget to increase theconfig_versionin that file too. In the example below I updated the IP addresses of both nodes by:- adding a new ring, increase version
- saving the file
- restarting the corosync server
systemctl restart corosync - disabling the old rings, increase version
- saving the file
- restarting the corosync server
systemctl restart corosync
logging {
  debug: off
  to_syslog: yes
}

nodelist {
  node {
    name: jplsrv1
    nodeid: 2
    quorum_votes: 1
    #ring0_addr: 192.168.178.31
    #ring1_addr: 192.168.178.41
    ring2_addr: 10.33.60.100
  }
  node {
    name: jplsrv2
    nodeid: 1
    quorum_votes: 1
    #ring0_addr: 192.168.178.32
    #ring1_addr: 192.168.178.42
    ring2_addr: 10.33.60.101
  }
}

quorum {
  provider: corosync_votequorum
}

totem {
  cluster_name: jpl-cluster
  config_version: 6
  #interface {
  #  linknumber: 0
  #}
  #interface {
  #  linknumber: 1
  #}
  interface {
    linknumber: 2
  }
  ip_version: ipv4-6
  link_mode: passive
  secauth: on
  version: 2
}
¶ Remove node from cluster
systemctl stop pve-cluster
systemctl stop corosync
pmxcfs -l
rm /etc/pve/corosync.conf
rm -r /etc/corosync/*
killall pmxcfs
systemctl start pve-cluster
Never remove a node, reinstall it and try to add it back with the same hostname/ip-address. You can add it back as a different node, but not as the same.
Always properly remove a node. If you don't, all changes are blocked because the cluster cannot reach consensus as the amount of "votes" are not as expected. I don't understand how all of this works, it has to do with needing at least 2 nodes to vote (me having just 2, means if one is down, the cluster cannot vote). Anyway, just trust me if your time is valuable.
¶ Email with Postfix
Sources:
https://github.com/blueimp/aws-smtp-relay
https://anandarajpandey.com/2014/09/10/how-to-change-default-root-email-address-linux-postfix-centos/
https://blog.rbtr.dev/posts/postfix-gmail/
https://blog.rbtr.dev/posts/zol-zed-postfix/
-
To be able to send mail alerts, we need to update postfix (comes installed with Debian/Proxmox).
apt install postfix-pcre -
Create a file
/etc/postfix/smtp_header_checks. Change "Proxmox PVE" by your server name and change the from address<proxmox@yourdomain.com>.nano /etc/postfix/smtp_header_checks/^From:(.*)$/ REPLACE From: jpl-proxmox1 <proxmox@joeplaa.com> -
Open
/etc/postfix/main.cfand add linesmtp_header_checks = pcre:/etc/postfix/smtp_header_checksnano /etc/postfix/main.cfIt should look something like this (change the relay host to your smtp relay):
# See /usr/share/postfix/main.cf.dist for a commented, more complete version myhostname=jpl-proxmox1.joeplaa.com # change this to your own server name and domain smtpd_banner = $myhostname ESMTP biff = no # appending .domain is the MUA's job. append_dot_mydomain = no # Uncomment the next line to generate "delayed mail" warnings #delay_warning_time = 4h alias_maps = hash:/etc/aliases alias_database = hash:/etc/aliases mydestination = $myhostname, localhost.$mydomain, localhost relayhost = 12.34.56.78:1025 # change this to the relay host (vm/lxc/docker) ip mynetworks = 127.0.0.0/8 inet_interfaces = loopback-only recipient_delimiter = + compatibility_level = 2 smtp_header_checks = pcre:/etc/postfix/smtp_header_checks -
Update and apply postfix settings:
postmap /etc/postfix/smtp_header_checks systemctl restart postfix -
Update root email address in
/etc/aliases:nano /etc/aliasesIt should look something like this:
postmaster: root nobody: root hostmaster: root webmaster: root www: root root: root@joeplaa.com -
Apply new alias and restart Postfix:
newaliases systemctl restart postfix -
Test settings:
echo "This is the body of the email" | mail -s "This is the subject line" info@yourdomain.com
¶ Firewall
Secure Proxmox Install – Sudo, Firewall with IPv6, and more – How to Configure from Start to Finish
¶ Hide "no subscription" splash screen
Source: https://johnscs.com/remove-proxmox51-subscription-notice/

-
SSH to the Proxmox node.
-
Browse to folder:
cd /usr/share/javascript/proxmox-widget-toolkit -
Make a backup:
cp proxmoxlib.js proxmoxlib.js.bak -
Open file with
nanoand edit:nano proxmoxlib.js -
Find the line (ctrl + w, enter
No valid subscription, press enter):Ext.Msg.show({ title: gettext('No valid subscription'), -
Change line to:
void({ //Ext.Msg.show({ title: gettext('No valid subscription'), -
Restart the Proxmox web service:
systemctl restart pveproxy.service -
This needs to be repeated after every update of the
proxmox-widget-toolkit. I.e. after every update of Proxmox. Or you can get a subscription of course.
¶ Memory tuning
¶ ARC (ZFS cache)
-
Open
/etc/modprobe.d/zfs.conf -
I want to use a max ARC size of 8GB
-
Set content to:
# Setting up ZFS ARC size on Ubuntu as per our needs # Set Max ARC size => 8GB == 8589934592 Bytes options zfs zfs_arc_max=8589934592 # Set Min ARC size => 1GB == 1073741824 Bytes options zfs zfs_arc_min=1073741824 -
Run
update-initramfs -u -
For EFI also:
pve-efiboot-tool refresh
¶ KSM (Kernel Shared Memory)
-
Open
/etc/ksmtuned.conf -
Calculate when Proxmox should start sharing kernel memory: (RAM_TOTAL - RAM_THRESHOLD) / (RAM_TOTAL / 100) = KSM_THRES_COEF
-
Add/uncomment line:
KSM_THRES_COEF=30
¶ Nested hypervisor
If you want to run nested hypervisors -a hypervisor in a VM-, you have to enable that. If your VM uses docker or snap, this needs to be enabled.
-
Check if nested hypervisor is enabled (
kvm_intelfor Intel CPU,kvm_amdfor AMD)cat /sys/module/kvm_intel/parameters/nested -
If
N, activate it. For Intel:echo "options kvm-intel nested=Y" > /etc/modprobe.d/kvm-intel.confFor AMD:
echo "options kvm-amd nested=1" > /etc/modprobe.d/kvm-amd.conf -
Reboot or reload the kernel module (
kvm_intelfor Intel CPU,kvm_amdfor AMD):modprobe -r kvm_intel modprobe kvm_intel -
check again:
cat /sys/module/kvm_intel/parameters/nested
¶ Network
Network Configuration
10GB ETHERNET WITH PROXMOX AND RYZENTOSH 3700X WITH MACOS CATALINA
¶ Non-subscription repository
By default the subscription repository for Proxmox package updates is set. If you don't have a subscription (you don't need to) you can use the "no-subscription" repository.
-
Browse to folder:
cd /etc/apt/sources.list.d/ -
Backup current file:
mv pve-enterprise.list pve-enterprise.list.backup -
Create new files:
echo "#deb https://enterprise.proxmox.com/debian/pve bullseye pve-enterprise" > /etc/apt/sources.list.d/pve-enterprise.list echo "deb http://download.proxmox.com/debian/pve bullseye pve-no-subscription" > /etc/apt/sources.list.d/pve-no-subscription.list -
Get update and install them:
apt update
apt dist-upgrade
It seems to be important to do
apt dist-upgradeinstead ofapt upgrade. This does some things behind the scenes like some cleanup, not sure what exactly. Read this for more information: https://www.caretech.io/2018/06/08/how-to-update-proxmox-without-buying-a-subscription/
¶ PCI pass-through
Source: https://www.thomas-krenn.com/en/wiki/Enable_Proxmox_PCIe_Passthrough
¶ Intro
Most of the time the use of virtualized hardware is sufficient for applications to run in a virtual machine. Sometimes, however, the application needs more control over the physical hardware. For example a rendering VM that needs a GPU, a router that needs direct access to the NIC or a NAS that works better with direct access to the hard drives. In those cases you pass the hardware "directly" to the VM. The advantage of this is that latencies are reduced and security increased, but at the cost of exclusive use of that particular piece of hardware by the VM. No more sharing the hardware between VM's.
In my particular cases I pass a 4 port gigabit NIC to pfSense to create my private networks and a HBA to TrueNAS to control the storage hard disks. To enable PCIe passthrough, first your motherboard should support it. Check and enable VT-d and IOMMU in the BIOS. If this is done, you have to enable it in the Linux kernel.
¶ Enable
-
Grub Configuration
-
Add parameter
GRUB_CMDLINE_LINUX_DEFAULT="quiet intel_iommu=on"to GRUB:nano /etc/default/grub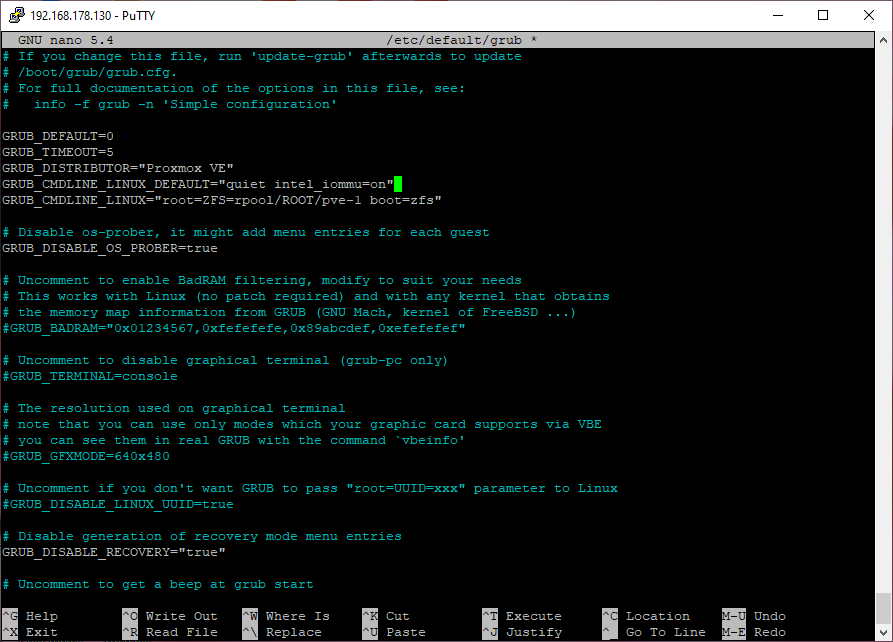
-
Update GRUB
update-grub
-
-
Add kernel modules:
nano /etc/modulesvfio vfio_iommu_type1 vfio_pci vfio_virqfd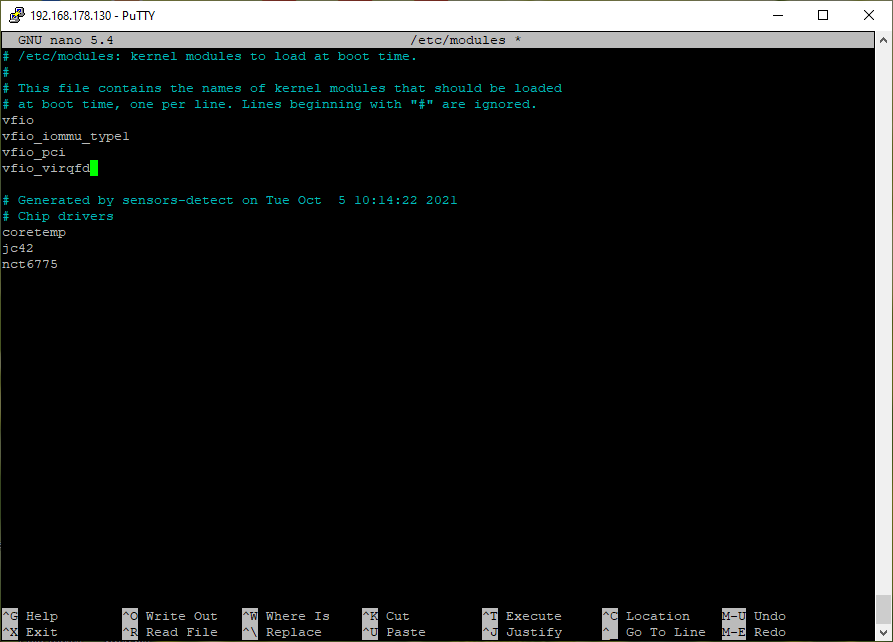
-
Update initramfs:
update-initramfs -u -k all -
Reboot
-
Check function:
dmesg | grep -e DMAR -e IOMMU -e AMD-Vi
lsmod | grep vfio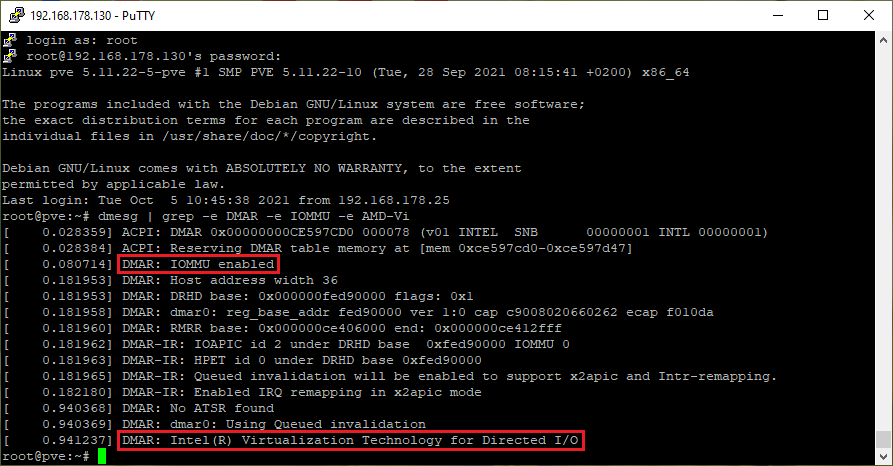

-
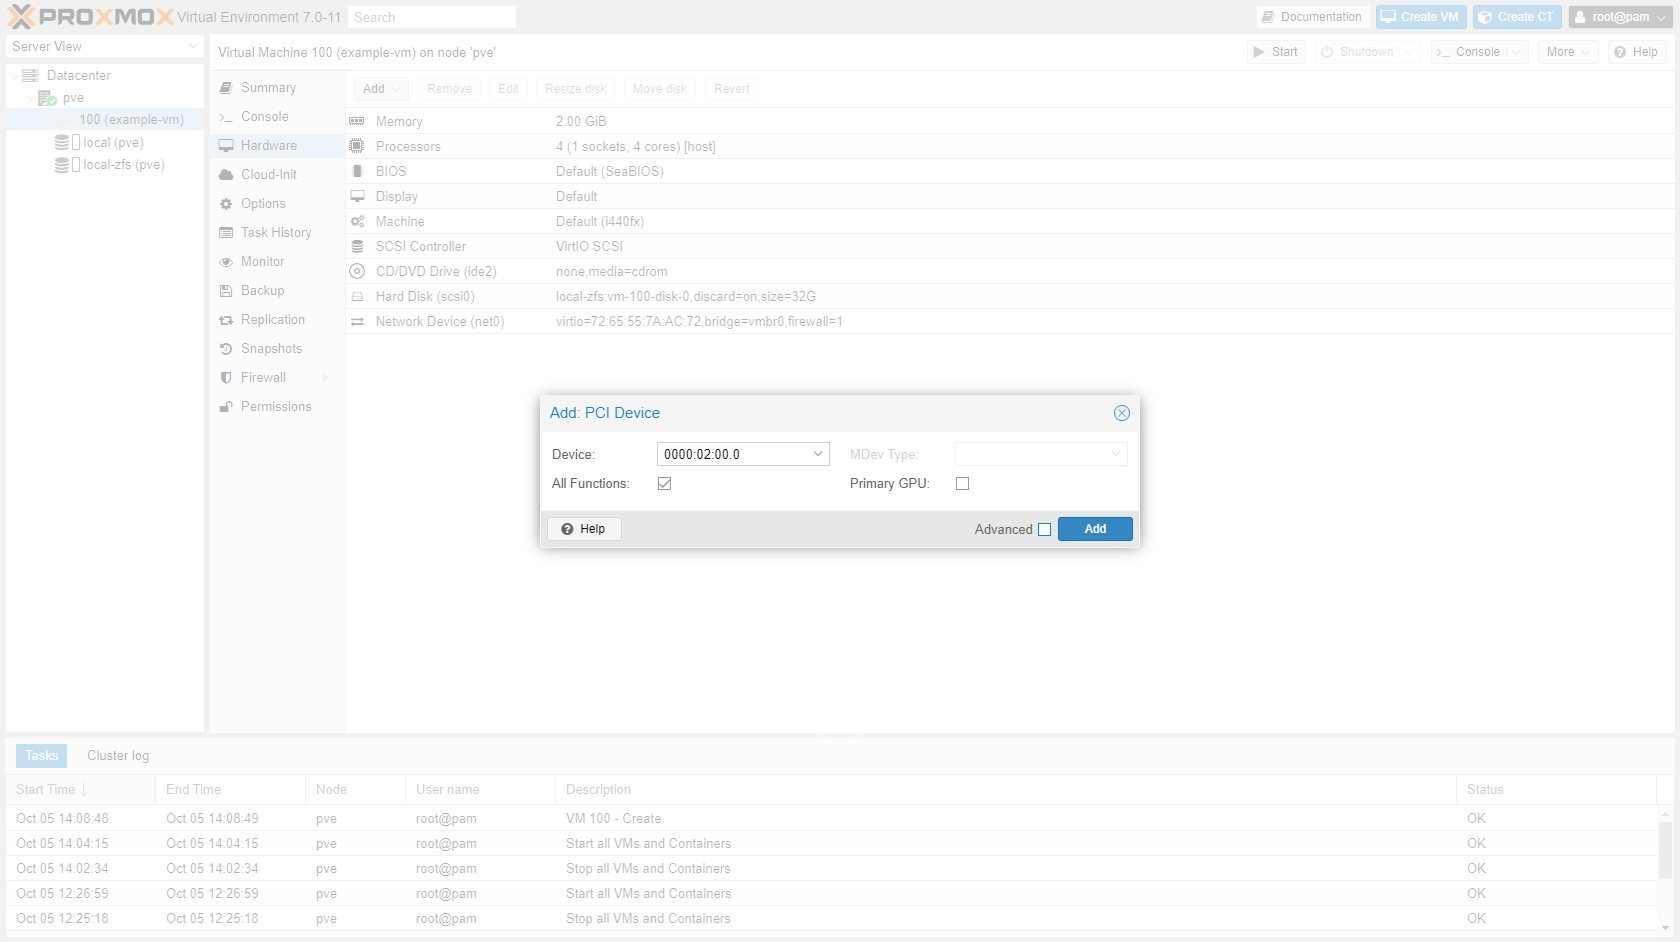
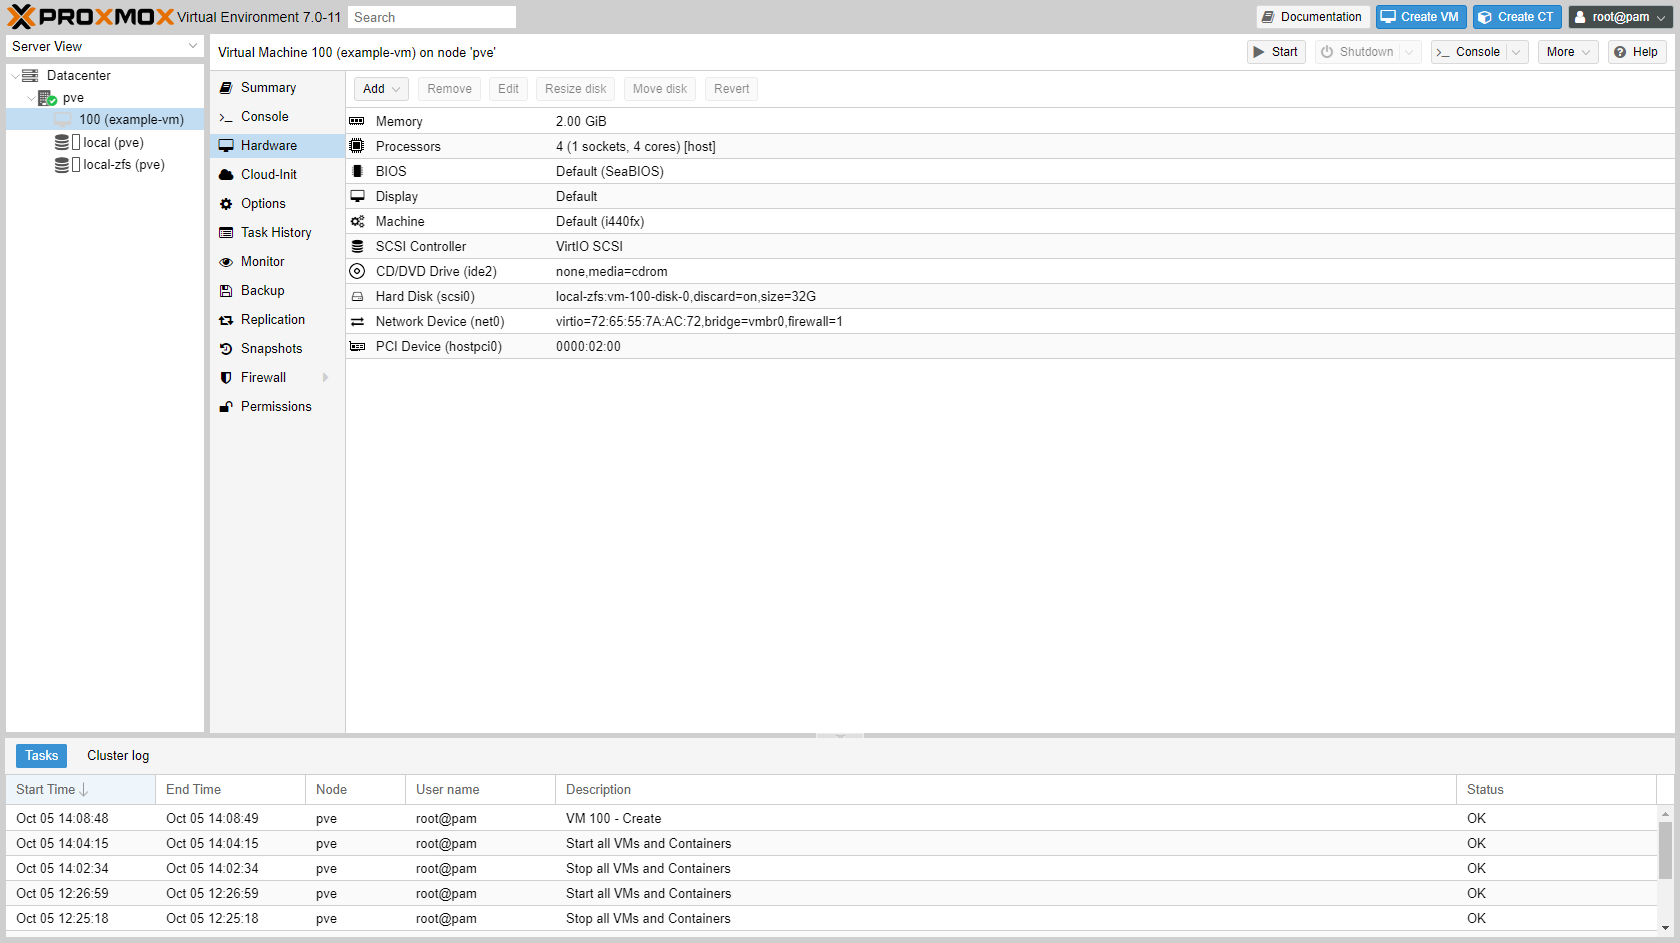
Add PCIe device to the VM in the GUI:
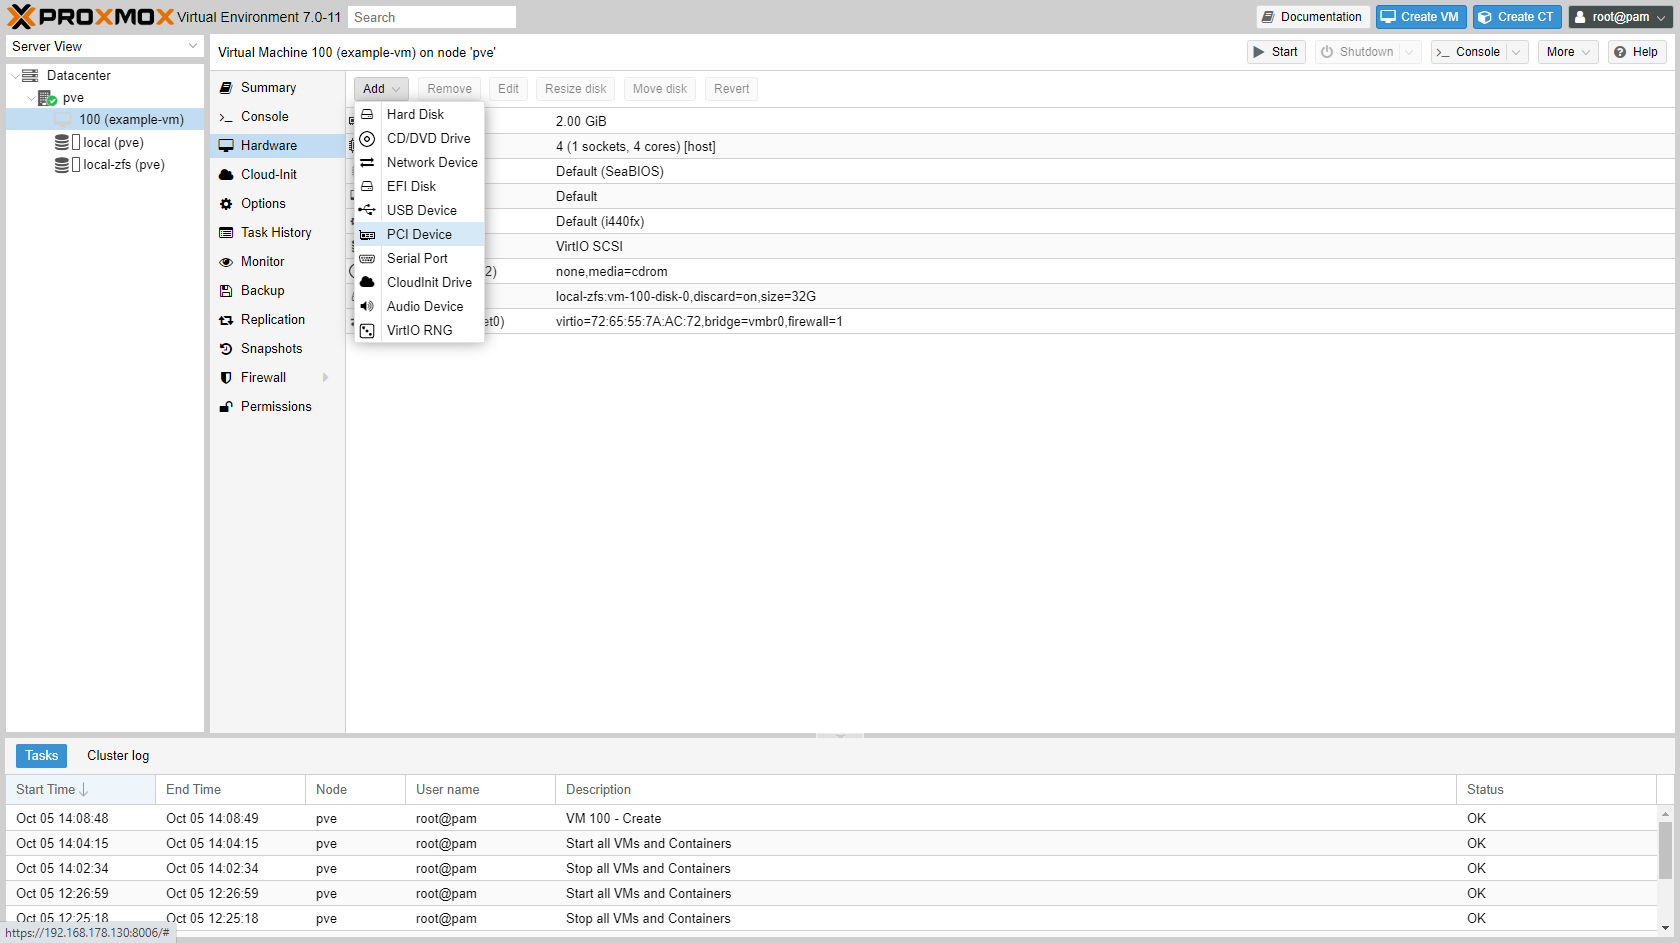
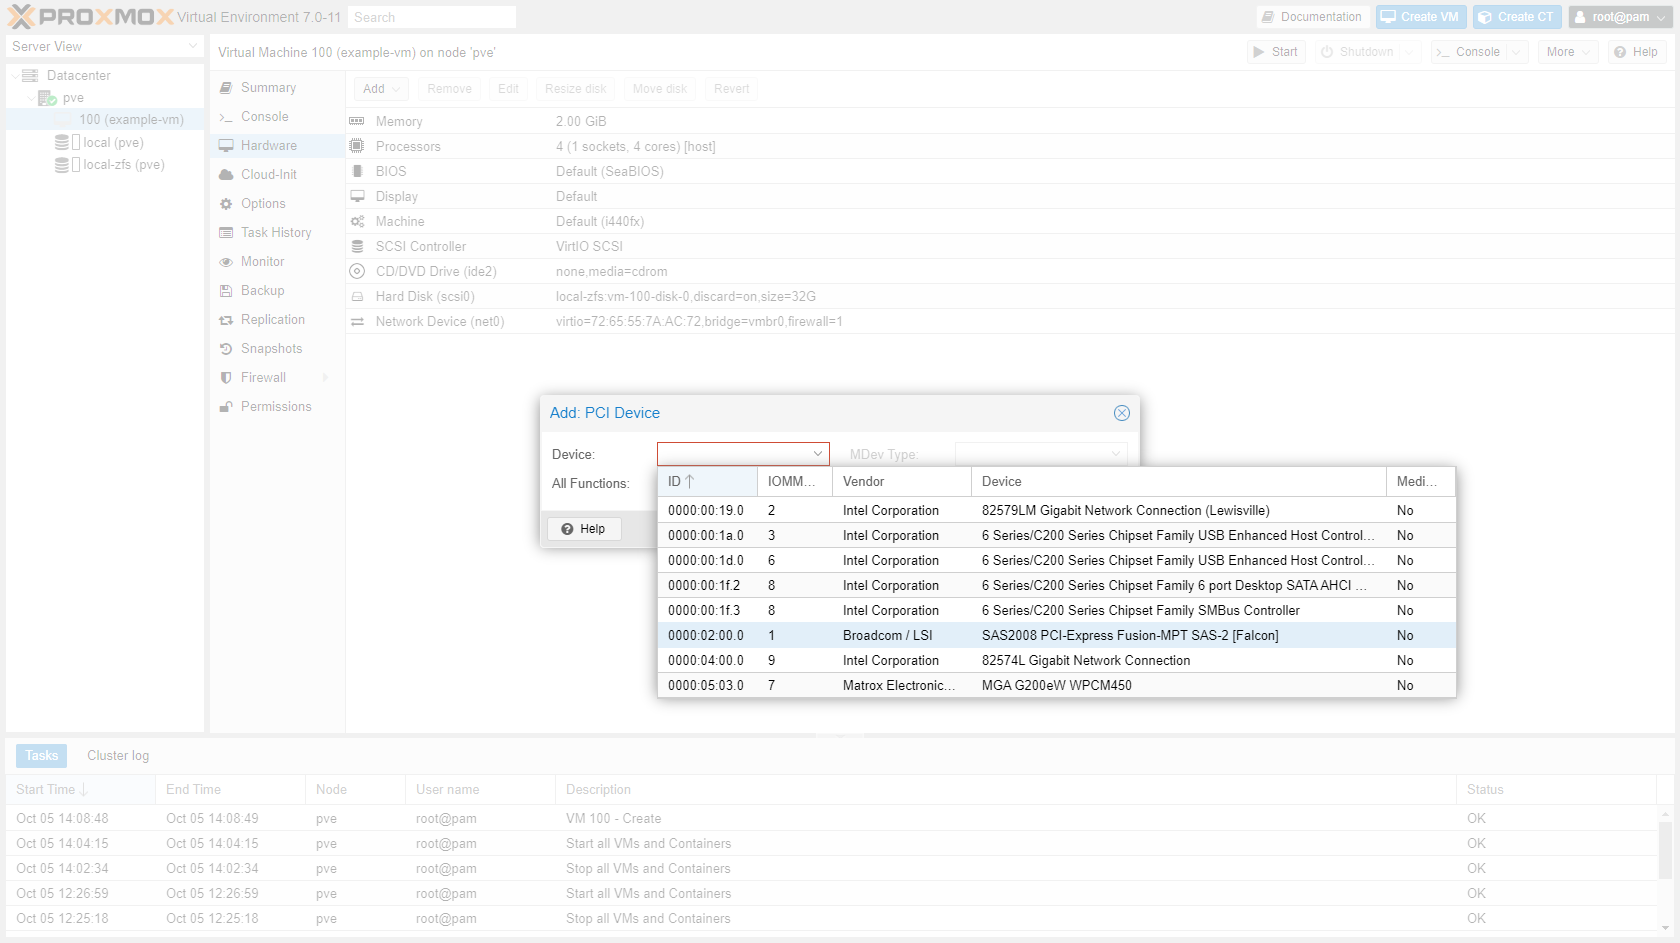
¶ Rename node
Rename Proxmox node with existing VMs
https://forum.proxmox.com/threads/rename-a-cluster-not-a-node.34442/
https://pve.proxmox.com/wiki/Renaming_a_PVE_node
-
Change to the new hostname in the following 4 files:
nano /etc/hostsnano /etc/hostnamenano /etc/postfix/main.cfnano /etc/pve/corosync.conf
Also increase the
config_versionin/etc/pve/corosync.conf.
-
Reboot Proxmox.
-
Restart the corosync service on all other nodes
systemctl restart corosync -
Next, copy the VMs and configuration to the new hostname folder:
cd /etc/pve/nodes/
cp -r old_hostname/qemu-server new_hostname/qemu-server
rm -r old_hostname
cd /var/lib/rrdcached/db/pve2-node/
cp -r old_hostname new_hostname
rm -r old_hostname
¶ Rename storage device
¶ Resize disks (LVM)
Source: https://forum.proxmox.com/threads/resize-lxc-disk-on-proxmox.68901/
¶ LXC
-
SSH into the host.
-
List the containers:
pct list -
Stop the particular container you want to resize:
pct stop 999 -
Find out it's path on the node:
lvdisplay | grep "LV Path\|LV Size" -
For good measure one can run a file system check:
e2fsck -fy /dev/pve/vm-999-disk-0 -
Resize the file system:
resize2fs /dev/pve/vm-999-disk-0 10G -
Resize the local volume
lvreduce -L 10G /dev/pve/vm-999-disk-0 -
Edit the container's conf, look for the rootfs line and change accordingly:
nano /etc/pve/lxc/999.confrootfs: local-lvm:vm-999-disk-0,size=32G >> rootfs: local-lvm:vm-999-disk-0,size=10G -
Start it:
pct start 999
¶ Resize disks (ZFS)
¶ LXC
https://forum.proxmox.com/threads/shrinking-zfs-filesystem-for-lxc-ct.40876/
-
Prepare your LXC disk for shrinking (defrag, clean files, shrink file system) and shut down the LXC.
-
SSH into the Proxmox node and set the new zfs pool size:
zfs set refquota=<new size>G rpool/data/subvol-<vmid>-disk-<disk_number> -
Open vm config:
nano /etc/pve/lxc/<vmid>.confand edit the size of the disk:
rootfs: local-zfs:subvol-<vmid>-disk-<disk_number>,size=<new size>G
¶ qemu
Source: https://forum.proxmox.com/threads/shrink-zfs-disk.45835/
-
Prepare your VM disk for shrinking (defrag, clean files, shrink file system) and shut down the VM.
-
SSH into the Proxmox node and set the new zfs pool size:
zfs set volsize=<new size>G rpool/data/vm-<vmid>-disk-<disk_number> -
Open vm config:
nano /etc/pve/qemu-server/<vmid>.confand edit the size of the disk:
scsi0: local-zfs:vm-<vmid>-disk-<disk_number>,size=<new size>G
If the size does not update in the Proxmox GUI, change the cache mode to something else and then revert back, this should force update the config.
¶ Security
¶ Create a non-root admin user
adduser joep
¶ Two Factor Authentication
-
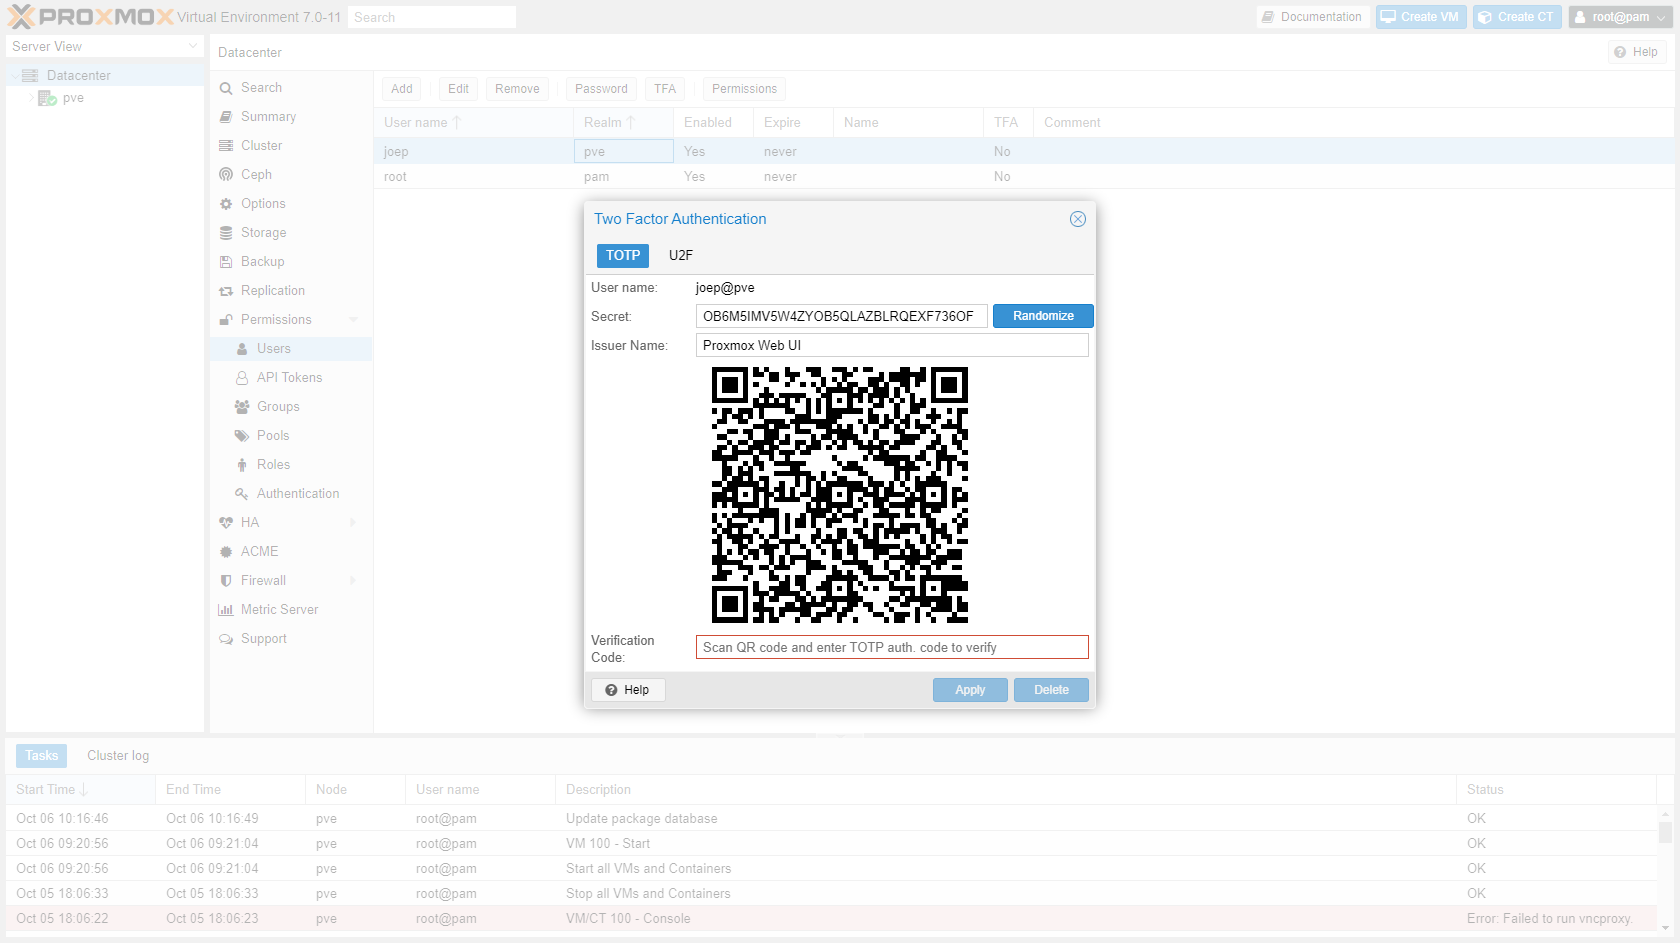
Go to "Datacenter" -> "Permissions" -> "Users", select the root user and click "TFA". Scan the QR code with your authenticator app.
-
Repeat for all users, obviously with their own authenticator.
-
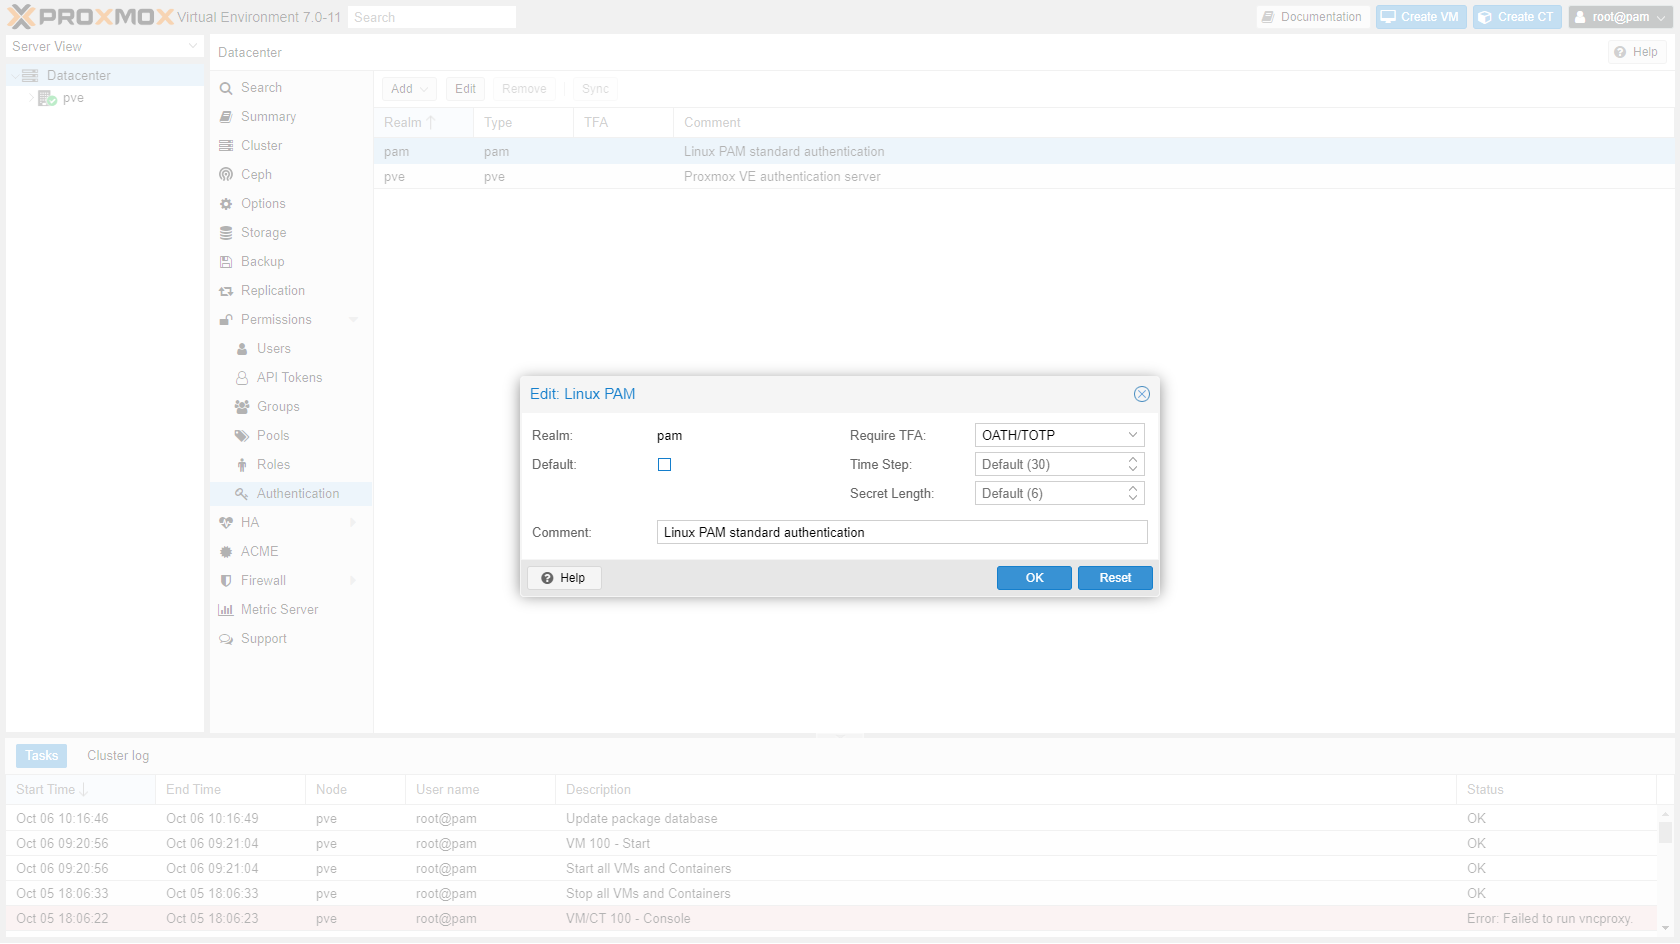
Go to "Datacenter" -> "Permissions" -> "Authentication" and enable TFA for both Realms.
¶ Private key console login
-
SSH into the master node.
-
Get the private key:
cat ~/.ssh/id_rsa -
Copy the key to your machine:
C:\users\<username>\.ssh\<hostname>, without file extension. -
Store this key somewhere safe.
-
¶ Set timezone
I want to have my servers run in UTC timezone.
-
Run command and follow the instructions.
dpkg-reconfigure tzdata
¶ Storage
¶ (Re)naming storage
The default file storage location in Proxmox is called local. VM storage is called local-zfs when using ZFS or local-lvm when using LVM. This is fine if you have a single node, but becomes confusing when multiple nodes in a cluster have storage that has the same name. Therefor I renamed it.
-
SSH into the Proxmox node.
-
Open file
/etc/pve/storage.cfgand change the names.nano /etc/pve/storage.cfg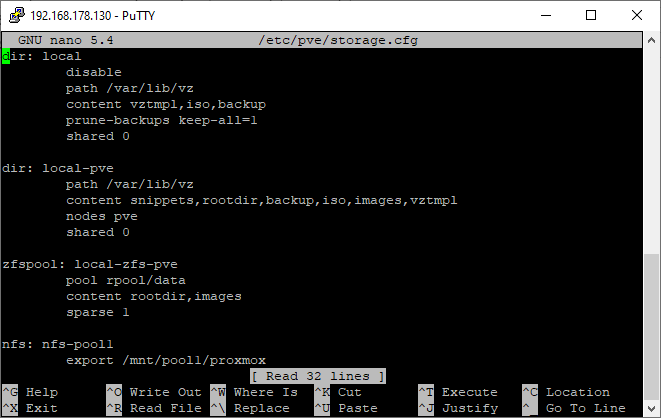
You cannot rename
local! To change, create a new directory storage and disablelocal.
-
If you already have VM's that use this storage (also links to ISO on
localand virtual disks onlocal-zfs) you have to change them manually.nano /etc/pve/qemu-server/<vmid>.conf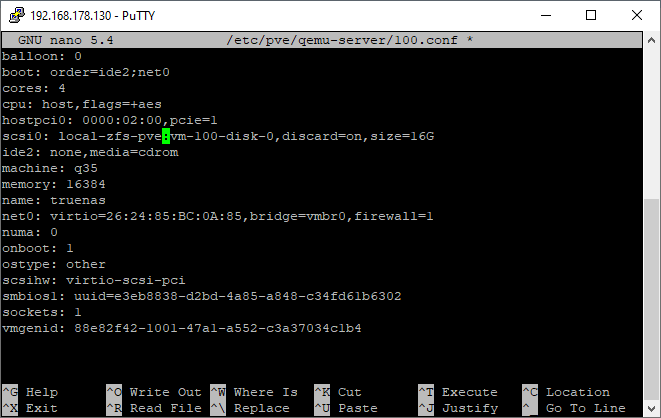
¶ NFS storage
If you have a NAS than it's almost a must to store VM backups on it. After enabling NFS on the NAS (TrueNas example), you can add the share in Proxmox.
-
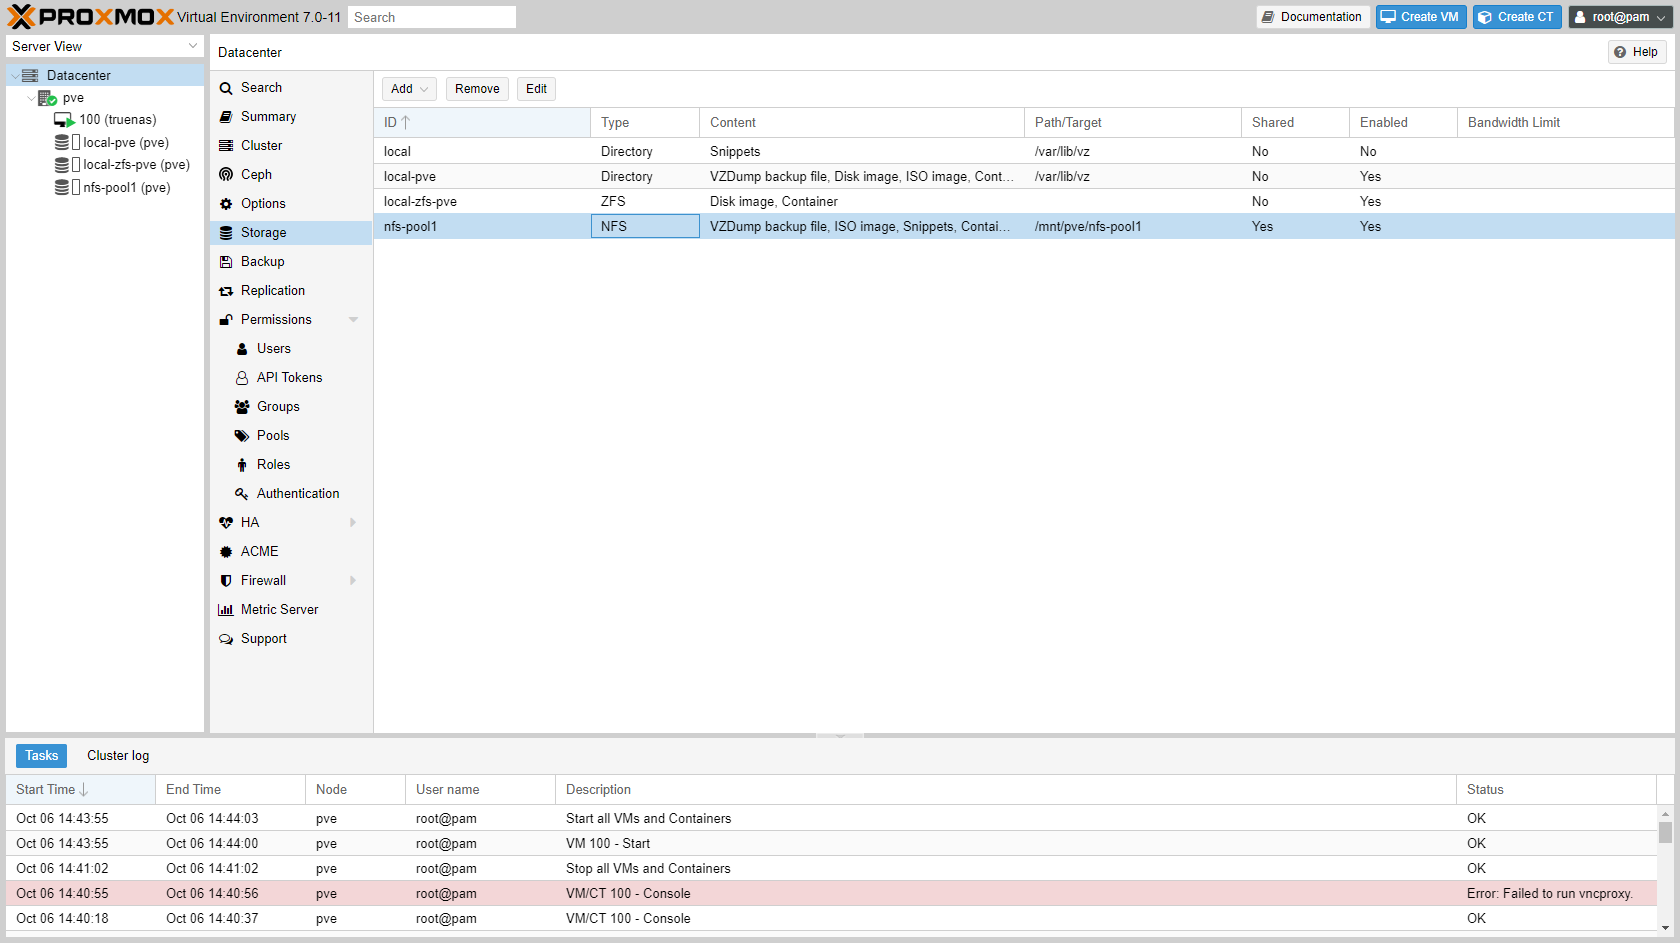
Go to "Datacenter" -> "Storage" and add NFS storage.
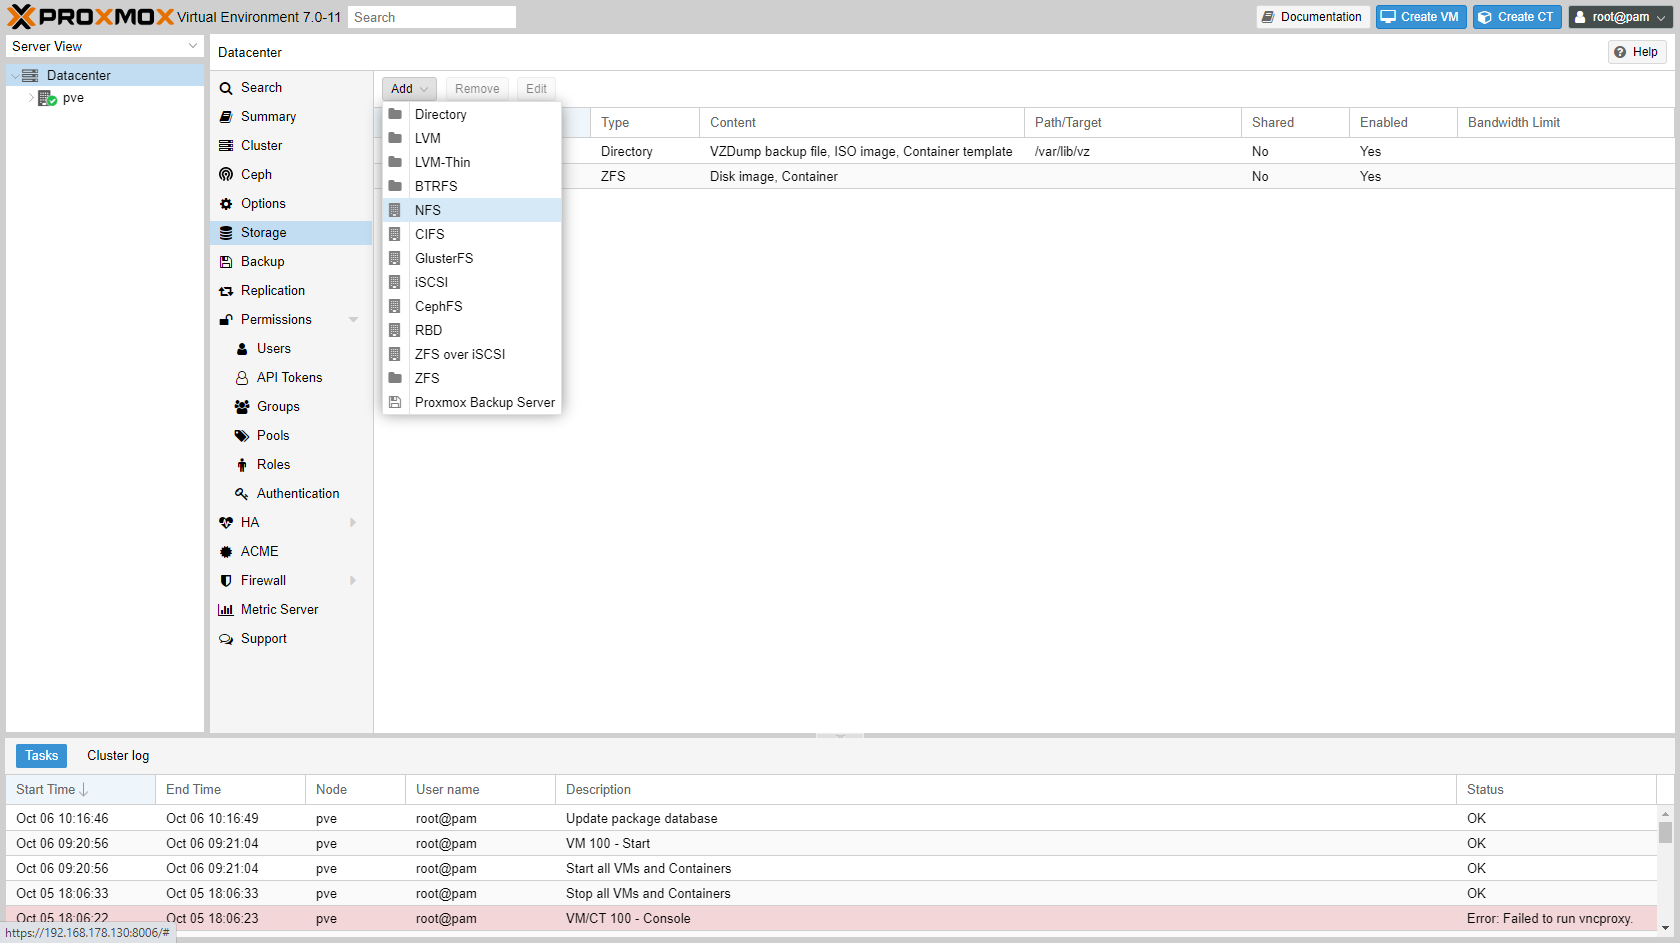
-
Enter details of storage:
- ID:
nfs-<poolname> - Server:
<ip address of NAS> - Export:
/mnt/pool1/proxmox(this list will show automatically after you enter the server address is entered) - Content:
ISO image, Container template, VZDump backup file, Snippets
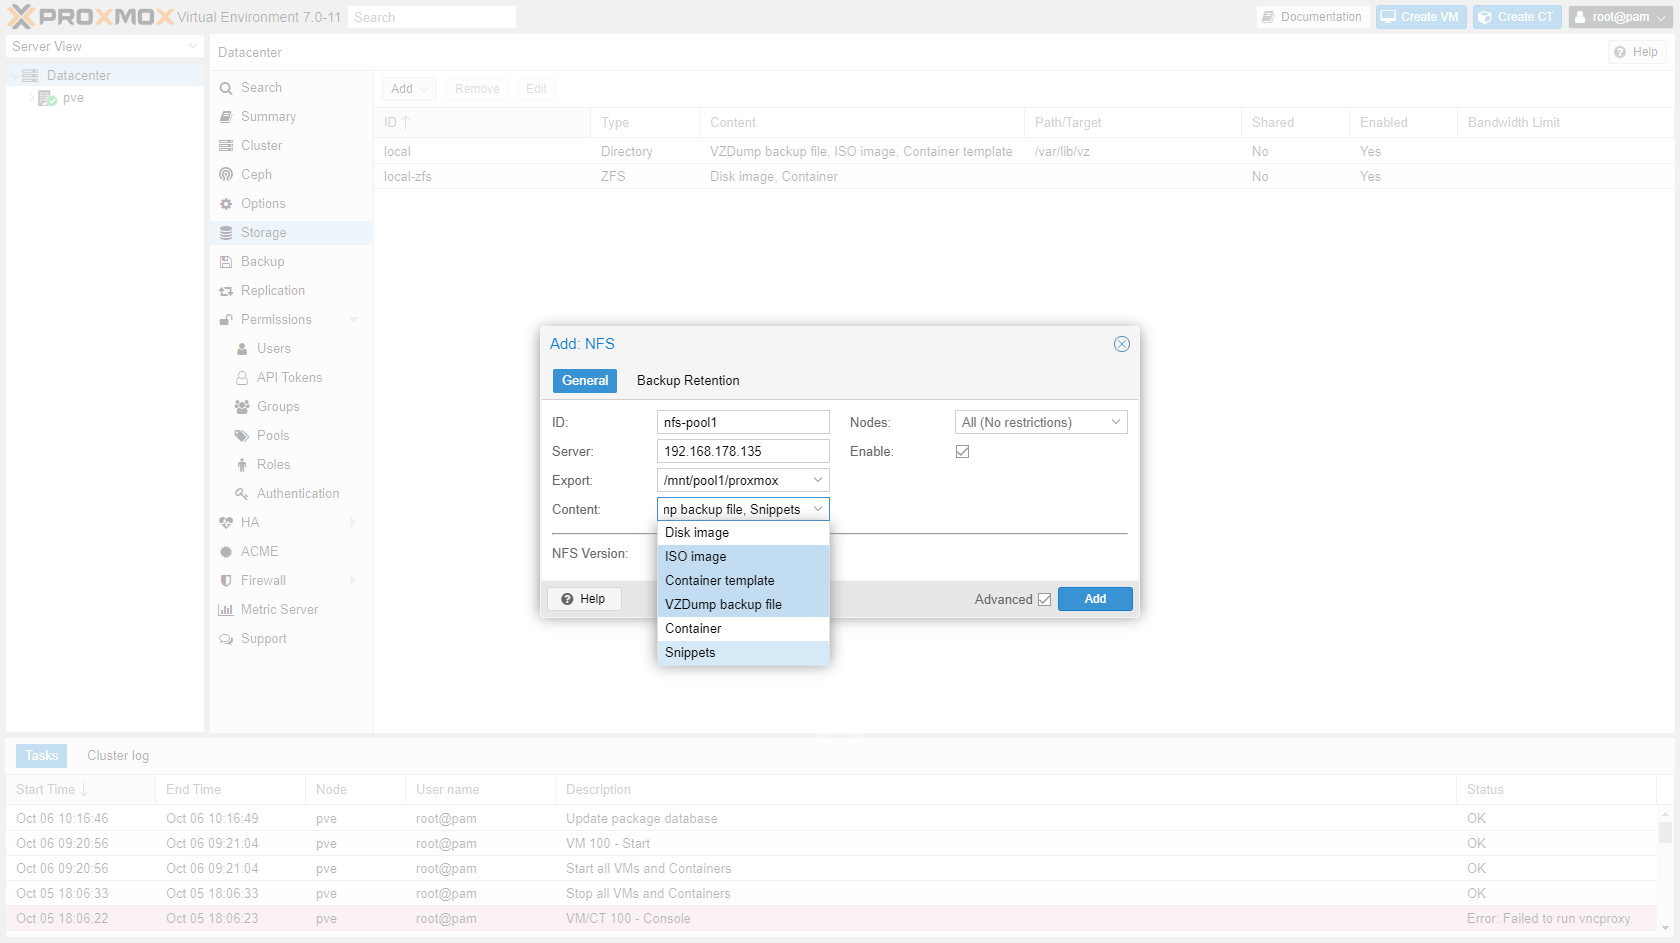
- ID:
-
The NFS store/pool is now available to Proxmox.
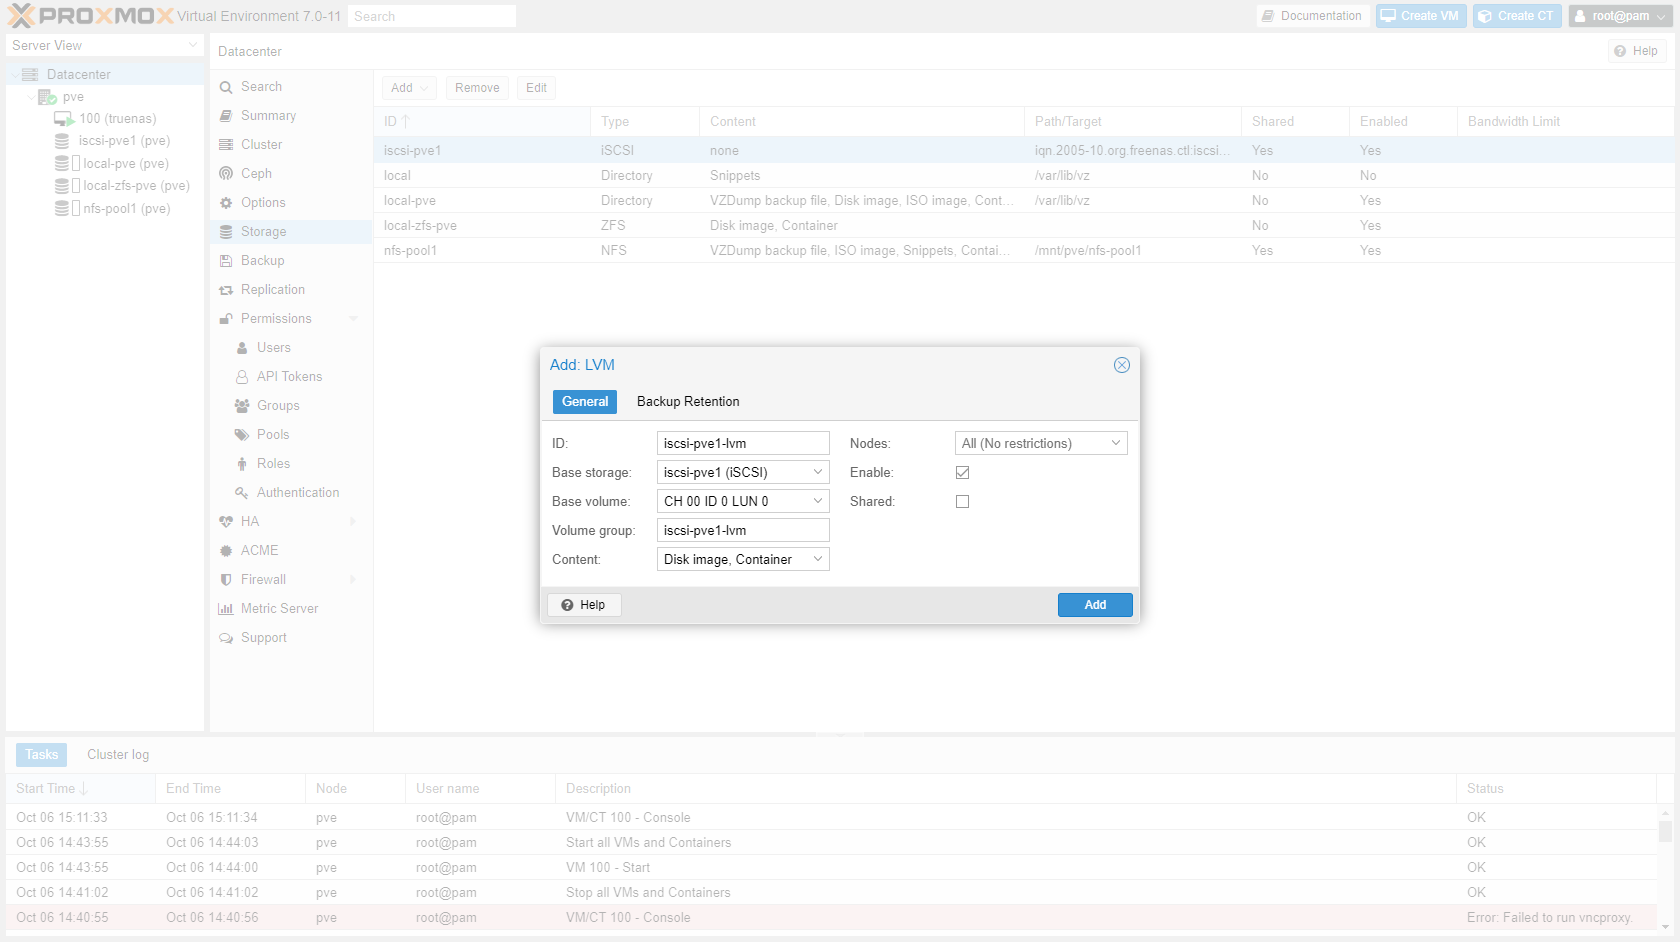
¶ iSCSI storage
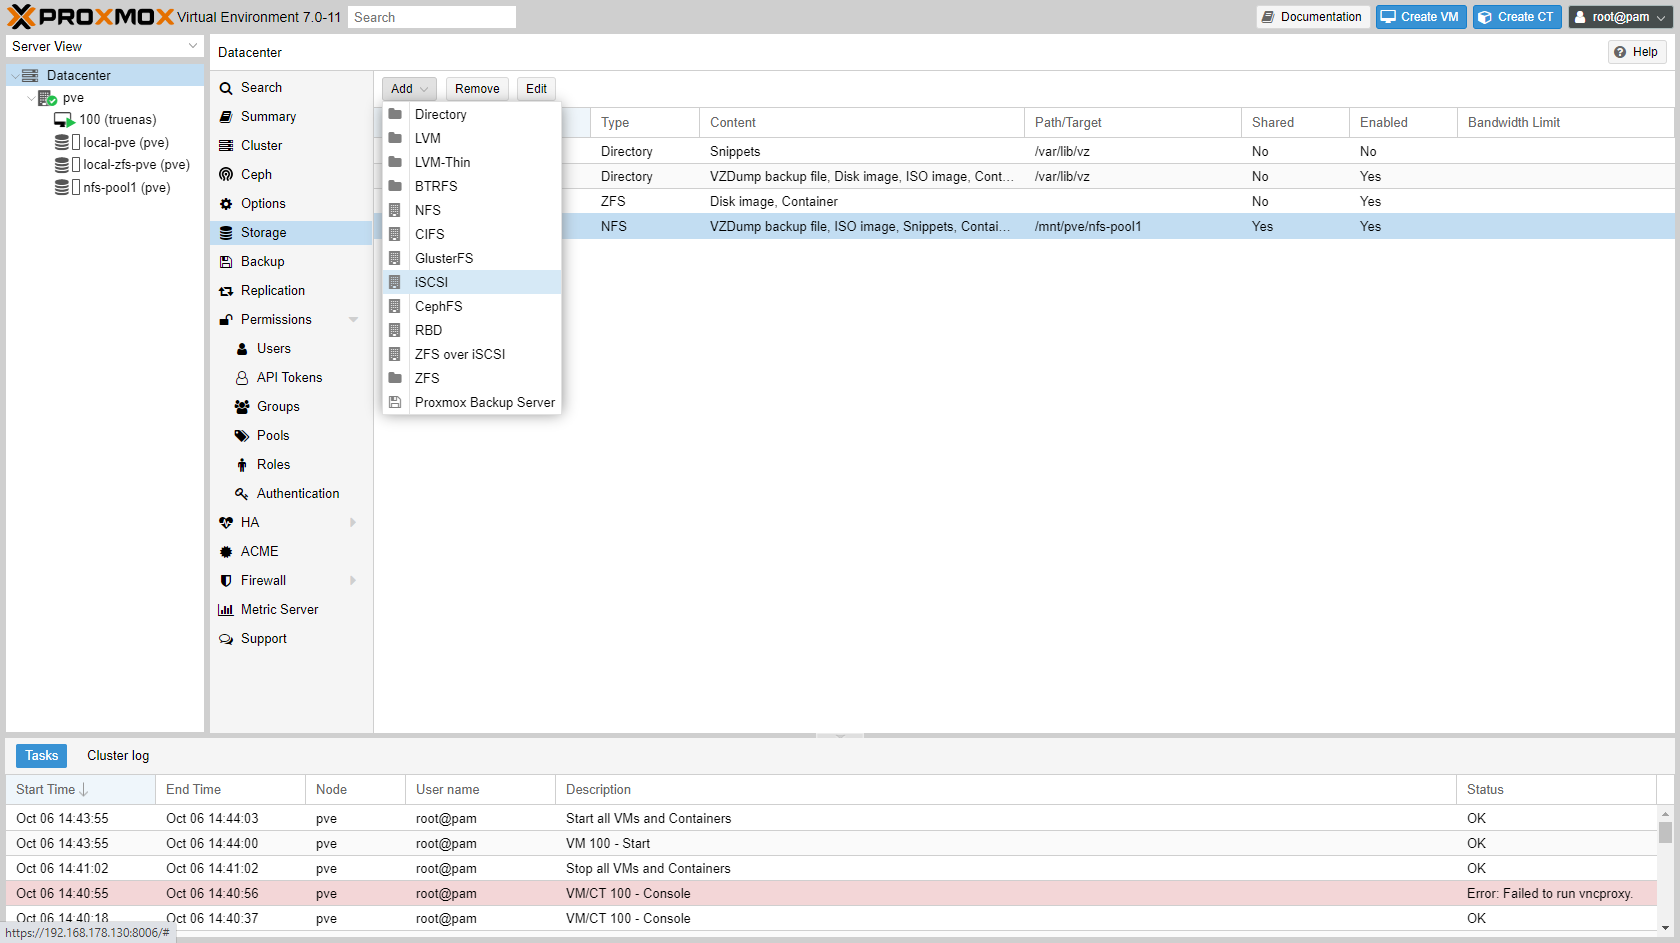
After creating an iSCSI target on your NAS/SAN (TrueNas example), you can add the target in Proxmox.
-
Go to "Datacenter" -> "Storage" and add iSCSI storage.
-
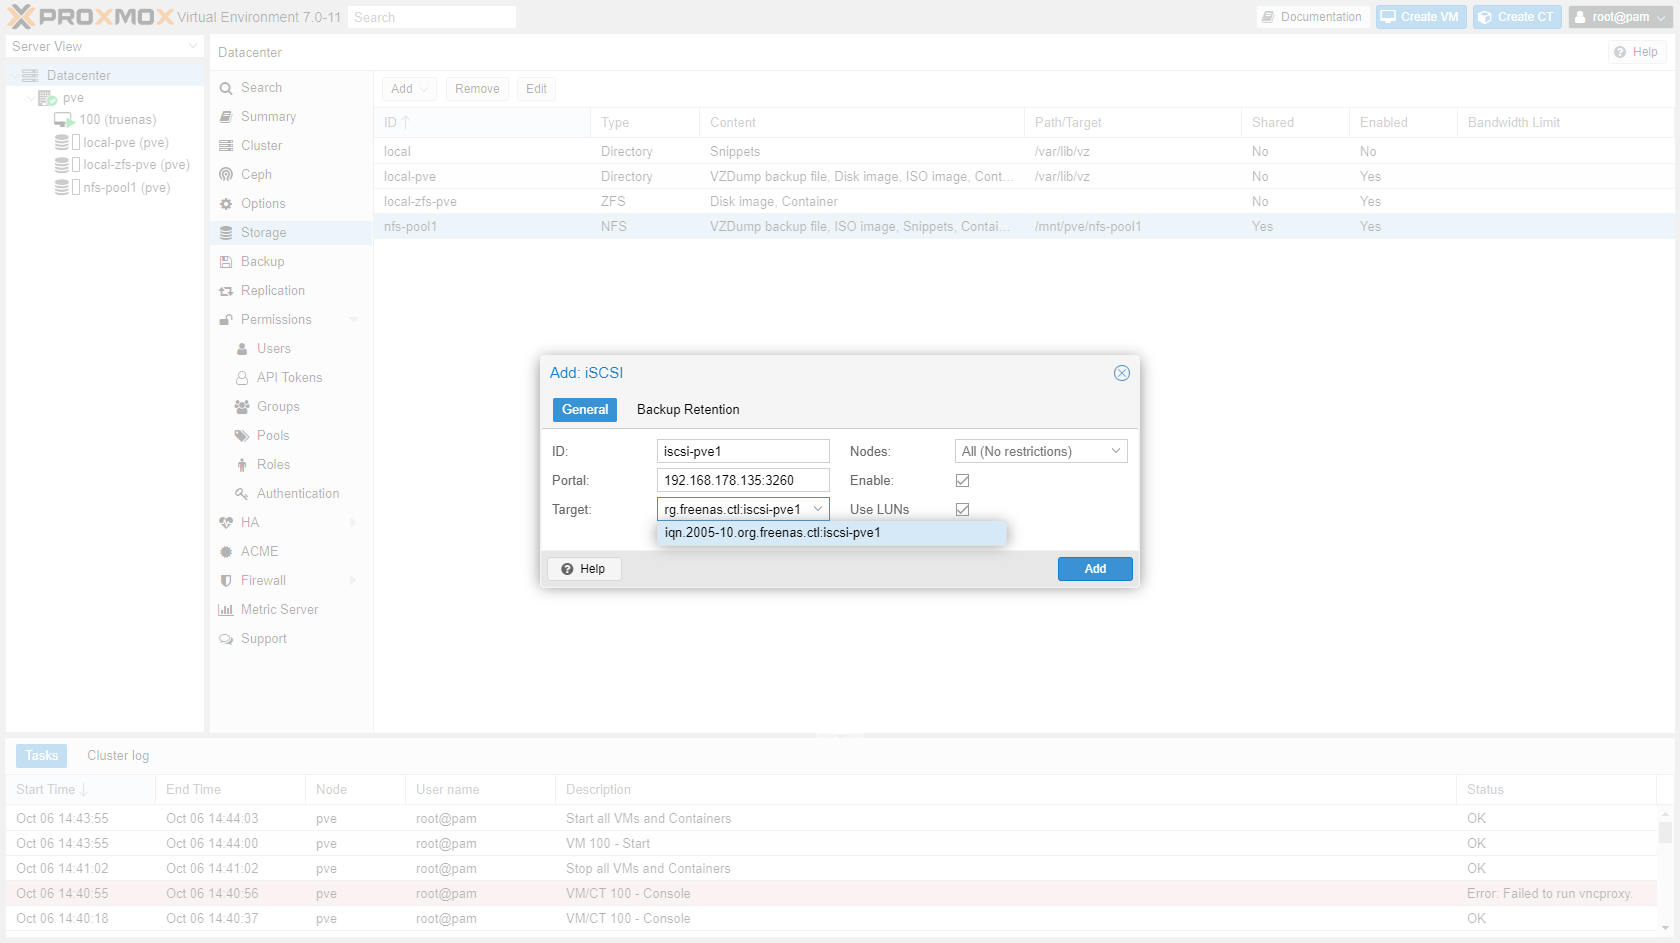
Enter details of iSCSI target:
- ID:
iscsi-<poolname> - Portal:
<ip address of NAS>:3260 - Target:
iqn.2005-10.org.freenas.ctl:iscsi-pve1(this list will show automatically after you enter the server address is entered) - Uncheck "Use LUNs directly"
- ID:
-
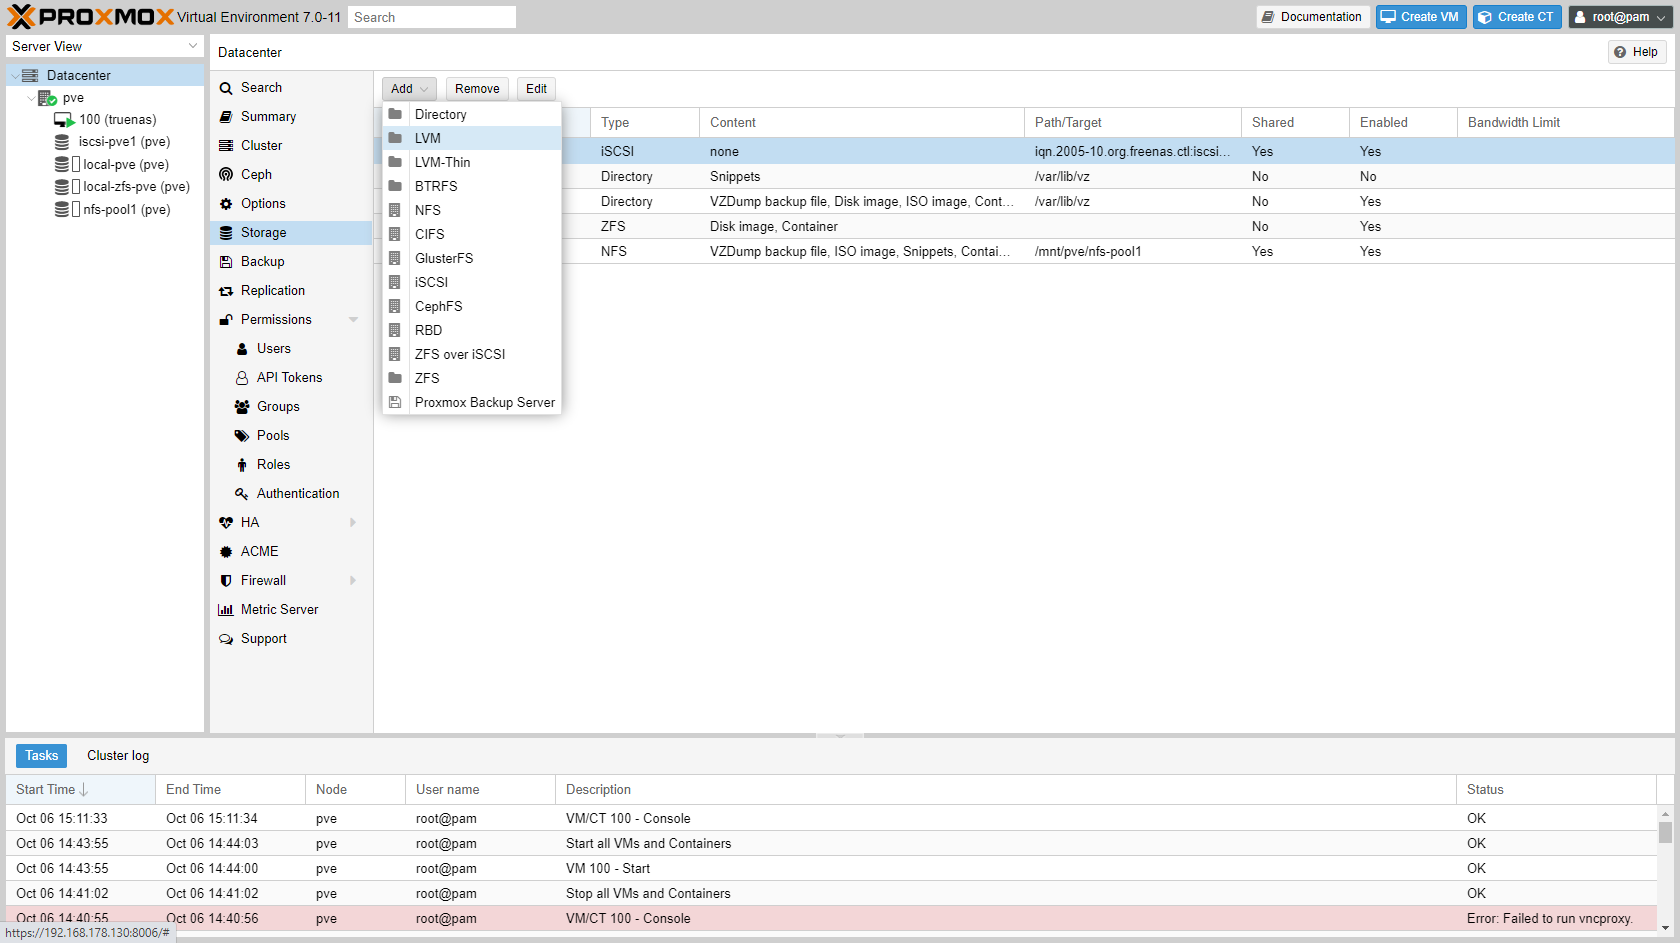
The iSCSI target is now available to Proxmox. Click "Add" and choose "LVM".
-
Enter details of LVM storage:
- ID:
iscsi-<poolname>-lvm - Base storage:
<poolname> (iSCSI) - Base volume:
CH 00 ID 0 LUN 0(in my case) - Volume group:
iscsi-<poolname>-lvm - Content:
Disk image, container
- ID:
-
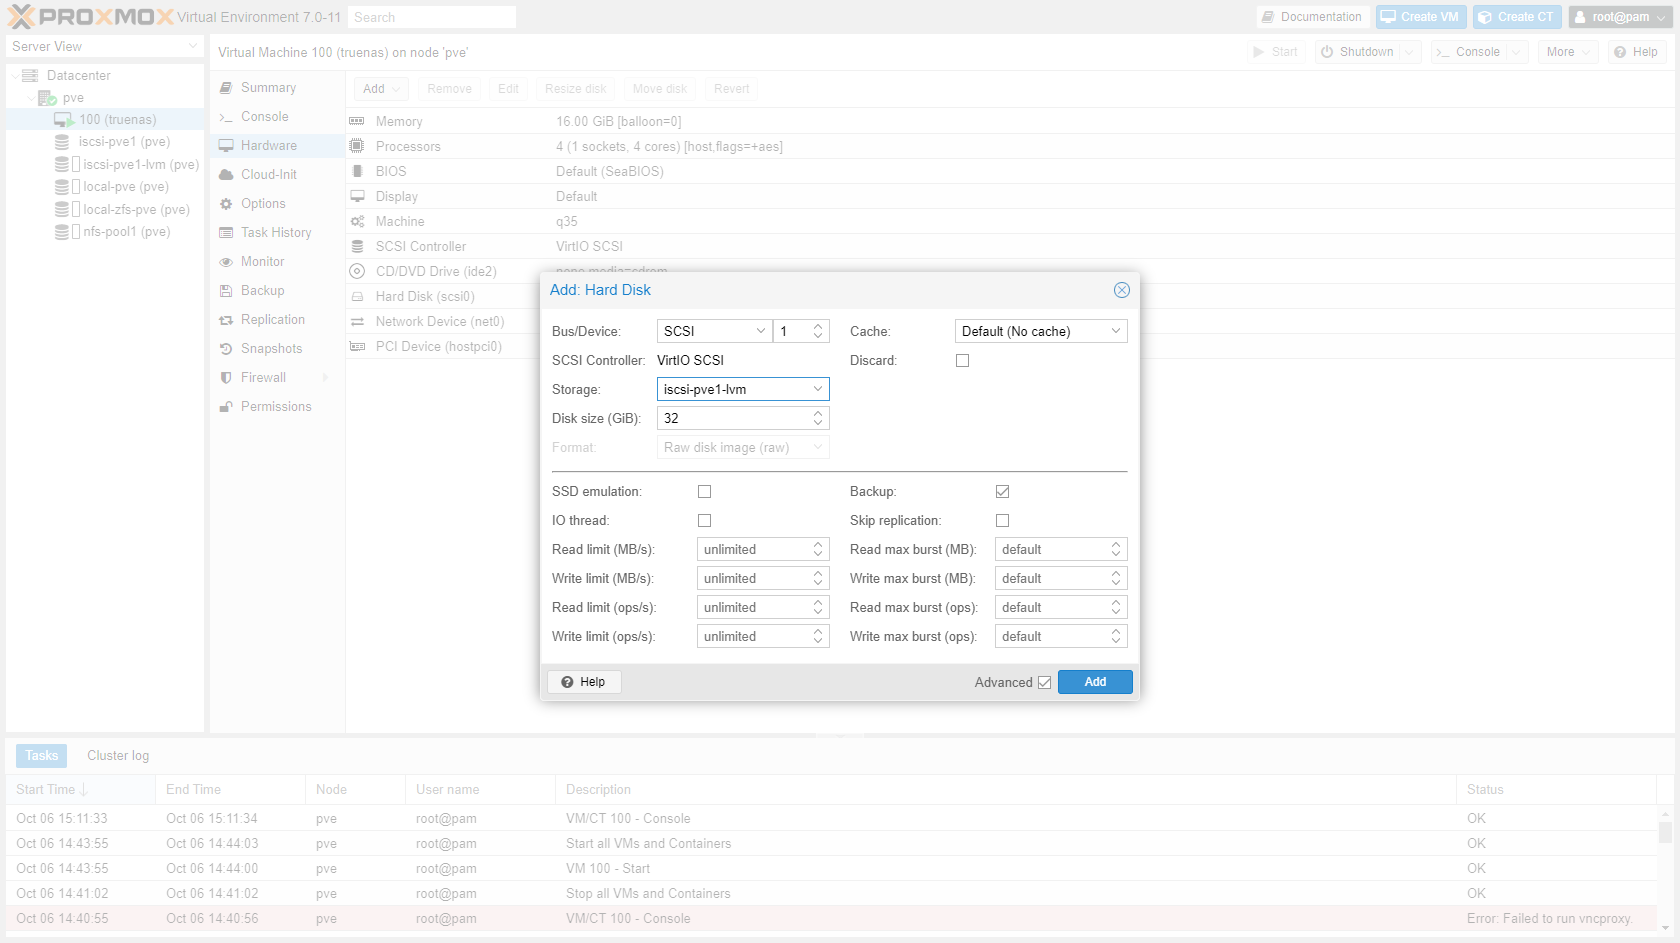
You can now add a VM or LXC disk on iSCSI.
¶ Time
Install Chrony.
¶ Users and groups
First make sure you create a non-root user in Debian. This user is added as PAM user below. GUI only users can be added as pve users.
-
Go to "Datacenter" -> "Permissions" -> "Groups" and create group
Admins.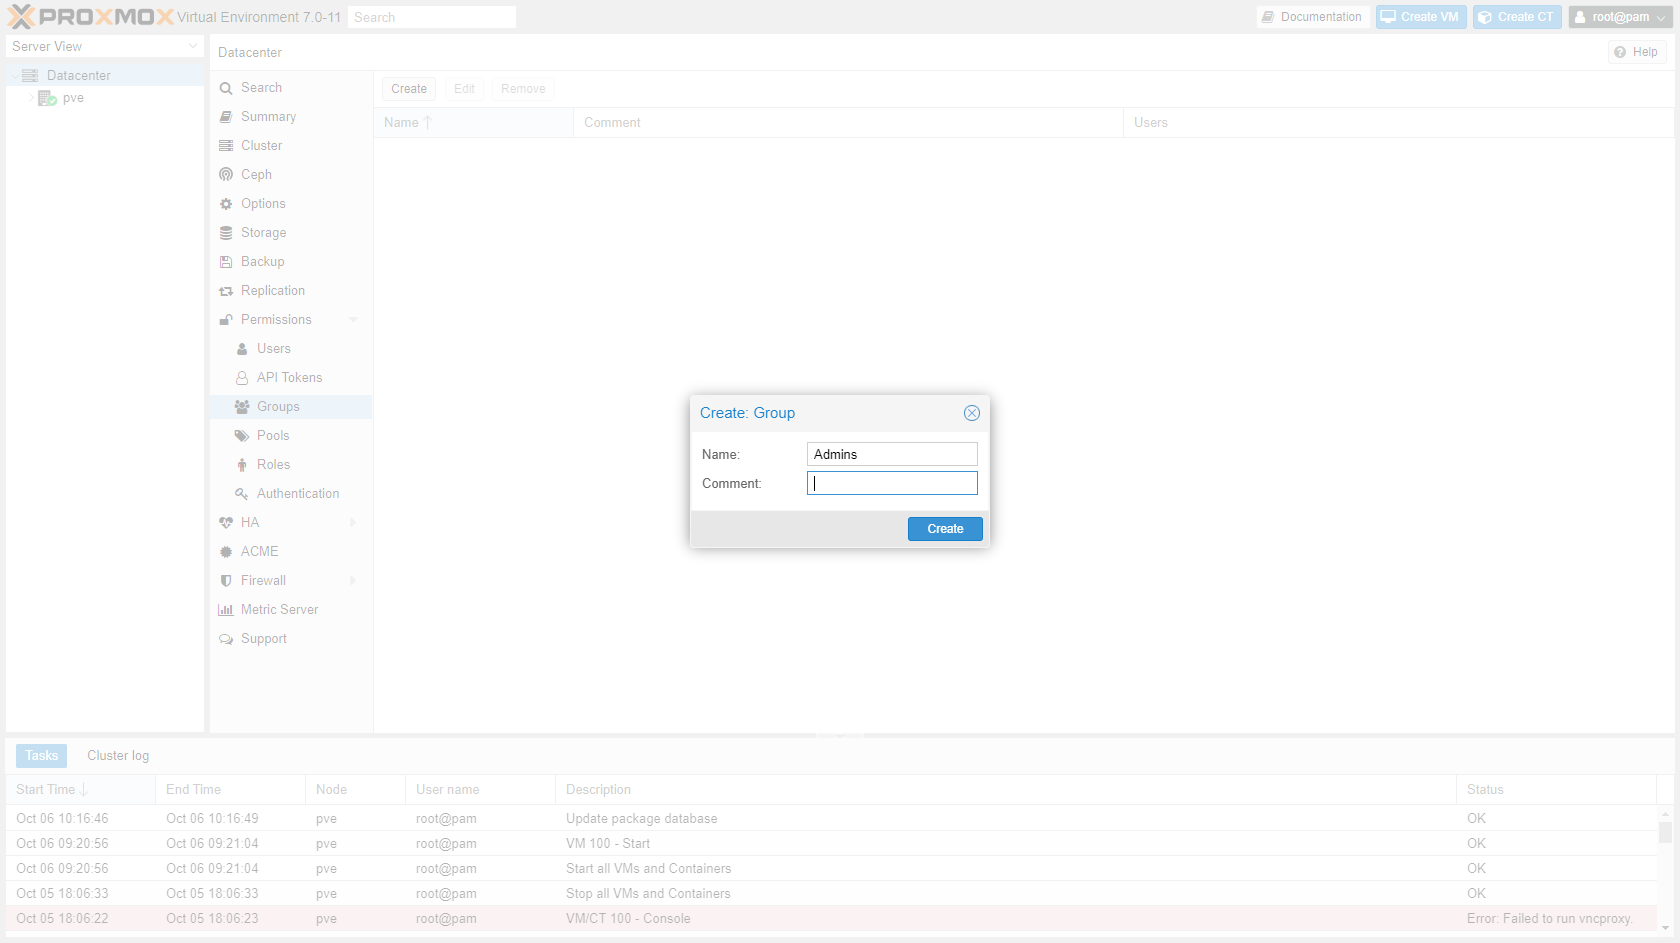
-
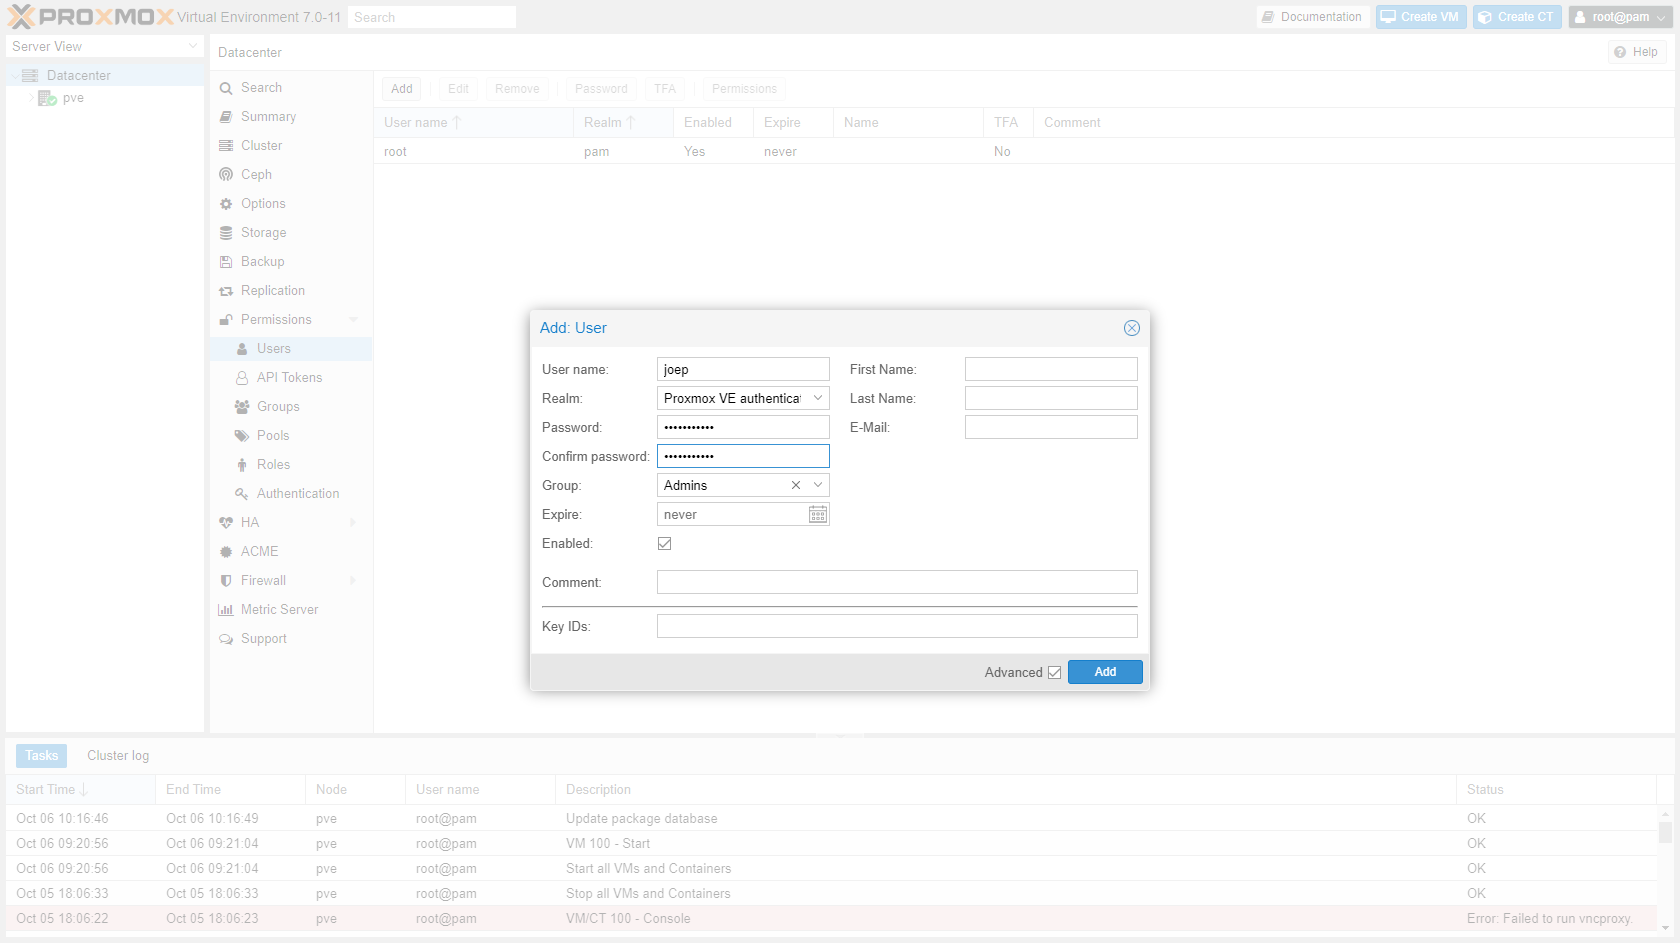
Go to "Datacenter" -> "Permissions" -> "Users" and create user.
-
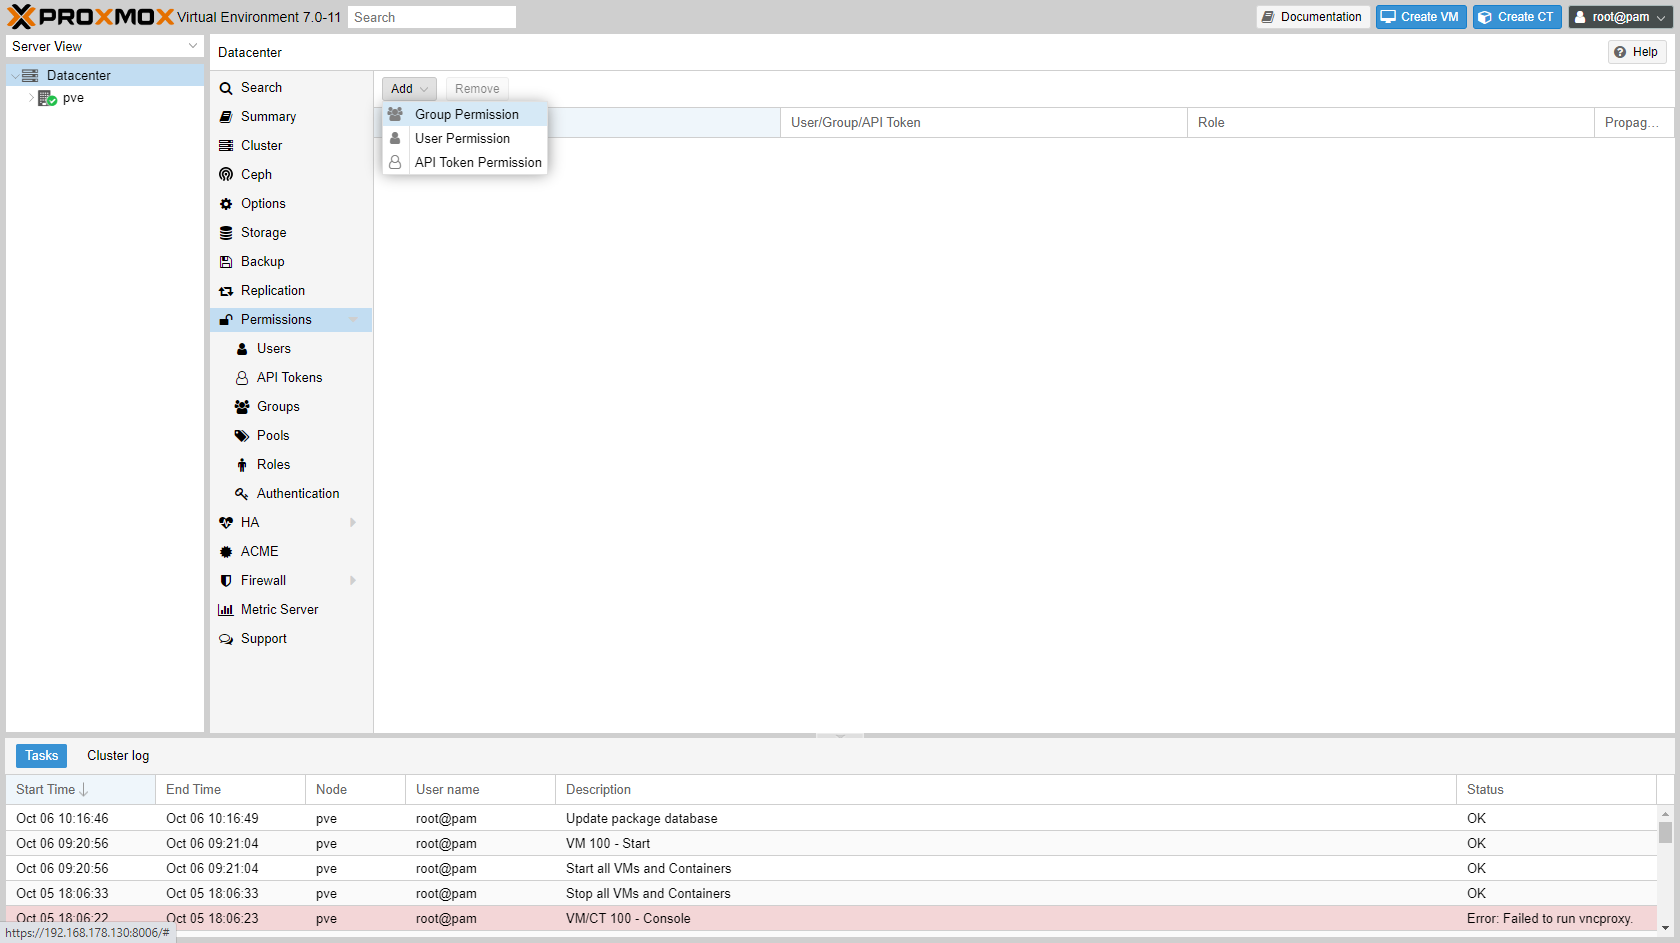
Go to "Datacenter" -> "Permissions" click Add -> Group Permissions.
-
Enter Path
\, GroupAdminsand RoleAdministrator.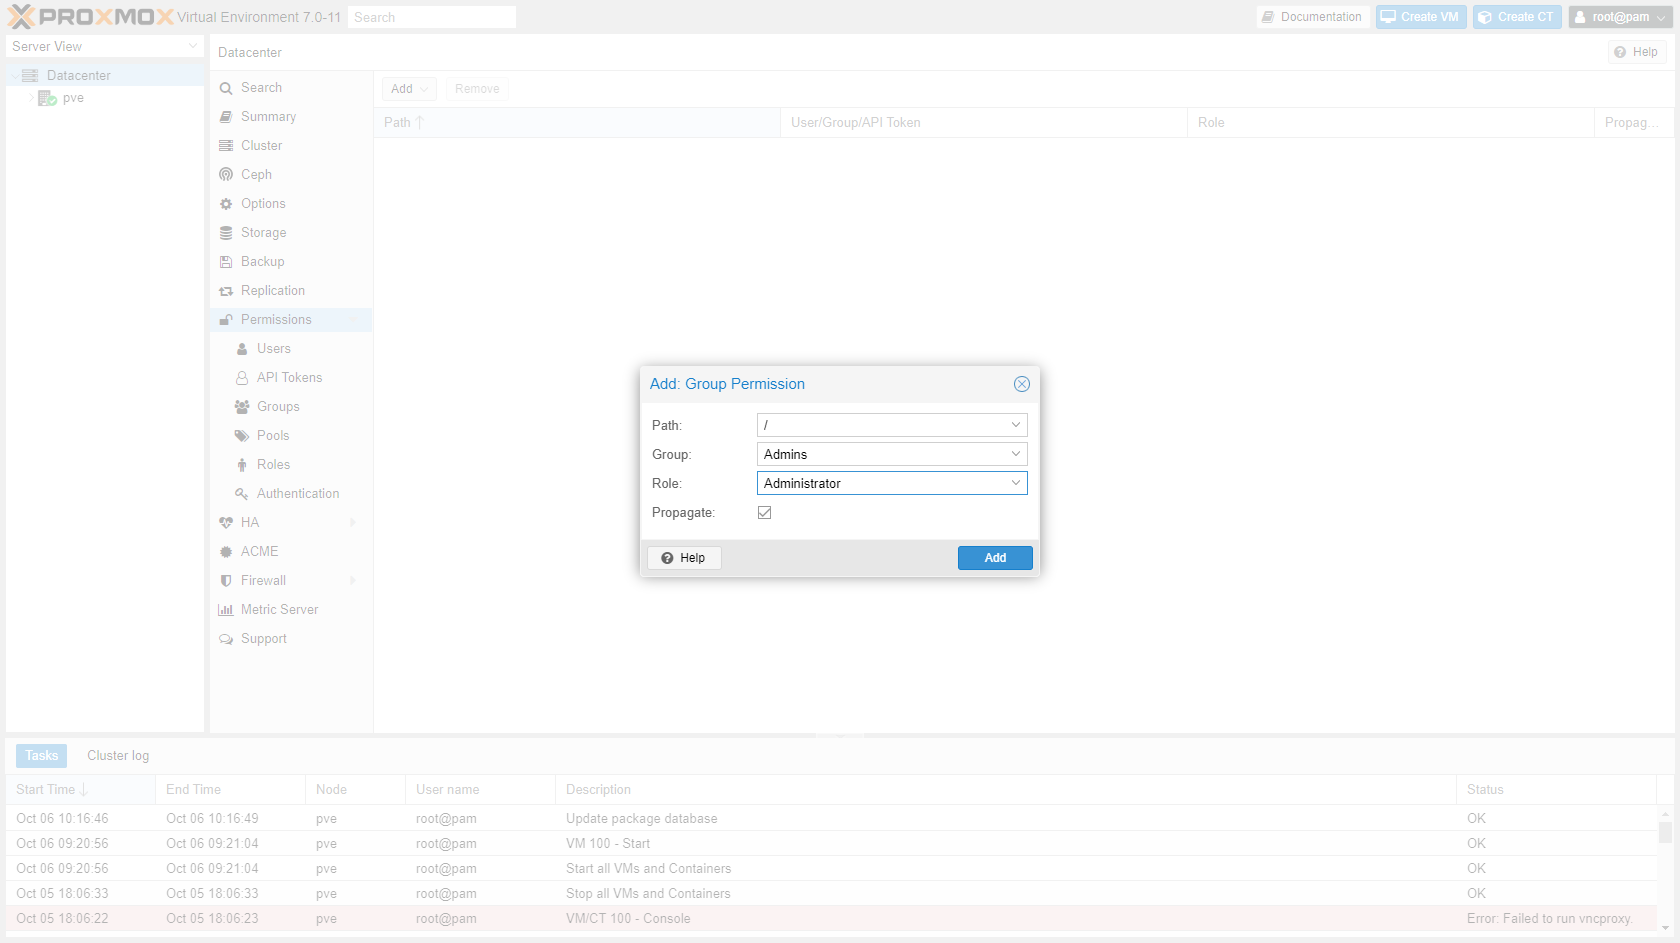
-
Open a private browser window and login with your newly created user. Check if you have sufficient permissions (everything should be visible). Logout and close the private browser.
-
Optional: In your "normal" browser screen logout the root user and login with your own user name. Go to "Datacenter" -> "Permissions" -> "Users" and disable the root user.
Step 5 is optional, because some tasks can only be done by the root user. Although this is safer, you have to re-enable the root user each time you need to do one of these restricted/root tasks. I would suggest you disable the root user when you're confident everything is running smoothly.
¶ Guests
¶ Qemu guests
Qemu guest are full virtual machines. You have to (can) specify a lot of details about the hardware and the OS will run as if it is a full machine.
¶ Commands
¶ List all vm's
sudo qm list
¶ Reboot vm
sudo qm reboot <vmid>
¶ Reset vm
sudo qm reset <vmid>
¶ Shutdown vm
sudo qm stop <vmid>
¶ Start vm
sudo qm start <vmid>
¶ Stop vm
sudo qm stop <vmid>
¶ Create a guest (Linux/Windows)
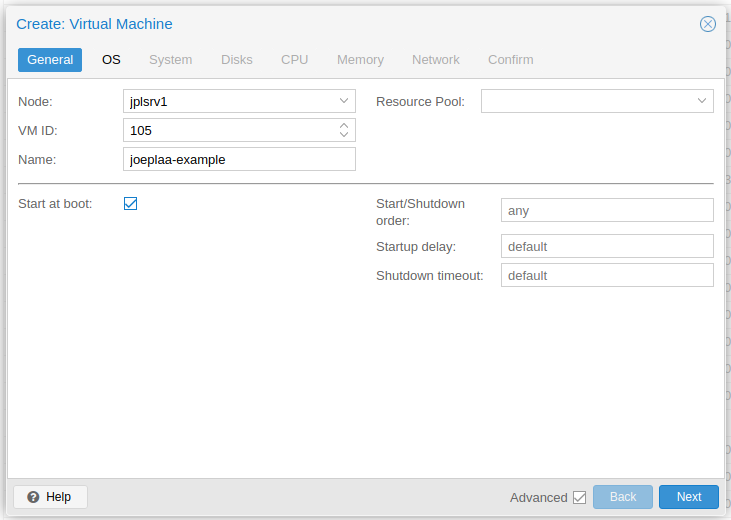
When creating a guest (VM) some basic settings are:
-
Select "Start at boot" and set "Start/Shutdown order".
-
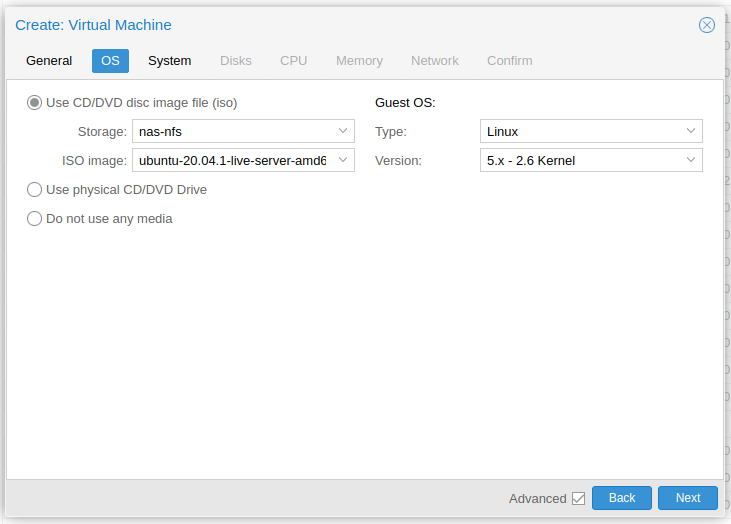
Set the correct "Guest OS". Proxmox will select the best defaults and lower level settings. Especially important when installing a Windows guest.
-
Select "Qemu Agent" and set "Machine" to
q35.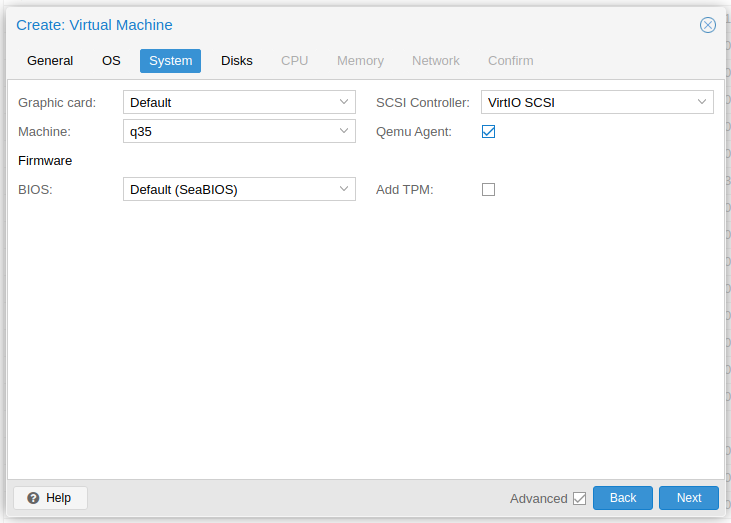
Setting "Graphic card" to
VirtIO-GPUmight solve some graphics related issues.
-
Select "Discard" and "SSD emulation" and set a proper "Disk size". The discard option will free up disk space on the host when files are deleted in the guest (on Linux enable with
sudo systemctl enable fstrim.timer). Set cache toWrite Backand enableIO thread.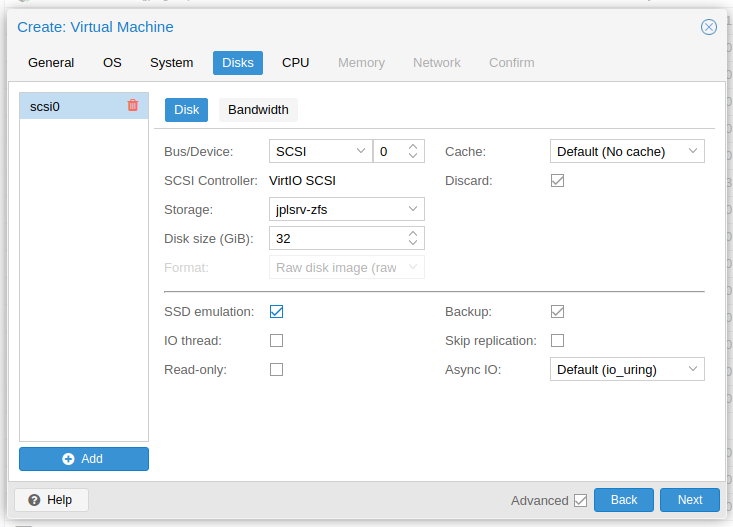
-
First set the number of "Sockets", "Cores" and "VCPUs". The number of vCPU's = Sockets x Cores. Only use multiple sockets if the host has multiple too. Set "Type" to
hostand select "Enable NUMA" if the host machine has multiple sockets. Lastly set "extra CPU Flags"md-clear,pcid,spec-ctrl,ssbdandaesto on.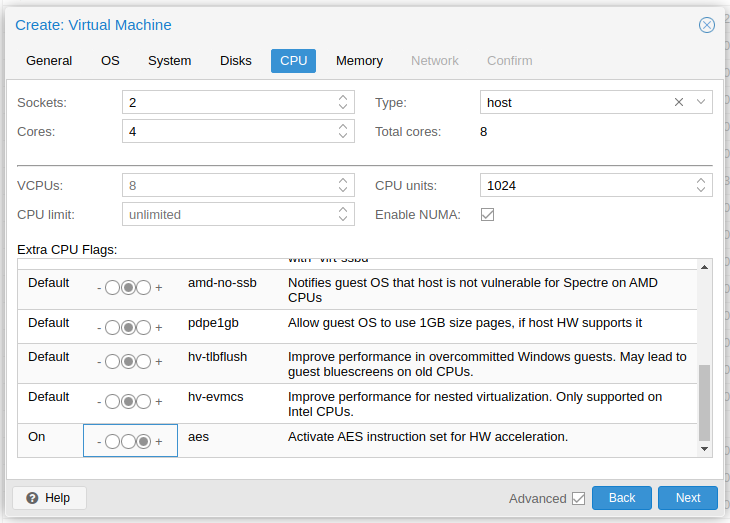
-
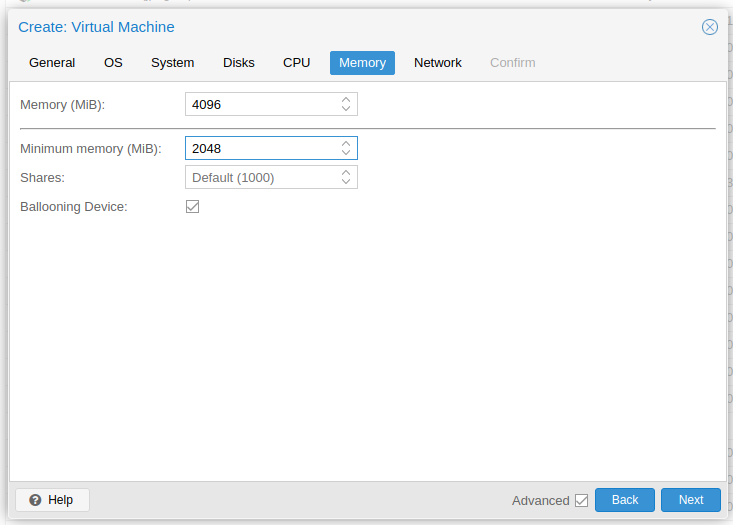
Set the amount of RAM. Use a ballooning device if you know the machine doesn't always use all of the RAM.
-
Select the network bridge that should be used by the guest and set the VLAN Tag if applicable.
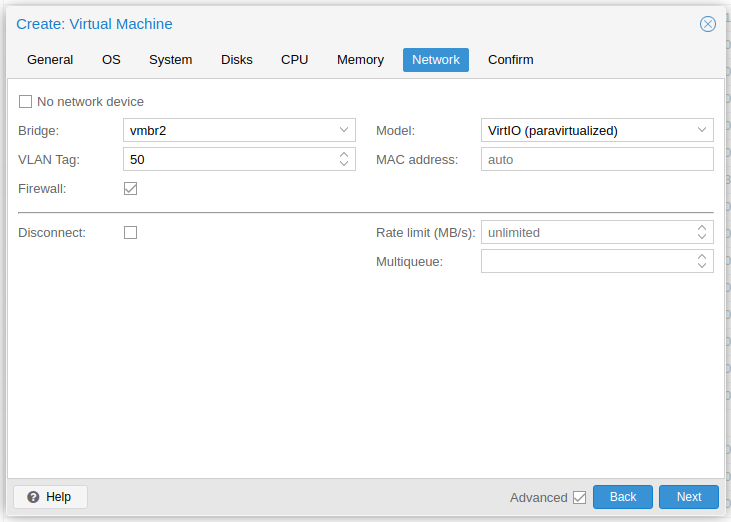
-
Confirm and finish.
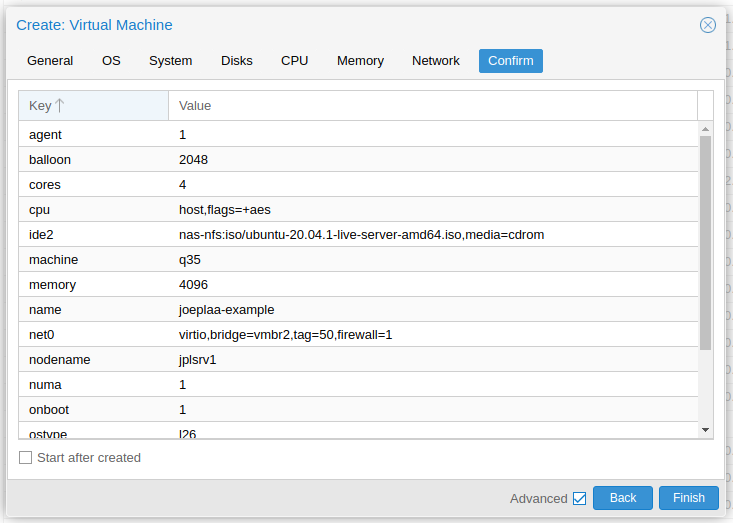
¶ Windows guests
Recommended settings for Windows 10 and 2019 Server on Proxmox
¶ Linux guest
¶ Create and enable swap space
-
We will create a 2 GB swap space (64 blocks of 32 MB). In the command line type:
sudo fallocate -l 2G /swapfileOr:
sudo dd if=/dev/zero of=/swapfile bs=32M count=64 -
Update the read and write permissions for the swap file:
sudo chmod 600 /swapfile -
Set up a Linux swap area:
sudo mkswap /swapfile -
Make the swap file available for immediate use by adding the swap file to swap space:
sudo swapon /swapfile -
Verify that the procedure was successful:
sudo swapon -s -
Remove autocreated swap file
sudo swapof /swap.img sudo rm /swap.img -
Enable the swap file at boot time by editing the
/etc/fstabfile. Open the file in the editor:sudo nano /etc/fstab -
Remove the existing line with
/swap.imgand add the following line at the end of the file (use arrow keys and paste the line with right-mouse button), save the file (ctrl+x), and then exit (y and hit Enter):/swapfile swap swap defaults 0 0 -
Show memory stats:
top
htop
free -h
¶ Adjust swappiness
-
See swappiness value
cat /proc/sys/vm/swappiness -
50-60 is fine for most systems. Set to lower if you want to use more RAM, or higher if you have little RAM and using SWAP is fine for your application.
sudo sysctl vm.swappiness=10Or add to `/etc/sysctl.conf:
vm.swappiness=10
¶ Guest client
First thing to after installing a guest OS is installing the Qemu guest client to allow Proxmox to properly shutdown, snapshot and control the guest. It also gives you the guests network address in the Proxmox web interface.
-
Windows
- Download: https://pve.proxmox.com/wiki/Qemu-guest-agent and upload
virtio-win-0.1.185.isoto storage on the host. - Attach the ISO to your Windows VM
- In Windows open explorer and install:
virtio-win-gt-x64.msivirtio-win-guest-tools.exe
- Reboot guest
- Download: https://pve.proxmox.com/wiki/Qemu-guest-agent and upload
-
Linux
-
Install agent
sudo apt update sudo apt install qemu-guest-agent -
Reboot guest
-
¶ LXC containers
LXC containers are light-weight alternatives to Qemu guests. They can be used to run a single application for example.
¶ Commands
¶ Enter container
sudo pct enter <vmid>
¶ List all containers
sudo pct list
¶ Start container
sudo pct start <vmid>
¶ Stop container
sudo pct stop <vmid>
¶ Create an LXC container
-
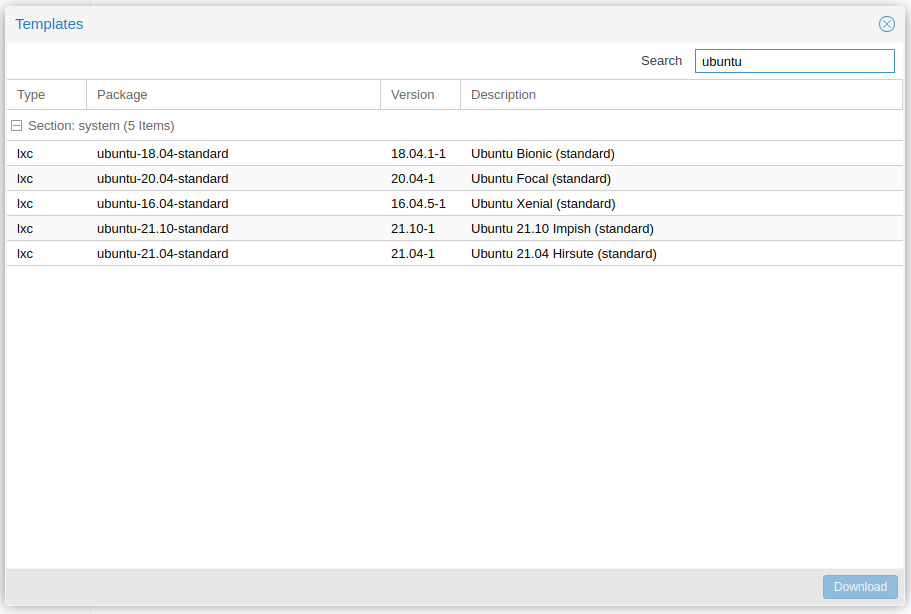
Go to your preferred storage pool (NFS for me) and download a template. "nas-nfs" -> "CT Templates" and click "Templates". Download Ubuntu 20.
-
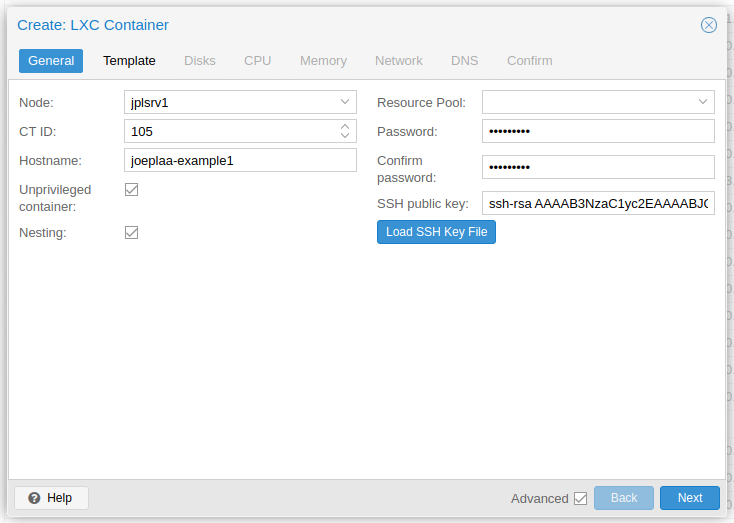
Click "Create CT" and enter a "Hostname", "Password" and optionally a "SSH public key". Also make sure "Unprivileged container" and "Nesting" are checked.
-
Select the container template, in my case from my NAS.
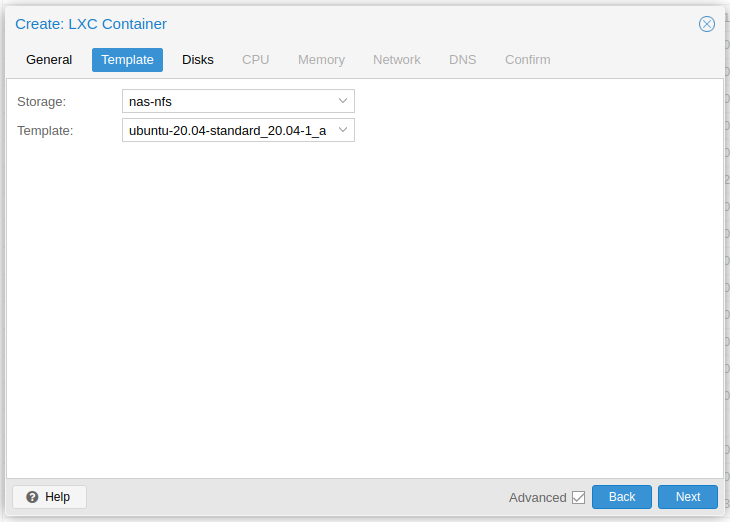
-
Select storage and determine the size.
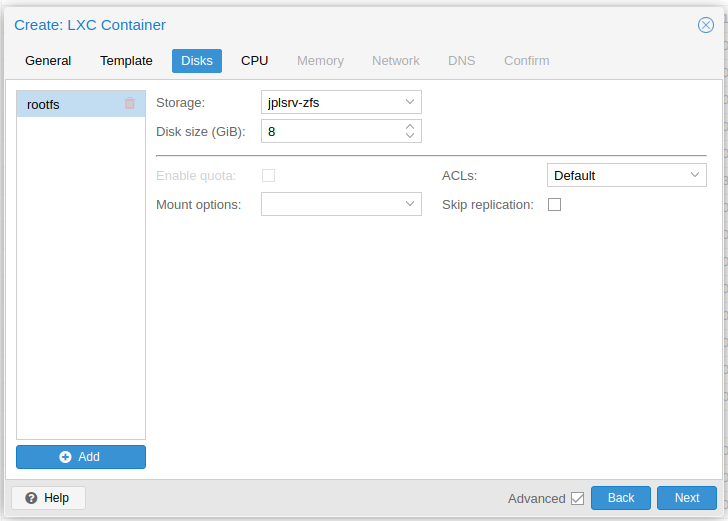
-
Enter amount of CPU cores the application will need. This can be adjusted up or down on the fly (while the container is running).
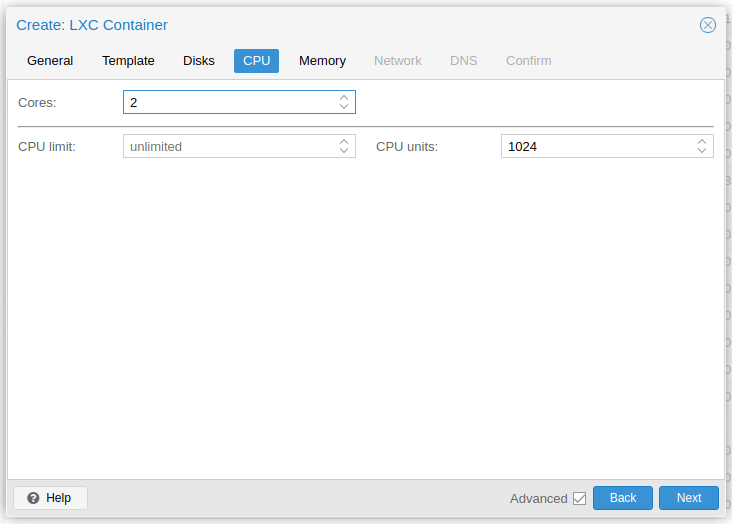
-
Enter amount of memory and swap space the application will need. This can be adjusted up or down on the fly (while the container is running).
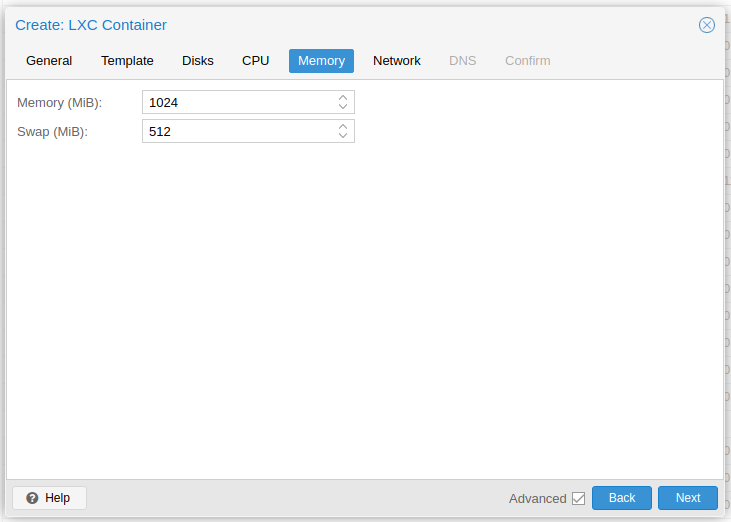
-
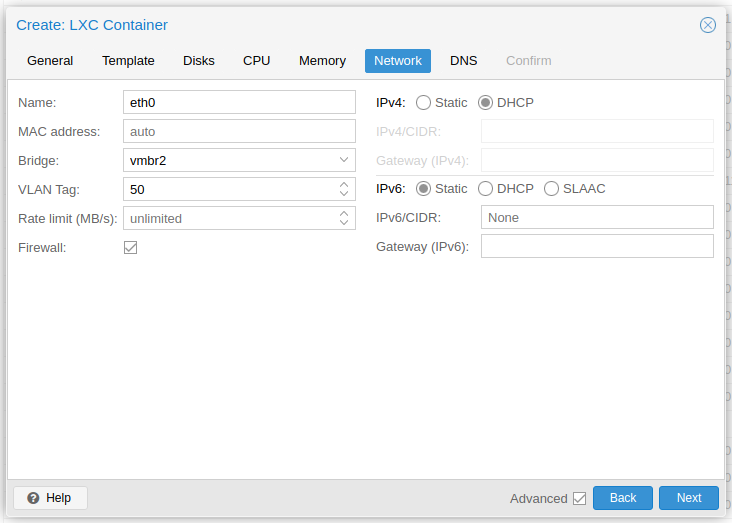
Configure the network. I choose to get a IPv4 address through DHCP, as I find it easier to keep track of the leases (reserved addresses) in my router (pfSense).
-
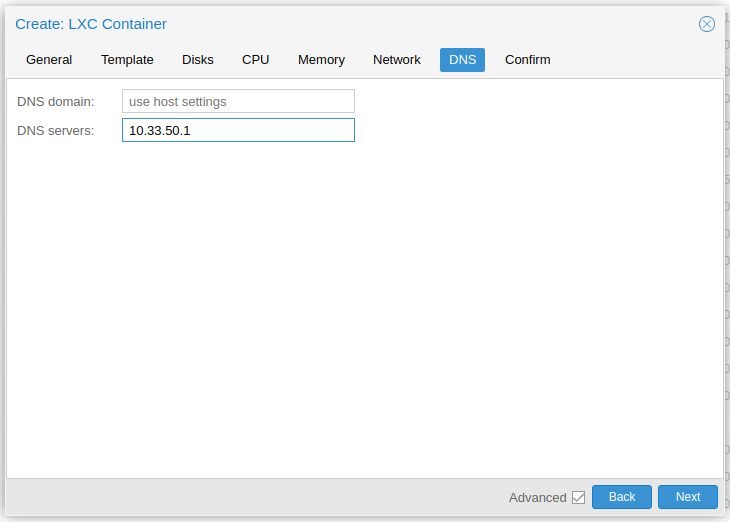
Optional: Configure DNS if the container runs on another VLAN than the host.
-
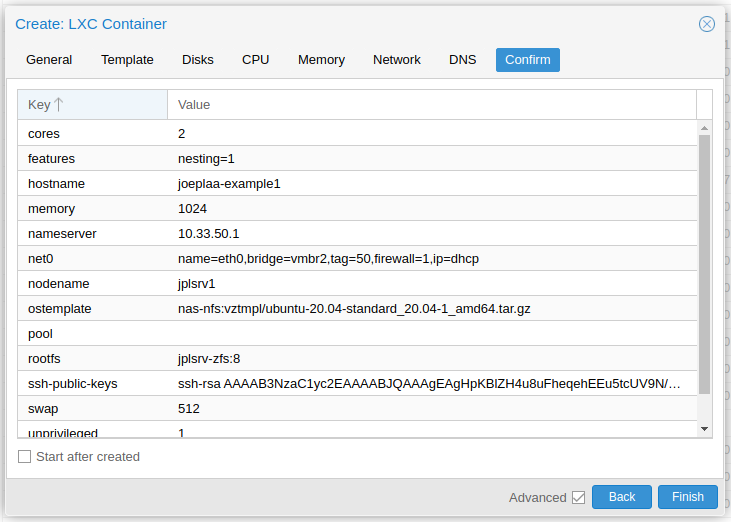
Confirm next screen.
-
Enable trim in guest.
sudo systemctl enable fstrim.timer
¶ Docker in container
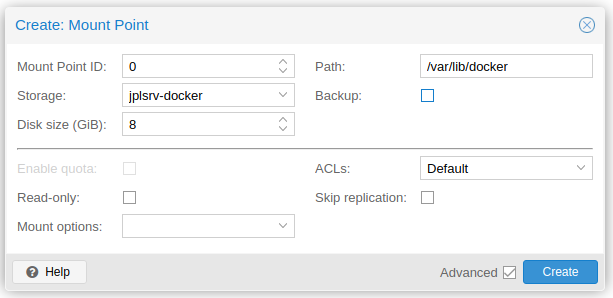
When running Docker inside the container: Click on the container and go to "Resources". Click "Add" -> "Mount point"
- Storage:
docker - Disk size (GiB):
>4depending on the size of the image, container and volume - Path:
/var/lib/docker - Uncheck "Backup"
¶ NFS in container
Source: https://theorangeone.net/posts/mount-nfs-inside-lxc/
-
If you need access to a share on an external server, either mount it on the host (through GUI: https://wiki.joeplaa.com/en/proxmox#nfs-storage or as non-proxmox share: https://wiki.joeplaa.com/en/linux) and add it as a mount point in the container.
-
Or create a privileged LXC container, modify the config file (
/etc/pve/lxc/<id>.confon Proxmox) and add features:mount=nfs(or add through GUI as root) -
(Re)start the container
-
Mount your data inside the container:
nano /etc/fstab192.168.1.1:/data /mnt/data nfs defaults 0 0mount -a
¶ Snap in container
Ubuntu Snaps inside LXC container on Proxmox
How to run a LXC container with snap on Proxmox
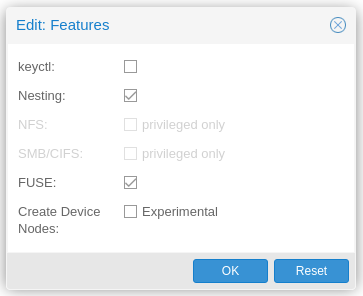
When running Snap inside the container: Click on the container and go to "Options". Select "Features" and click "Edit". Enable "FUSE".
¶ Unlock guest
Error:
can’t lock file ‘/var/lock/qemu-server/lock-xxx.conf’ -got timeout
rm /run/lock/qemu-server/lock-xxx.conf