¶ 7zip
¶ Installation
sudo apt update && sudo apt install p7zip-full p7zip-rar
¶ Certbot
¶ Installation
Source: https://certbot.eff.org/
sudo snap install core; sudo snap refresh core
sudo snap install --classic certbot
sudo ln -s /snap/bin/certbot /usr/bin/certbot
¶ Chrony
¶ Installation
sudo apt update && sudo apt install chrony
¶ Config
-
Open
/etc/chrony/chrony.conf -
Add time servers:
# Use local time server(s); do not a virtualized pfSense instance!! Time will drift. server 10.20.30.40 iburst server 10.20.30.41 iburst # Use public time server(s) server ntp1.example.com iburst server ntp2.example.com iburst server ntp3.example.com iburst -
Restart chrony:
systemctl restart chronyd -
Check the journal to confirm that the newly configured NTP servers are being used:
journalctl --since -1h -u chrony
¶ Fail2ban
¶ Installation
sudo apt update && sudo apt install fail2ban
¶ Configuration
¶ WordPress
Sources:
https://osric.com/chris/accidental-developer/2019/07/block-wordpress-scanners-fail2ban/
https://blog.rimuhosting.com/2016/11/02/using-fail2ban-on-wordpress-wp-login-php-and-xmlrpc-php/
-
Create filter:
sudo nano /etc/fail2ban/filter.d/wordpress.conf[Definition] failregex = ^<HOST> .* "POST .*wp-login.php ^<HOST> .* "POST .*xmlrpc.php ignoreregex = -
Create jail:
sudo nano /etc/fail2ban/jail.d/wordpress.confChange
<SITE>to your site name.[wordpress] enabled = true port = http,https filter = wordpress action = iptables-multiport[name=wordpress, port="http,https", protocol=tcp] logpath = /var/log/nginx/<SITE>-access.log maxretry = 3 findtime = 600 bantime = 600 -
Restart fail2ban service:
sudo sytemctl restart fail2ban
¶ Git
¶ Installation
¶ Ubuntu
sudo apt update && sudo apt install git
¶ Windows
Donwload and run Git for Windows.
¶ Configuration
¶ Line-endings
“Checkout as-is, commit Unix-style”:
git config --global core.autocrlf input
¶ Add ssh-key to Bitbucket
-
Create a key pair:
ssh-keygen -t ed25519 eval `ssh-agent` ssh-add ~/.ssh/id_ed25519 -
Copy the public key:
cat ~/.ssh/id_ed25519.pubYou should get something like this:
ssh-ed25519 AAAAC3NzaC1lZDI1NTE5AAAAIP4ufAYAhC3kTsd5IFGa79WLx16G+WScuV4mzbFncMqU joep@jodiBook01Copy everything including ssh-ed25519. You can leave out the
<user>@<pc>part. -
Add key in Bitbucket:
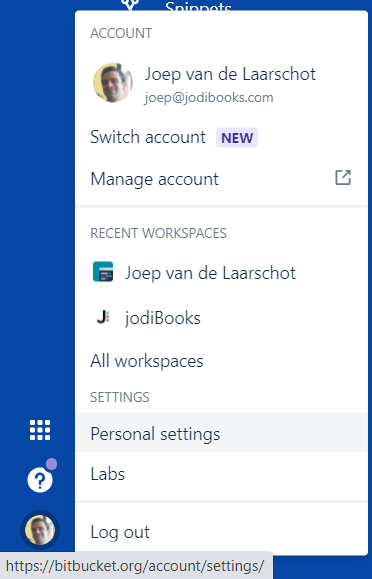
- Choose "Personal settings" from your avatar in the lower left. The Account settings page opens.
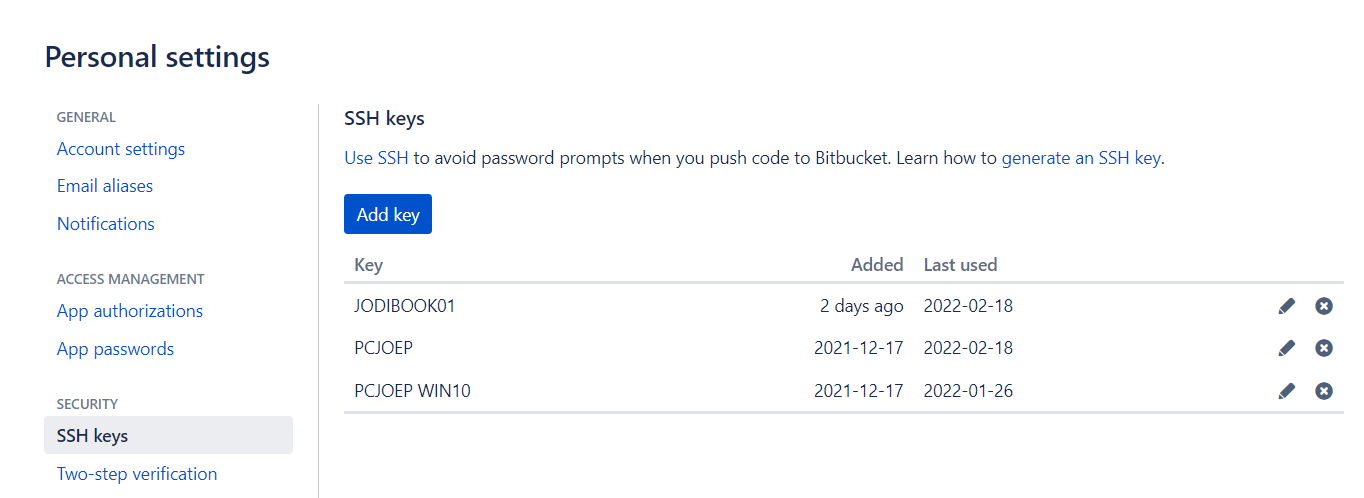
- Click "SSH keys". If you've already added keys, you'll see them on this page.
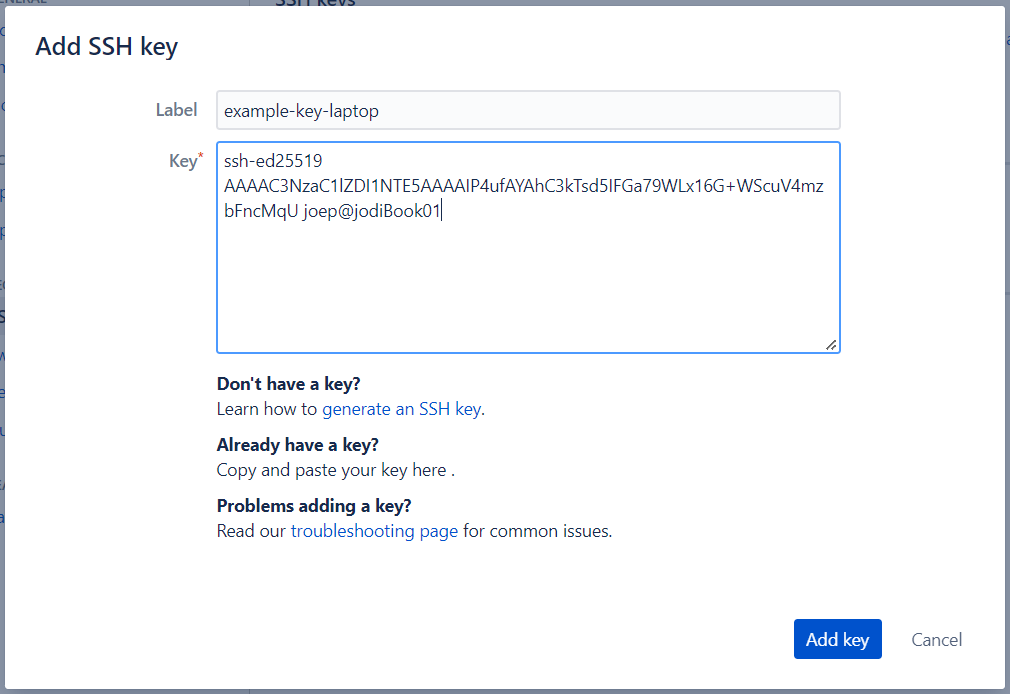
- Click "Add key", give it a name and paste the key.
- Add the key.
- Choose "Personal settings" from your avatar in the lower left. The Account settings page opens.
¶ Add ssh-key to Github
-
Create a key pair:
ssh-keygen -t ed25519 eval `ssh-agent` ssh-add ~/.ssh/id_ed25519 -
Copy the public key:
cat ~/.ssh/id_ed25519.pubYou should get something like this:
ssh-ed25519 AAAAC3NzaC1lZDI1NTE5AAAAIP4ufAYAhC3kTsd5IFGa79WLx16G+WScuV4mzbFncMqU joep@jodiBook01Copy everything including ssh-ed25519. You can leave out the
<user>@<pc>part. -
Add key in Github:
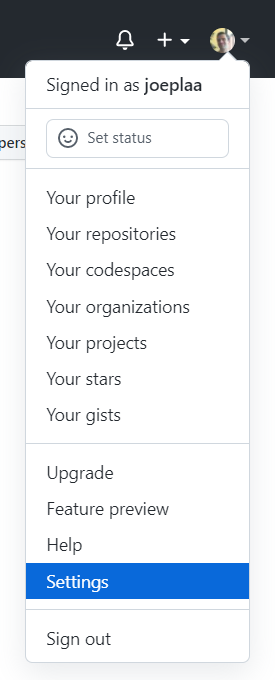
- Choose "Settings" from your avatar in the upper right. The settings page opens.
- Click "SSH and GPG keys". If you've already added keys, you'll see them on this page.
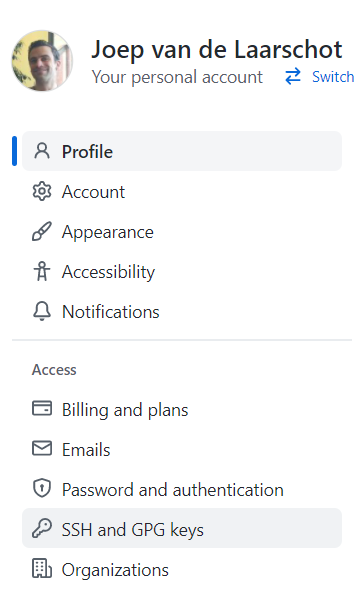
- Click "New SSH key", give it a title and paste the key.
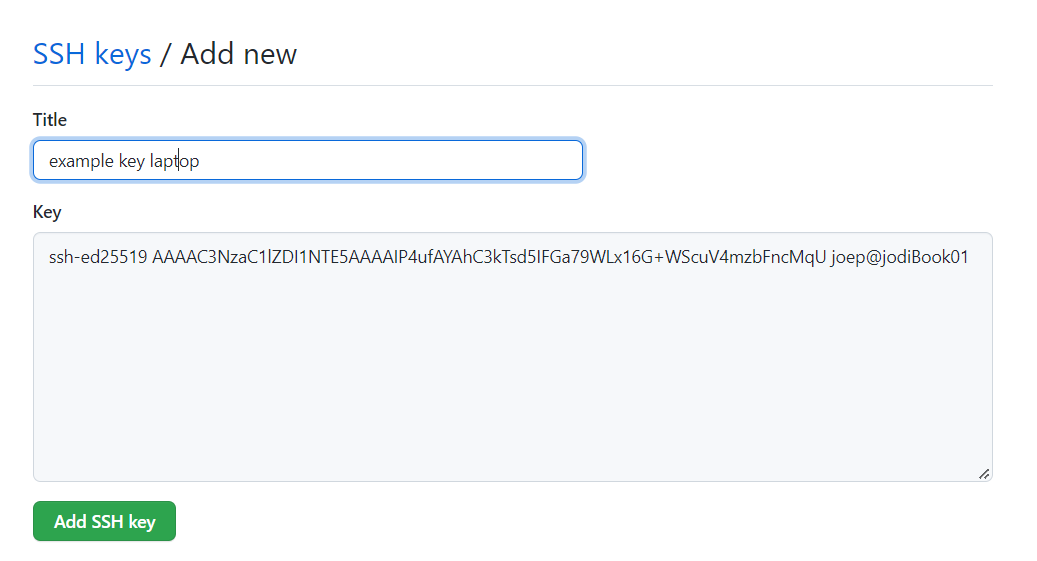
- Add the key.
- Choose "Settings" from your avatar in the upper right. The settings page opens.
¶ Commands
¶ Undo last commit
git reset HEAD^
¶ IIS
¶ Installation
This guide details how to install IIS in Windows 2019. The settings in step 5 and 6 are when hosting .NET framework 4.7 applications. Change as needed.
-
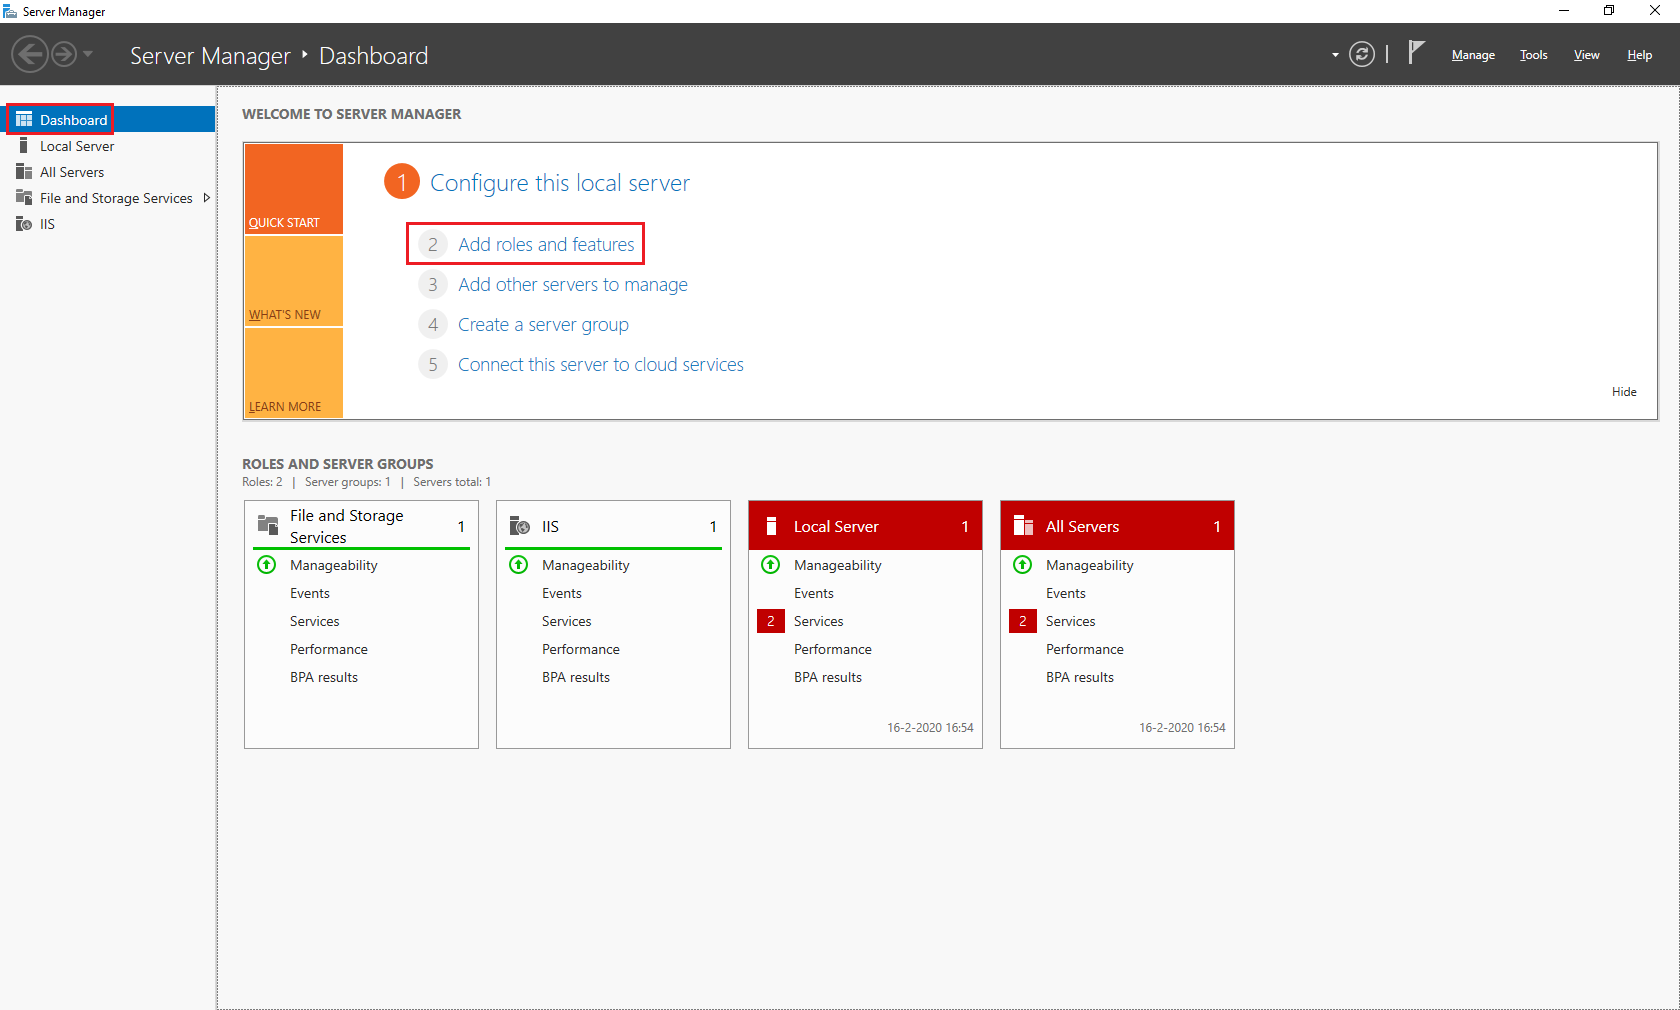
Open "Server Manager". Now click 2 Add roles and features"
-
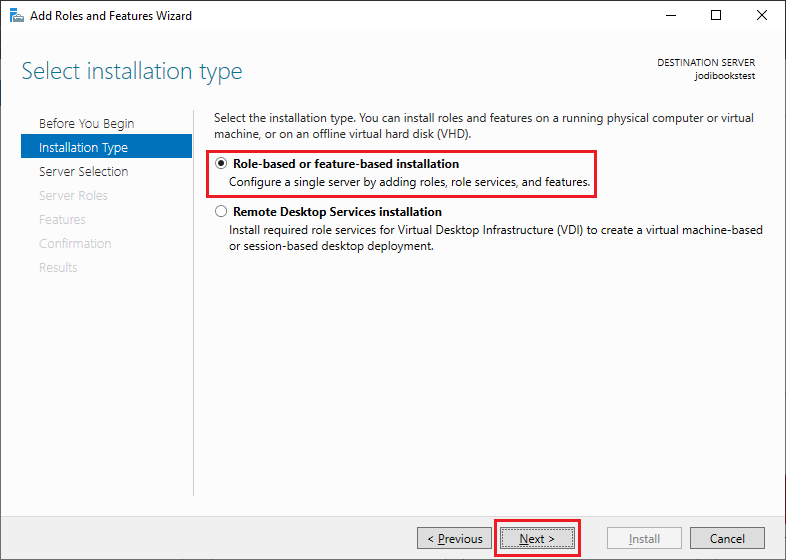
Select Role-based or feature-based installation and click next.
-
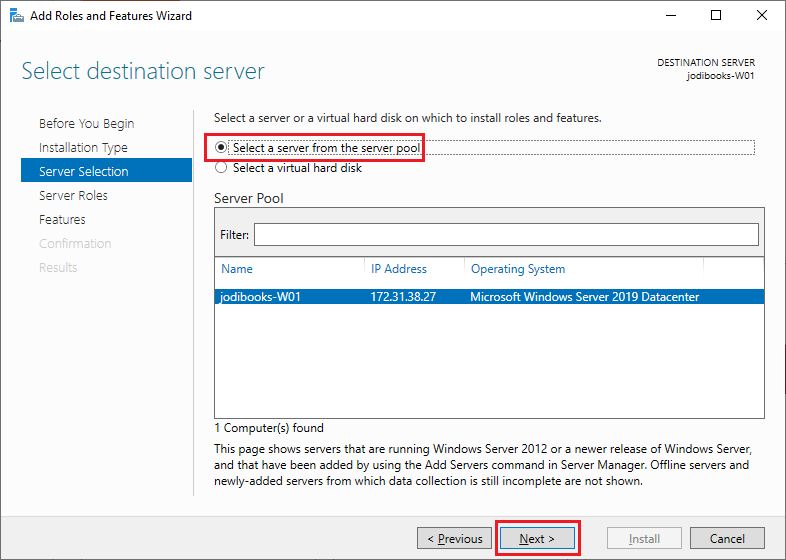
Choose Select a server from the server pool, select the
jodiWin2019server and click next.
-
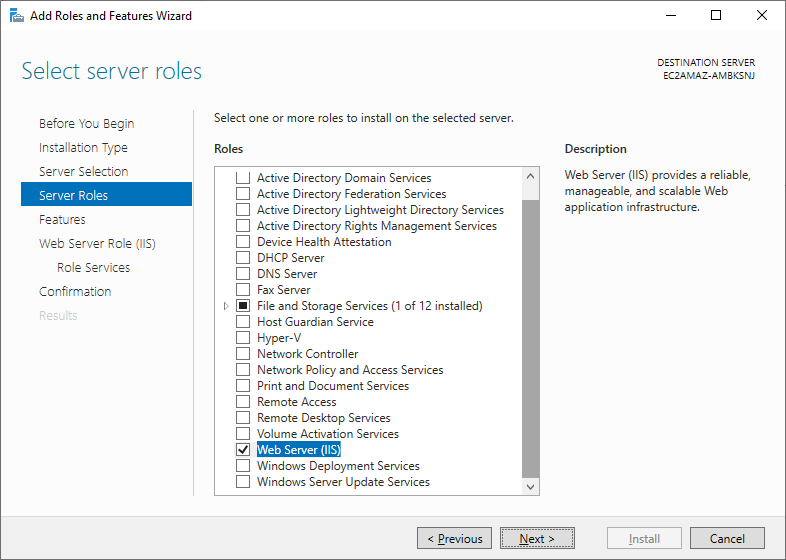
Scroll down to Web Server (IIS) and select the option.
-
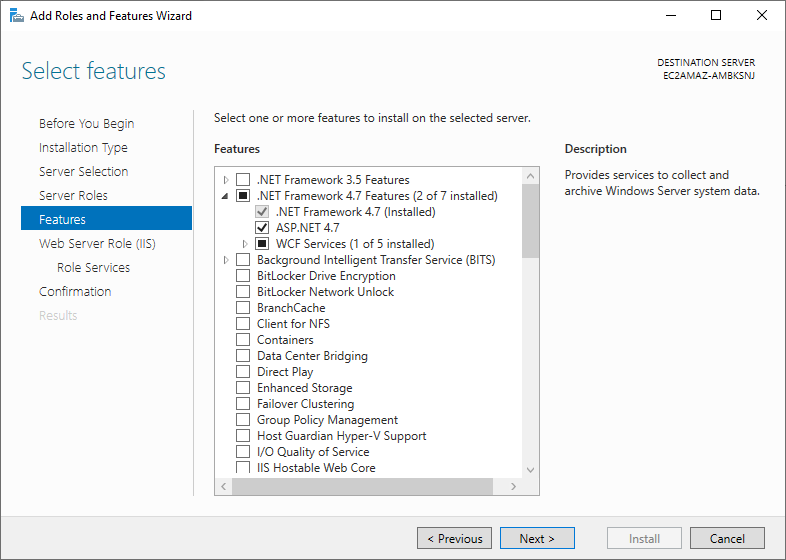
Click Features and select the following:
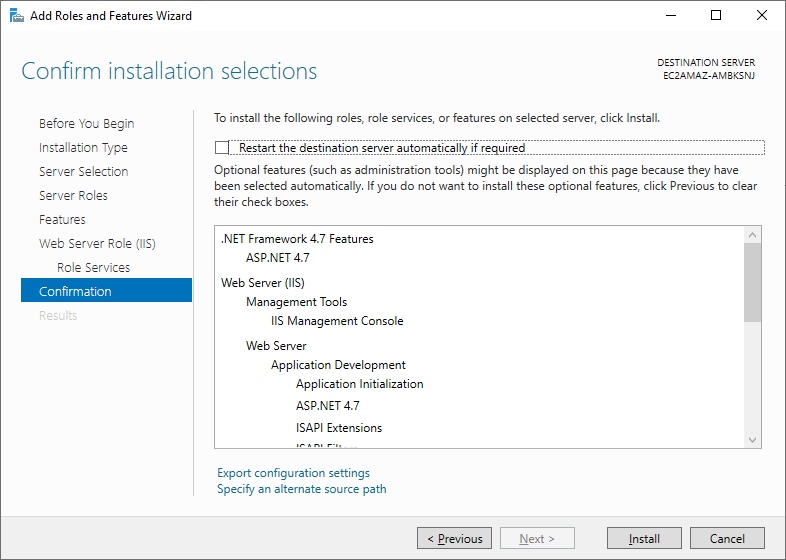
- .NET Framework 4.7 Features
- ASP.NET 4.7
- ASP.NET 4.7
- .NET Framework 4.7 Features
-
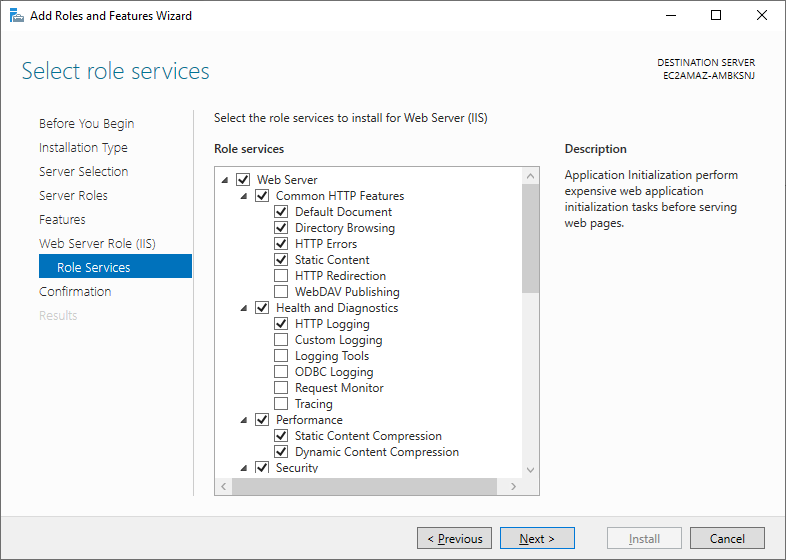
Click Role Services and select the following:
- Web Server
- Common HTTP Features
- Default Document
- Directory Browsing
- HTTP Errors
- Static Content
- HTTP Redirection
- Default Document
- Health and Diagnostics
- HTTP Logging
- Performance
- Static Content
- Dynamic Content
- Application Development
- .NET Extensibility 4.7
- Application Initialization
- ASP.NET 4.7
- ISAPI Extensions
- ISAPI Filters
- Management Tools
- IIS Management Console
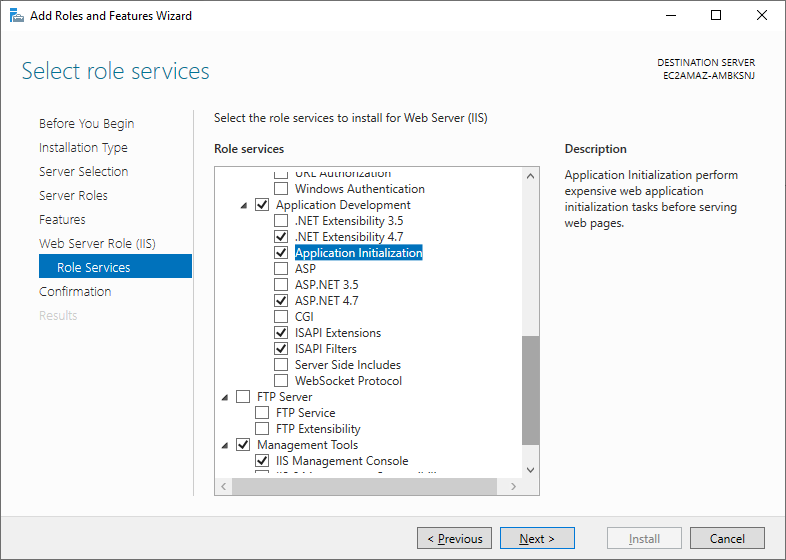
- IIS Management Console
- Common HTTP Features
- Web Server
-
Press Install to install IIS.
¶ ipmitool
¶ Installation
apt update && apt install ipmitool
¶ Configuration
Create a user with ipmi permissions only in Dell iDrac or HP iLO
¶ Commands
https://www.tzulo.com/crm/knowledgebase/47/IPMI-and-IPMITOOL-Cheat-sheet.html
¶ Get all sensor data
ipmitool -I lanplus -H <iDRAC IP> -U <iDRAC user> -P <iDRAC password> sdr list full
¶ Get temperature(s)
ipmitool -I lanplus -H <iDRAC IP> -U <iDRAC user> -P <iDRAC password> sdr type Temperature
¶ Get fanspeed(s)
ipmitool -I lanplus -H <iDRAC IP> -U <iDRAC user> -P <iDRAC password> sdr type Fan
Or
ipmitool -I lanplus -H <iDRAC IP> -U <iDRAC user> -P <iDRAC password> sdr get Fan1 Fan2 | grep "Sensor Reading"
¶ Get power supply info
ipmitool -I lanplus -H <iDRAC IP> -U <iDRAC user> -P <iDRAC password> sdr type 'Power Supply'
¶ Enable auto fan control / disable static mode (Dell)
ipmitool -I lanplus -H <iDRAC IP> -U <iDRAC user> -P <iDRAC password> raw 0x30 0x30 0x01 0x01
¶ Enable static fan control / disable auto mode (Dell)
ipmitool -I lanplus -H <iDRAC IP> -U <iDRAC user> -P <iDRAC password> raw 0x30 0x30 0x01 0x00
¶ Set fanspeed 20% (Dell)
See the script for other speeds. The last 4 characters differ.
ipmitool -I lanplus -H <iDRAC IP> -U <iDRAC user> -P <iDRAC password> raw 0x30 0x30 0x02 0xff 0x14
¶ Change system state
ipmitool -H <iDRAC IP> -U <iDRAC user> -P <iDRAC password> chassis power <status|on|off|cycle|reset>
¶ Netdata
¶ Installation
-
Install on a single machine (for cloud see below):
bash <(curl -Ss https://my-netdata.io/kickstart-static64.sh) --stable-channel -
Reinstall:
bash <(curl -Ss https://my-netdata.io/kickstart-static64.sh) --stable-channel --reinstall -
Uninstall:
/opt/netdata/usr/libexec/netdata/netdata-uninstaller.sh --force --yes --env /opt/netdata/etc/netdata/.environment
¶ Netdata cloud
To add a machine to your cloud, you need your claim-token and room key.
-
Login to your Netdata cloud dashboard
-
Select the room you want to add your machine to
-
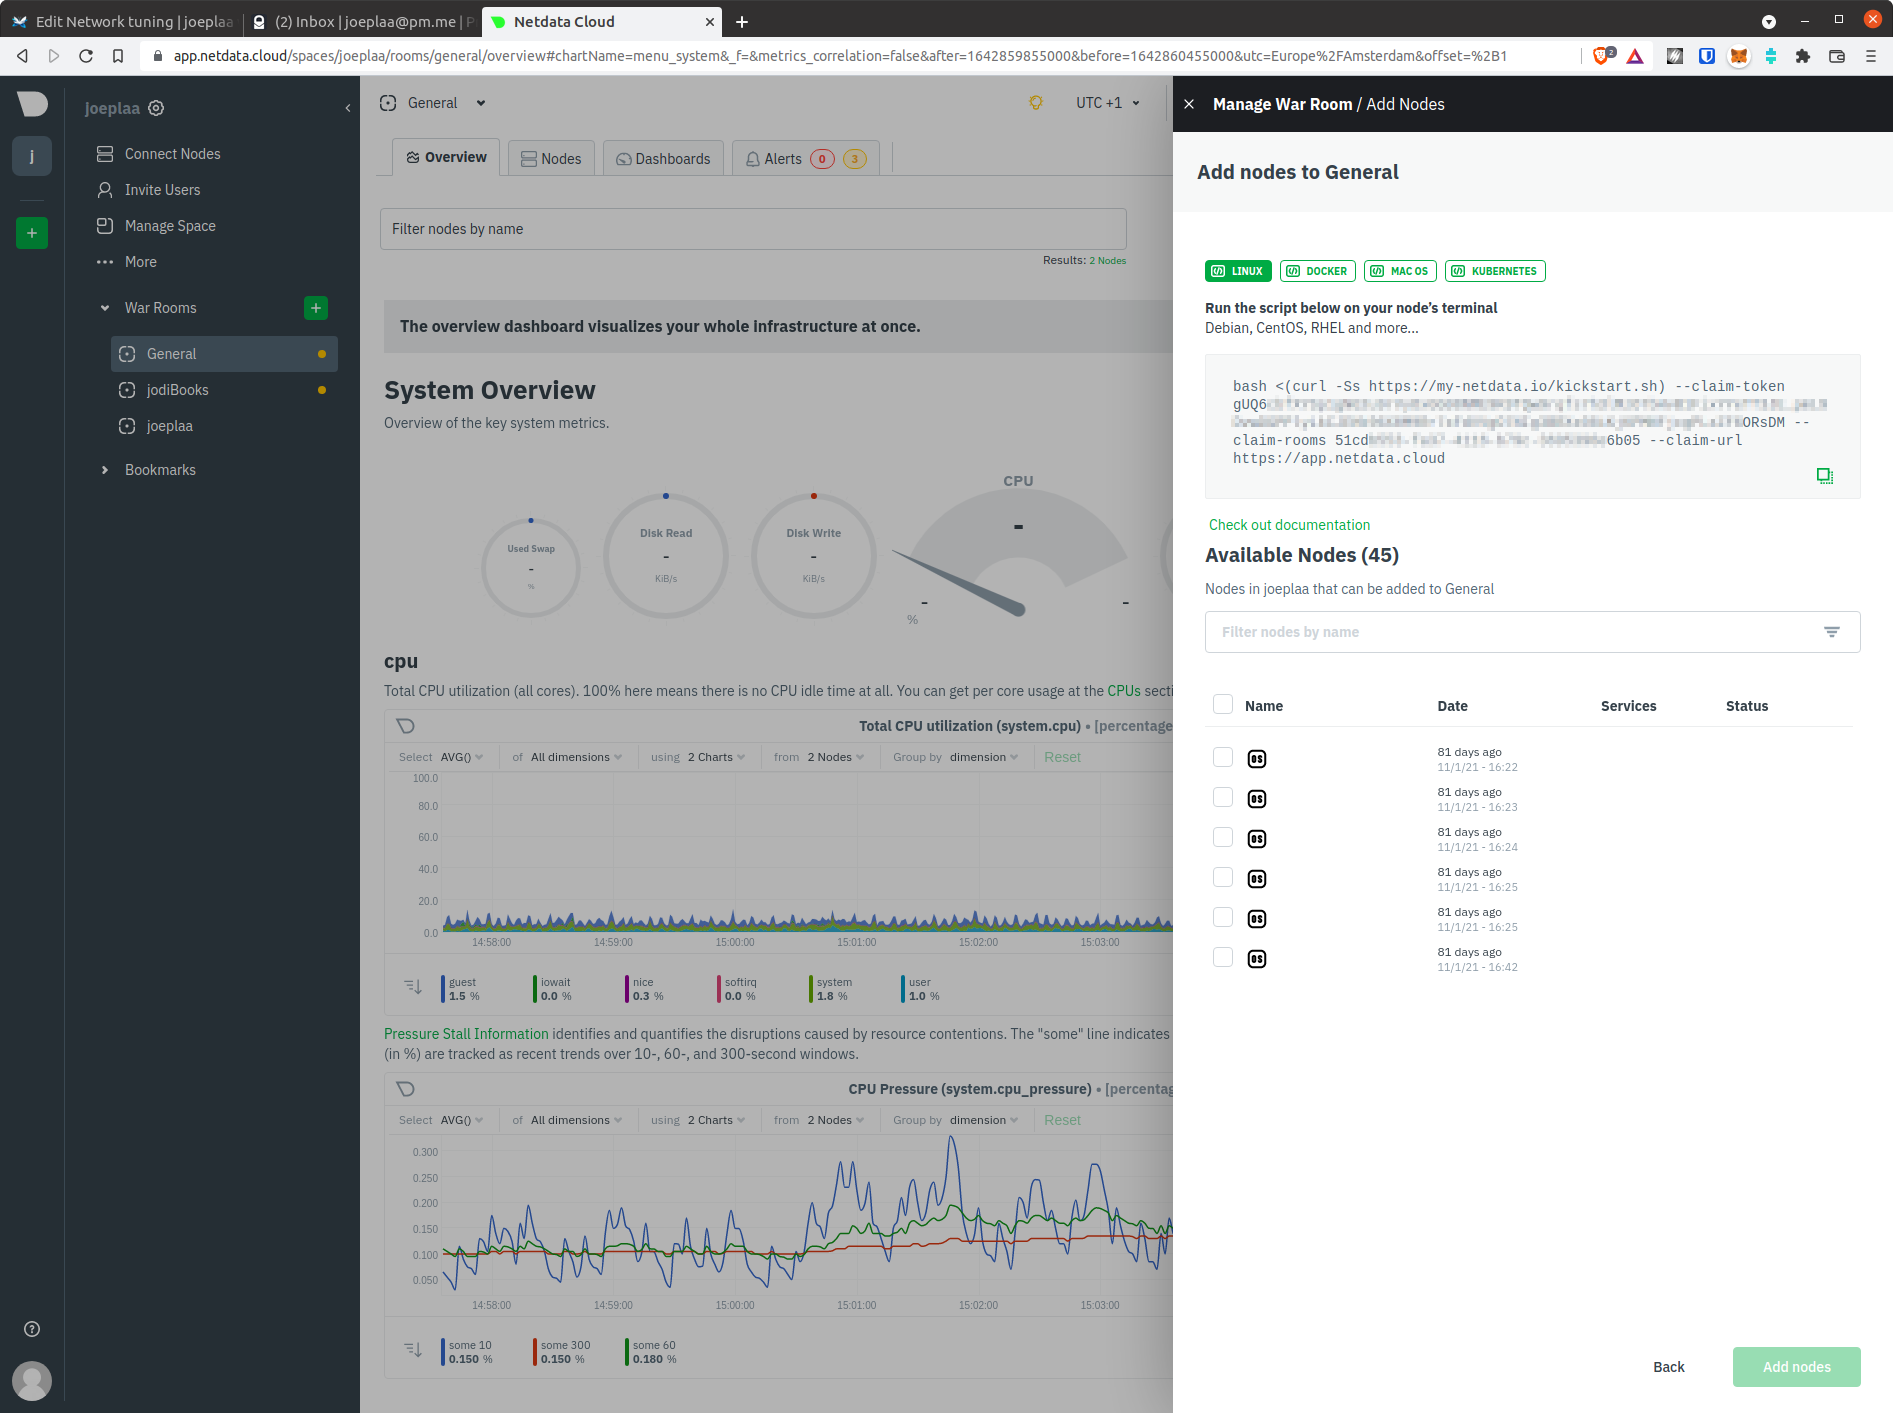
Open the menu by clicking the room name at the top (e.g.
General) and selectAdd Nodes

-
An info panel will slide from the right displaying the full link to add your node to this room. However, we only want to copy the
claim-tokenandroom keyand use them in the commands below.
Add machine to cloud by one of the 3 methods below.
-
Install and claim in your Netdata cloud:
bash <(curl -Ss https://my-netdata.io/kickstart-static64.sh) --stable-channel --claim-token <claim_token> --claim-rooms <room_key> --claim-url https://app.netdata.cloud -
Claim (add) a machine to your cloud:
/opt/netdata/bin/netdata-claim.sh -token=<claim_token> -rooms=<room_key> -url=https://app.netdata.cloud -
Reconnect a machine to your cloud:
rm -rf /opt/netdata/var/lib/netdata/cloud.d
sudo apt update && sudo apt install uuid-runtime
/opt/netdata/bin/netdata-claim.sh -token=<claim_token> -rooms=<room_key> -url=https://app.netdata.cloud -id=$(uuidgen)
¶ Netdata on Windows
¶ On Windows machine
Download the Prometheus Windows exporter. Files can be found on the releases page.
msiexec /i <path-to-msi-file> ENABLED_COLLECTORS="cpu,memory,net,logical_disk,os,system,logon"
¶ On Unix host
cd /opt/netdata/etc/netdata/
./edit-config go.d/wmi.conf
Scroll to the jobs: section and add the Windows machine. It should look something like this:
# [ JOBS ]
# JOBS allow you to collect values from multiple sources.
# Each source will have its own set of charts.
#
# IMPORTANT:
#  - Parameter 'name' is mandatory.
#  - Jobs with the same name are mutually exclusive. Only one of them will be allowed running at any time.
#
# This allows autodetection to try several alternatives and pick the one that works.
# Any number of jobs is supported.
#
# The JOBS section format:
#
jobs:
  - name: jodiWin10
    url: http://jodiWin10:9182/metrics

  - name: jodiWin2019
    url: http://jodiWin2019:9182/metrics
#
¶ Configuration
¶ Silence alarms
Source:
https://learn.netdata.cloud/guides/monitor/stop-notifications-alarms
Some alarms can become annoying, because you cannot fix them and accept the risks or they can be considered false positives. I haven't found how to silence (specific) an alarm for a specific cgroup (qemu and lxc). So for now I can only silence an alarm completely.
In my case the FritzBox router keeps sending out discovery packets to find other "Fritz" hardware in the network like homeplugs. This results in packets being dropped by all virtual network interfaces (bridges) on my Proxmox machines. Therefor I disabled inbound_packets_dropped_ratio and outbound_packets_dropped_ratio. I'm not running mission critical applications, so I accept the risk here.
So for this case I have to edit the net.conf file that contains all the network metric data.
cd /opt/netdata/etc/netdata/
./edit-config health.d/net.conf
Scroll to the metric/alarm you want to silence. And change to: sysadmin to to:silent.
template: inbound_packets_dropped_ratio
       on: net.packets
    class: Errors
     type: System
component: Network
       os: linux
    hosts: *
 families: !net* !wl* *
   lookup: sum -10m unaligned absolute of received
     calc: (($inbound_packets_dropped != nan AND $this > 10000) ? ($inbound_packets_dropped * 100 / $this) : (0))
    units: %
    every: 1m
     warn: $this >= 2
    delay: up 1m down 1h multiplier 1.5 max 2h
     info: ratio of inbound dropped packets for the network interface $family over the last 10 minutes
       to: silent
¶ Nginx
Sources:
https://nginx.org/en/docs/
https://www.nginx.com/resources/wiki/start/topics/tutorials/install/#ubuntu-ppa
¶ Installation
sudo add-apt-repository ppa:nginx/stable
sudo apt update && sudo apt install nginx
¶ Configuration
¶ Add a website
-
Create config file, see examples.
sudo nano /etc/nginx/sites-available/examplesalon.nl.conf -
Enable config
sudo ln -s /etc/nginx/sites-available/examplesalon.com.conf /etc/nginx/sites-enabled/examplesalon.com.conf -
Check for errors
sudo nginx -t -
Reload config
sudo systemctl reload nginx
¶ Harden Nginx (Slowloris)
¶ Mitigation
We can mitigate the attack in some network related approach like:
- Limiting the number of connections from one IP
- Lower the timed out wait time for each http connection
However, by using proxies (such as TOR network) to make connections appear to be from different IPs, the attacker can easily by pass these network defense approaches. After that, 1024 connections is something that is pretty easy to achieve.
Therefore, to protect NGINX from this type of attack, we should optimize the default configurations mentioned above.
¶ Config #1: NGINX worker connections limit
Open nginx configuration file, which usually located at /etc/nginx/nginx.conf, and change this setting:
events {
    worker_connections 768;
}
to something larger like this:
events {
    worker_connections 100000;
}
This settings will tell NGINX to allow each of its worker process to handle up to 100k connections.
¶ Config #2: system open file limit
Even we told NGINX to allow each of its worker process to handle up to 100k connections, the number of connections may be further limited by the system open file limit.
To check the current system file limit:
cat /proc/sys/fs/file-max
Normally this number would be 10% of the system’s memory, i.e. if our system has 2GB of RAM, this number will be 200k, which should be enough. However, if this number is too small, we can increase it. Open /etc/sysctl.conf, change the following line to (or add the line if it’s not already there)
fs.file-max = 500000
Apply the setting:
sudo sysctl -p
Check the setting again:
cat /proc/sys/fs/file-max
The output should be:
fs.file-max = 500000
¶ Config #3: user’s open file limit
Besides system-wide open file limit as mentioned in Config #2, Linux system also limit the number of open file per user. By default, NGINX worker processes will run as www-data user or nginx user, and is therefore limited by this number.
To check the current limit for nginx’s user (www-data in the example below), first we need to switch to www-data user:
sudo su - www-data -s /bin/bash
By default, www-data user is not provided with a shell, therefore to run commands as www-data, we must provide a shell with the -s argument and provide the /bin/bash as the shell.
After switching to www-data user, we can check the open file limit of that user:
ulimit -n
To check the hard limit:
ulimit -Hn
To check the soft limit:
ulimit -Sn
By default, the soft limit is 1024 and hard limit is 4096, which is too small to survive a Slowloris attack.
To increase this limit, open /etc/security/limits.conf and add the following lines (remember to switch back to a sudo user so that we can edit the file):
*                soft    nofile          102400
*                hard    nofile          409600
www-data         soft    nofile          102400
www-data         hard    nofile          409600
¶ Config #4: NGINX’s worker number of open files limit
Even when the ulimit -n command for www-data returns 102400, the nginx worker process open file limit is still 1024.
To verify the limit applied to the running worker process, first we need to find the process id of the worker process by listing the running worker processes:
ps aux | grep nginx
root      1095  0.0  0.0  85880  1336 ?        Ss   18:30   0:00 nginx: master process /usr/sbin/nginx
www-data  1096  0.0  0.0  86224  1764 ?        S    18:30   0:00 nginx: worker process
www-data  1097  0.0  0.0  86224  1764 ?        S    18:30   0:00 nginx: worker process
www-data  1098  0.0  0.0  86224  1764 ?        S    18:30   0:00 nginx: worker process
www-data  1099  0.0  0.0  86224  1764 ?        S    18:30   0:00 nginx: worker process
then take one of the process ids (e.g. 1096 in the above example output), and then check the limit currently applied to the process (remember to change 1096 to the right process id in your server):
cat /proc/1096/limits | grep open
You can see that the max open files is still 1024:
Max open files 1024 4096 files
That is because NGINX itself also limits the number of open files by default to 1024.
To change this, open NGINX configuration file (/etc/nginx/nginx.conf) and add/edit the following line:
worker_rlimit_nofile 102400;
Make sure that this line is put at the top level configurations and not nested in the events configuration like worker_connections.
The final nginx.conf would look something like this:
user www-data;
worker_processes auto;
pid /run/nginx.pid;
worker_rlimit_nofile 102400;

events {
    worker_connections 100000;
}
...
Restart NGINX, then verify the limit applied to the running worker process again. The Max open files should now change to 102400.
Congratulations! Now your NGINX server can survive a Slowloris attack. You can argue that the attacker can still make more than 100k open connections to take down the target web server, but that would become more of any DDoS attack than Slowloris attack specifically.
Source:
SLOWLORIS DOS ATTACK AND MITIGATION ON NGINX WEB SERVER
¶ Site configuration
¶ Block URL Access (wp-admin/wp-login.php) To All Except One IP Address
Source: https://www.cyberciti.biz/faq/nginx-block-url-access-all-except-one-ip-address/
location ~ ^/(wp-admin|wp-login\.php) {
    allow 1.2.3.4;
    deny all;
}
¶ Mitigating DDoS Attacks
Sources:
https://www.nginx.com/blog/mitigating-ddos-attacks-with-nginx-and-nginx-plus/
https://www.nginx.com/blog/nginx-protect-cve-2015-1635/
¶ Limiting the Rate of Requests
limit_req_zone $binary_remote_addr zone=one:10m rate=30r/m;

server {
    # ...
    location /login.html {
        limit_req zone=one;
    # ...
    }
}
¶ Limiting the Number of Connections
limit_conn_zone $binary_remote_addr zone=addr:10m;

server {
    # ...
    location /store/ {
        limit_conn addr 10;
        # ...
    }
}
¶ Closing Slow Connections
server {
    client_body_timeout 5s;
    client_header_timeout 5s;
    # ...
}
¶ Identifying and Handling Reconnaissance Traffic
server {
    listen 80;

    if ($http_range ~ "d{9,}") {
        return 444;
    }

    location / {
        proxy_pass http://windowsserver:80;
    }
}
¶ Reverse Proxy
Sources:
https://docs.nginx.com/nginx/admin-guide/load-balancer/using-proxy-protocol/
https://docs.nginx.com/nginx/admin-guide/security-controls/securing-http-traffic-upstream/
https://linuxize.com/post/nginx-reverse-proxy/
https://www.tweaked.io/guide/nginx-proxying/
¶ Examples
Config examples for reverse proxies are listed here.
¶ Add websocket support
Some reverse proxies need websockets enabled, (pfSense, Proxmox, TruenNAS). Add part below in the http section of /etc/nginx/nginx.conf:
# WebSocket support
map $http_upgrade $proxy_connection
{
    default upgrade;
    '' close;
}
map $http_upgrade $connection_upgrade {
    default upgrade;
    '' close;
}
# CloudFront specific Websocket support
map $http_x_forwarded_proto $proxy_x_forwarded_proto
{
    default $http_x_forwarded_proto;
    '' $scheme;
}
¶ Reading the client IP address
¶ "Normal" reverse proxy
real_ip_header X-Forwarded-For;
set_real_ip_from 127.0.0.1;

# Proxy
location / {
    ...
    proxy_set_header X-Real-IP $remote_addr;
    proxy_set_header X-Forwarded-For $proxy_add_x_forwarded_for;
    ...
}
¶ LXD reverse proxy
When using a reverse proxy in an LXD, the proxy can use proxy_protocol to get the source IP.
The proxy adds proxy_protocol to the listen statement:
listen 80 proxy_protocol;

real_ip_header X-Forwarded-For;
set_real_ip_from 127.0.0.1;

# Proxy
location / {
    ...
    proxy_set_header X-Real-IP $remote_addr;
    proxy_set_header X-Forwarded-For $proxy_add_x_forwarded_for;
    ...
}
On the host running LXD a port mapping is made with proxy_protocol enabled:
lxc config device add proxy myport80 proxy listen=tcp:0.0.0.0:80 connect=tcp:127.0.0.1:80 proxy_protocol=true
lxc config device add proxy myport443 proxy listen=tcp:0.0.0.0:443 connect=tcp:127.0.0.1:443 proxy_protocol=true
Sources:
https://www.linode.com/docs/guides/beginners-guide-to-lxd-reverse-proxy/
https://blog.simos.info/how-to-use-the-lxd-proxy-device-to-map-ports-between-the-host-and-the-containers/
¶ Node.js
¶ Installation
¶ From repository
curl -sL https://deb.nodesource.com/setup_14.x | sudo bash -
sudo apt update && sudo apt install nodejs
¶ With nvm
nvm or Node Version Manager makes it easy to switch between Node.js versions. Mostly this is the way to install for developers. When running in production, you don't switch versions regularly, so use the installation method above.
¶ Install
Go to the nvm github page to get the latest version and change the download command accordingly.
curl -o- https://raw.githubusercontent.com/nvm-sh/nvm/v0.39.1/install.sh | bash
source ~/.bashrc
¶ nvm commands
¶ List remote Node versions
nvm ls-remote
nvm ls-remote --lts
¶ Install Node version
For codename and versions: https://nodejs.org/en/about/releases/
nvm install --lts
nvm install lts/argon
¶ Use Node version
nvm use --lts
nvm use lts/argon
¶ Rng-tools
Netdata lowest_entropy
This alert presents the minimum amount of entropy in the kernel entropy pool in the last 5 minutes.Low entropy can lead to a reduction in the quality of random numbers produced by /dev/randomand /dev/urandom.
The Netdata Agent checks for the minimum entropy value in the last 5 minutes. The alert gets raised into warning if the value < 100, and cleared if the value > 200.
¶ Installation
apt update && apt install rng-tools
service rngd enable
service rngd start
¶ UFW
Sources:
https://help.ubuntu.com/community/UFW
https://www.digitalocean.com/community/tutorials/how-to-set-up-a-firewall-with-ufw-on-ubuntu-20-04
https://www.digitalocean.com/community/tutorials/ufw-essentials-common-firewall-rules-and-commands
https://serverfault.com/questions/925281/ufw-comment-existing-rule
¶ Installation
sudo apt update && sudo apt install ufw
¶ Configuration / commands
¶ Allow all outgoing traffic
sudo ufw default allow outgoing
¶ Deny all incoming traffic
sudo ufw default deny incoming
¶ Allow applications
Get a list of services:
cat /etc/services
¶ SSH
sudo ufw allow ssh
¶ NGINX
sudo ufw allow 'Nginx Full'
¶ Allow/deny rules
Change allow to deny if you want to deny.
¶ Specific port
sudo ufw allow <port>
sudo ufw allow 53
¶ Specific Port Ranges
sudo ufw allow <port-range>/<optional: protocol>
sudo ufw allow 50-55/tcp
¶ Specific port and protocol
sudo ufw allow <port>/<optional: protocol>
sudo ufw allow 53/tcp
sudo ufw allow 53/udp
¶ Specific IP address
sudo ufw allow from <ip address>
sudo ufw allow from 12.34.56.78
¶ Specific IP subnet
sudo ufw allow from <subnet>
sudo ufw allow from 192.168.1.0/24
¶ Specific IP and port
sudo ufw allow from <target> to <destination> port <port number>
sudo ufw allow from 192.168.0.4 to any port 22
¶ Specific IP, port and protocol
sudo ufw allow from <target> to <destination> port <port number> proto <protocol name>
sudo ufw allow from 192.168.0.4 to any port 22 proto tcp
¶ Enable firewall
sudo ufw enable
¶ Check status
sudo ufw status verbose
¶ Delete a rule
¶ By actual rule
sudo ufw delete allow 80
¶ By rule number
sudo ufw status numbered
sudo ufw delete 2
¶ Comment a rule
This command either updates an existing rule or create a new one.
sudo ufw allow from 10.0.0.0/24 to any port 1234 comment "Comment"
¶ WordPress
¶ Requirements
Todo
¶ Installation
-
Install dependencies:
sudo apt update && sudo apt install -y software-properties-common sudo add-apt-repository ppa:ondrej/php sudo add-apt-repository ppa:nginx/stable sudo apt update && sudo apt install nginx redis php8.1-fpm php8.1-mysql php8.1-redis php8.1-common php8.1-curl php8.1-dom php8.1-imagick php8.1-mbstring php8.1-zip php8.1-intl -
Update config files: Download zip-file and copy the files to the folders as in the archive: Download Wordpress Configuration.
-
Download and install WordPress:
wget https://wordpress.org/latest.tar.gz tar -xzvf latest.tar.gz cp -r wordpress/ /var/www/html rm -r wordpress latest.tar.gz -
Link to database in
wp-config.php:sudo nano /var/www/html/wp-config.php// ** MySQL settings - You can get this info from your web host ** // /** The name of the database for WordPress */ define( 'DB_NAME', 'database_name_here' ); /** MySQL database username */ define( 'DB_USER', 'username_here' ); /** MySQL database password */ define( 'DB_PASSWORD', 'password_here' ); /** MySQL hostname */ define( 'DB_HOST', 'localhost' ); -
Add secrets in
wp-config.php: Generate them here: https://api.wordpress.org/secret-key/1.1/salt/define('AUTH_KEY', 'B)>D }8E]ZM|7XT72cP.;{Ux^y}!E&!L,_zb)Sj:}O`z5s *yK/4pW!@S4exDmy}'); define('SECURE_AUTH_KEY', 'Sfsl9c3UkGVz.G>W*y1<5|se<m|Yw8P*jpUW|zlwXc*m@=PCJ|*KG:SJGUY 1M!Q'); define('LOGGED_IN_KEY', 'Y;M*#U.-d}|dU|U33,0``E[Vx^EZ@^Z<yggv[!<`b5lyO7.|0++KblY:H3<C=mq6'); define('NONCE_KEY', 'mF;cPsy48{SO(Jz9Y%fHjoGILIANQ|5-^ErIaw.B,Tje*m:uj+|o$yW:-Bw:TmZ['); define('AUTH_SALT', 'R4XfVmPo6Aq(T&6Rw1+-#tw;^Fj.^oZ=I5>,SLlC2/9qsy|,yf4z 4#6CNK(|i2{'); define('SECURE_AUTH_SALT', ' -vUqT|1Fh*IYV9!LMW&l6*jb/, sQ; G^U=1CW7)~_CPi}]T;WE/<_r%3lND-ii'); define('LOGGED_IN_SALT', 'M-p<i)0!_*3}]jNar G8|[#:t!N-Z&9r#N_-b!Y3KXECT<QN1 8ya3k$Ua4WCaW`'); define('NONCE_SALT', 'OC4@ J-j}lCX6-D?Cq(.W+YHf*PbI>^^oW|_P;|]o@xCNZGm~G*!0V(d73wxYDAD'); -
Run the install script: https://example.com/wp-admin/install.php
Sources:
https://wordpress.org/support/article/how-to-install-wordpress/#detailed-instructions
https://www.wpintense.com/2018/10/20/installing-the-fastest-wordpress-stack-ubuntu-18-mysql-8/
¶ Configuration
Todo
¶ Yarn
¶ Installation
¶ From repository
curl -sS https://dl.yarnpkg.com/debian/pubkey.gpg | sudo apt-key add -
echo "deb https://dl.yarnpkg.com/debian/ stable main" | sudo tee /etc/apt/sources.list.d/yarn.list
sudo apt update && sudo apt install --no-install-recommends yarn
¶ With npm
npm install --global yarn
¶ Zenmap (+ Nmap)
¶ Installation
sudo apt update && sudo apt install nmap
wget http://archive.ubuntu.com/ubuntu/pool/universe/p/pygtk/python-gtk2_2.24.0-5.1ubuntu2_amd64.deb
sudo apt install ./python-gtk2_2.24.0-5.1ubuntu2_amd64.deb
wget http://archive.ubuntu.com/ubuntu/pool/universe/n/nmap/zenmap_7.60-1ubuntu5_all.deb
sudo apt install ./zenmap_7.60-1ubuntu5_all.deb