¶ Self-signed certificates
¶ In Linux command line
-
Create a CA (certificate authority):
openssl genrsa -des3 -out jodiBooksCA.key 2048 openssl req -x509 -new -nodes -key jodiBooksCA.key -sha256 -days 730 -out jodiBooksCA.pemThe second command asks a few question. The output with answers should show something like this:
joep@PCJOEP:~$ openssl genrsa -des3 -out jodiBooksCA.key 2048 Generating RSA private key, 2048 bit long modulus (2 primes) ...............................................+++++ ................................................+++++ e is 65537 (0x010001) Enter pass phrase for jodiBooksCA.key: Verifying - Enter pass phrase for jodiBooksCA.key: joep@PCJOEP:~$ openssl req -x509 -new -nodes -key jodiBooksCA.key -sha256 -days 730 -out jodiBooksCA.pem Enter pass phrase for jodiBooksCA.key: You are about to be asked to enter information that will be incorporated into your certificate request. What you are about to enter is what is called a Distinguished Name or a DN. There are quite a few fields but you can leave some blank For some fields there will be a default value, If you enter '.', the field will be left blank. ----- Country Name (2 letter code) [AU]:NL State or Province Name (full name) [Some-State]:North-Brabant Locality Name (eg, city) []:Eindhoven Organization Name (eg, company) [Internet Widgits Pty Ltd]:jodiBooks B.V. Organizational Unit Name (eg, section) []:. Common Name (e.g. server FQDN or YOUR name) []:jodibooks.com Email Address []:info@jodibooks.com -
Now create a signed certificate:
NAME=jodibooks.com openssl genrsa -out $NAME.key 2048 openssl req -new -key $NAME.key -out $NAME.csr >$NAME.ext cat <<-EOF authorityKeyIdentifier=keyid,issuer basicConstraints=CA:FALSE keyUsage = digitalSignature, nonRepudiation, keyEncipherment, dataEncipherment subjectAltName = @alt_names [alt_names] DNS.1 = dev-api.$NAME DNS.2 = dev-beauty.$NAME DNS.3 = dev-mgmt.$NAME DNS.4 = dev-payments.$NAME EOF openssl x509 -req -in $NAME.csr -CA jodiBooksCA.pem -CAkey jodiBooksCA.key -CAcreateserial -out $NAME.crt -days 730 -sha256 -extfile $NAME.ext openssl pkcs12 -export -out $NAME.pfx -inkey $NAME.key -in $NAME.crtSome commands ask for additional input. The output with answers should show something like this:
joep@PCJOEP:~$ NAME=jodibooks.com
joep@PCJOEP:~$ openssl genrsa -out $NAME.key 2048
Generating RSA private key, 2048 bit long modulus (2 primes)
.......................................................+++++
.....+++++
e is 65537 (0x010001)
joep@PCJOEP:~$ openssl req -new -key $NAME.key -out $NAME.csr
You are about to be asked to enter information that will be incorporated
into your certificate request.
What you are about to enter is what is called a Distinguished Name or a DN.
There are quite a few fields but you can leave some blank
For some fields there will be a default value,
If you enter '.', the field will be left blank.
-----
Country Name (2 letter code) [AU]:NL
State or Province Name (full name) [Some-State]:North-Brabant
Locality Name (eg, city) []:Eindhoven
Organization Name (eg, company) [Internet Widgits Pty Ltd]:jodiBooks B.V.
Organizational Unit Name (eg, section) []:
Common Name (e.g. server FQDN or YOUR name) []:jodibooks.com
Email Address []:info@jodibooks.com

Please enter the following 'extra' attributes
to be sent with your certificate request
A challenge password []:
An optional company name []:
joep@PCJOEP:~$ >$NAME.ext cat <<-EOF
> authorityKeyIdentifier=keyid,issuer
> basicConstraints=CA:FALSE
> keyUsage = digitalSignature, nonRepudiation, keyEncipherment, dataEncipherment
> subjectAltName = @alt_names
> [alt_names]
> DNS.1 = dev-api.$NAME
> DNS.2 = dev-beauty.$NAME
> DNS.3 = dev-mgmt.$NAME
> DNS.4 = dev-payments.$NAME
> EOF
joep@PCJOEP:~$ openssl x509 -req -in $NAME.csr -CA jodiBooksCA.pem -CAkey jodiBooksCA.key -CAcreateserial -out $NAME.crt -days 730 -sha256 -extfile $NAME.ext
Signature ok
subject=C = NL, ST = North-Brabant, L = Eindhoven, O = jodiBooks B.V., CN = jodibooks.com, emailAddress = info@jodibooks.com
Getting CA Private Key
Enter pass phrase for jodiBooksCA.key:
joep@PCJOEP:~$ openssl pkcs12 -export -out $NAME.pfx -inkey $NAME.key -in $NAME.crt
Enter Export Password:
Verifying - Enter Export Password:
¶ Add certificate authority to browser
- Chromium based: Open Brave browser and browse to
brave://settings/certificates(changebravetochromeoredgedepending on the exact browser you use). Now add our created CA as an authority. Select "Trust this CA to identify websites". - Firefox: Open browser and browse to
about:preferences#privacy. Scroll down and click “View Certificates”. Add our created CA as authority. Select "Trust this CA to identify websites".
Sources:
Getting Chrome to accept self-signed localhost certificate
Create a .pfx/.p12 Certificate File Using OpenSSL - SSL.com
¶ Hosting with IIS
¶ Installation
¶ Configure configuration
¶ Add a self-signed certificate
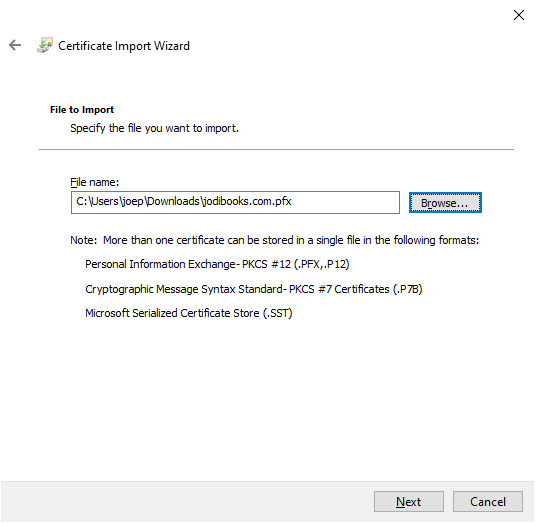
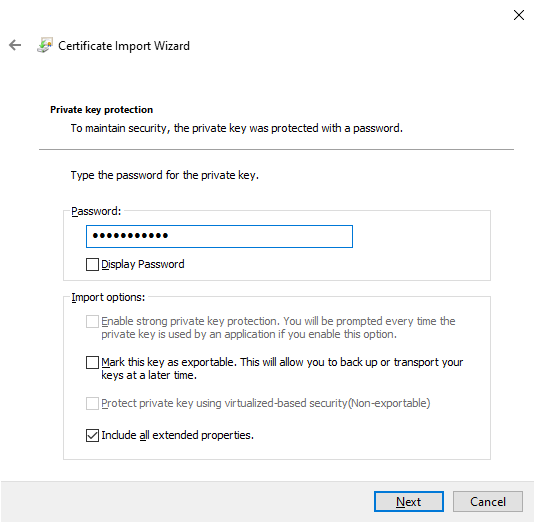
- Copy the .PFX key to your Windows machine.
- Open start menu and search for
certand open "Manage computer certificates". - Go to "Personal" → "Certificates" and import the certificate.
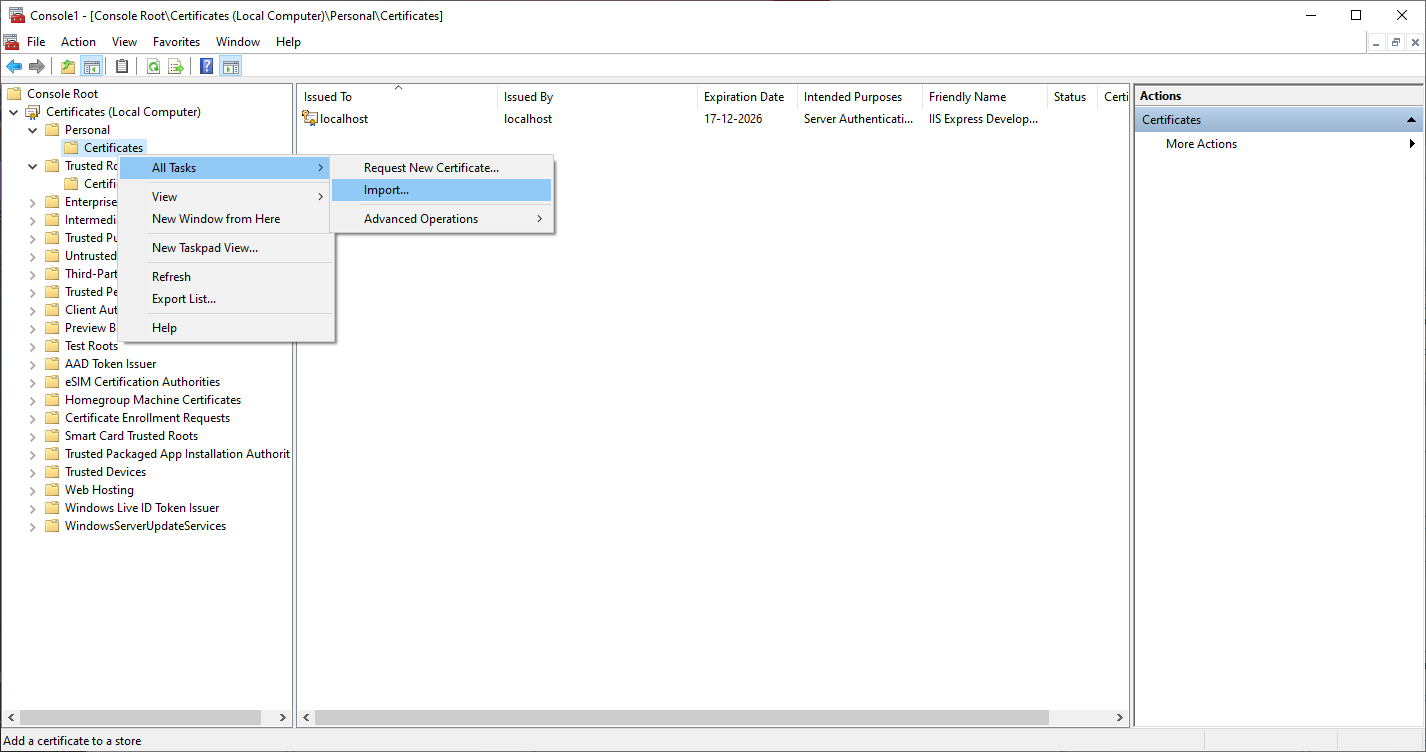

- Now copy this certificate to "Trusted Root Certification Authorities"
- Import
jodiBooksCA.peminto "Trusted Root Certification Authorities"
¶ Add apps
- Create application pool, for example
jodibooks. - Add your website/application. Right-click "Sites" in the left pane and click "Add Website...". Make sure you select the app-pool
jodibooks. Add a "http binding" to the domain/website on port80. - Add an SSL binding to the site. Select the website and in the right pane click "bindings". Now click "Add..." and add an https binding to the domain. Select "Require Server Name Indication" and choose the appropriate SSL certificate.
- For internal testing create one yourself: self-signed certificate
- For production create one with LetsEncrypt
¶ File permissions
IIS needs read permissions on the application files to serve the applications. It needs Full control to write new files like log files. This can be set by adding the usr IIS_IUSRS to folder containing the application.
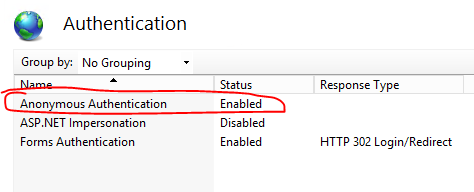
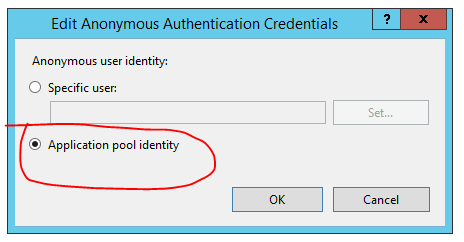
¶ Error: IIS does not serve CSS/JS files
-
On main page of IIS, find “Authentication”. Click “Anonymous Authentication” and in the right hand bar click “Edit”
-
Then, select “Application pool identity”
¶ Optimize performance
There are a lot of settings in IIS that affect the speed of your website. Apply at least these:
-
Enable Application Initialization (optional, only for performance testing)
- Click "Application Pools" and select the application pool
- Click "Advanced Settings" in the Actions pane
- Select "AlwaysRunning" from the Start Mode list
- Select the site or app and click "Advanced Settings" in the Actions pane
- Select "True" from the Preload Enabled list
-
Enable "Cache-control Header"
- Click site
- Click "Set Common Header" in the Actions pane
- Select "Expire Web content" option
- Select "After". Enter a value in days:
14. Increase or decrease depending on how often you update your site. - Click "OK"
Source:
https://port135.com/2019/05/17/recommendations-improve-iis-performance-fine-tuning/
¶ Exclude IIS folders from Windows Defender
-
Open "Virus & threat detection"
-
Under heading "Virus & threat protection settings" click Manage settings
-
Under heading "Exclusions" click Add or remove exclusions
-
Add folders:
C:\inetpub\temp\appPoolsC:\inetpub\temp\IIS Temporary Compressed FilesC:\inetpub\wwwrootC:\jodibooks\appsC:\Windows\Microsoft.Net\Framework64\v4.0.30319\ConfigC:\Windows\Microsoft.Net\Framework64\v4.0.30319\Temporary ASP.NET FilesC:\Windows\Microsoft.Net\Framework\v2.0.50727\CONFIGC:\Windows\Microsoft.Net\Framework\v4.0.3031\ConfigC:\Windows\Microsoft.Net\Framework\v4.0.3031\Temporary ASP.NET FilesC:\Windows\System32\inetsrv\Config
¶ Improve SSL cipher strength
There are many ciphers and encryption algorythms that can be used to communicate between the browser and IIS. Most of them are now deemed unsafe. To only use "safe" ones, use a tool called IISCrypto and select the Strict template. 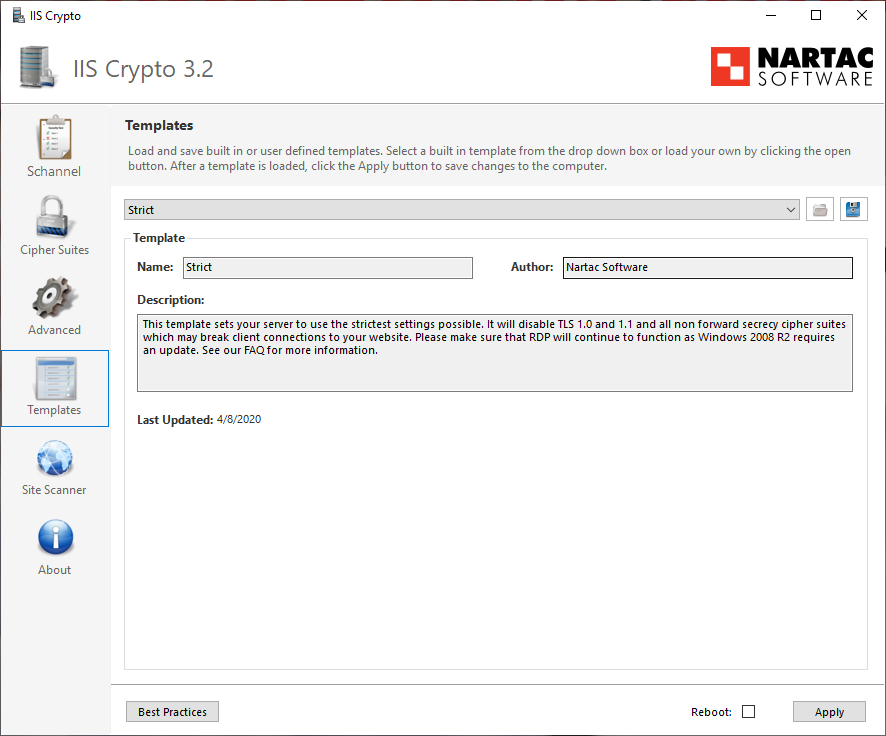
¶ Hosting with Nginx
¶ Installation
¶ Configuration
-
Add user to
www-datagroup:sudo usermod -aG www-data jodibooks -
Create a folder for the website and make sure your user owns the folder:
sudo mkdir /var/www/test-website sudo chown jodibooks:www-data /var/www/test-website -
Create Nginx config:
sudo nano /etc/nginx/sites-available/test-website.com.conf -
Copy and paste the content:
# Listen on port 443 (https) server { # use http2 for improved performance listen 443 ssl http2; # application folder location root /var/www/test-website; # search for thes index file types index index.html; # specify application domain name server_name test-website.com; # what to do with the request location / { # check if uri is valid otherwise return 404 try_files $uri $uri/ $uri.html =404; # tell crawlers/search engines to not index this application (uncomment for test websites) #add_header X-Robots-Tag "noindex, nofollow, nosnippet, noarchive"; } # error page file and location error_page 404 /404.html; location /404.html { internal; } # static file caching location ~* .(html|js|css|png|webp|jpg|jpeg|ico|svg|json|pdf)$ { expires max; log_not_found off; access_log off; } # log location and file name access_log /var/log/nginx/test-website_access.log; error_log /var/log/nginx/test-website_error.log; # SSL include /etc/letsencrypt/options-ssl-nginx.conf; ssl_dhparam /etc/letsencrypt/ssl-dhparams.pem; } # Listen on port 80 (http) server { # listen if a request comes in through port 80 listen 80; server_name test-website.com; } -
Enable site by soft-linking the
.conffile in thesites-availablefolder to thesites-enabledfolder:sudo ln -s /etc/nginx/sites-available/test-website.com.conf /etc/nginx/sites-enabled/
¶ Configure DNS
-
Create two records. The actual steps are dependent on the DNS hoster of our customers' domain reseller.
Name Type Value test-website.com A <external_ip_of_server> www.test-website.com CNAME test-website.com
¶ Open port in FW
- Make sure ports 80 and 443 allow for inbound traffic.
¶ Add SSL certificate (Certbot)
-
Install Certbot on the Ubuntu machine running Nginx.
-
Run Certbot to create a certificate:
sudo certbot --nginx -
Update
crontabto automatically renew certificates (addsudoif the user tab doesn't work):crontab -eAdd lines:
# Renew Let's Encrypt certificates 0 0 1 * * certbot renew -
Certbot will update your
test-website.confNginx file. It will look something like this now:# Listen on port 443 (https) server { # use http2 for improved performance listen 443 ssl http2; # application folder location root /var/www/test-website; # search for thes index file types index index.html; # specify application domain name server_name test-website.com; # what to do with the request location / { # check if uri is valid otherwise return 404 try_files $uri $uri/ $uri.html =404; # tell crawlers/search engines to not index this application (uncomment for test websites) #add_header X-Robots-Tag "noindex, nofollow, nosnippet, noarchive"; } # error page file and location error_page 404 /404.html; location /404.html { internal; } # static file caching location ~* .(html|js|css|png|webp|jpg|jpeg|ico|svg|json|pdf)$ { expires max; log_not_found off; access_log off; } # log location and file name access_log /var/log/nginx/test-website_access.log; error_log /var/log/nginx/test-website_error.log; # SSL include /etc/letsencrypt/options-ssl-nginx.conf; ssl_dhparam /etc/letsencrypt/ssl-dhparams.pem; ssl_certificate /etc/letsencrypt/live/test-booking.jodibeauty.com/fullchain.pem; # managed by Certbot ssl_certificate_key /etc/letsencrypt/live/test-booking.jodibeauty.com/privkey.pem; # managed by Certbot } # Listen on port 80 (http) server { # if a http request comes in through port 80 redirect 301 with https if ($host = teamcity.jodibooks.com) { return 301 https://$host$request_uri; } # managed by Certbot # listen if a request comes in through port 80 listen 80; server_name test-website.com; return 404; # managed by Certbot }